 Illustration
1: Elimination of Intermediary: Move from Centralized Ledger to
Distributed Ledger
Illustration
1: Elimination of Intermediary: Move from Centralized Ledger to
Distributed Ledger
Company / Organization:
Scope:
Version:
File-name:
Author: blockchain--s0-v1@becke.ch
Copyright © 2018 becke.ch – All rights reserved
Document Version History
|
Version |
Date |
Author |
Description |
|---|---|---|---|
|
1.0.0 |
21.05.2018 |
Raoul Becke |
Modified this document according to requirement below 1.0.0. |
|
1.1.0 |
14.09.2018 |
Raoul Becke |
Modified this document according to requirement below 1.1.0. |
Module / Artifact / Component / Work-Product Version History
|
Version |
Date |
Author |
Requirements |
Components Changed |
|---|---|---|---|---|
|
1.0.0 |
21.05.2018 |
Raoul Becke |
Create documentation on: Blockchain, Ethereum Overview (Networks, Nodes, Cryptocurrency Wallet, Smart Contracts, DApps, Ether, Ethereum Virtual Machine), Nodes (Parity, Infura), Cryptocurrency Wallet (MetaMask), Testnet (Ropsten), Solidity Programming Language (Development, Compilation), web3.js (Installation, Integration, Instantiation, Sign Transaction, Callbacks, API), Deployment (web3), Truffle, Tools |
This document |
|
1.1.0 |
14.09.2018 |
Raoul Becke |
Restructured the entire document, new “Introduction and Overview” chapter, new “Architecture Overview” chapter, new chapter on “Fork”, reworked chapter “Parity” regarding Docker and Proof of Authority, extended chapter "Solidity – Smart Contract Programming Language" regarding samples and language specification, reworked chapter "web3.js - Ethereum JavaScript API" regarding packages and security, moved chapter “Truffle” in the appendix, moved chapter “Azure Blockchain Workbench” in the appendix, moved all “Error & Solution” chapters in the appendix |
This document |
Table of Contents
1. Introduction and Overview 8
1.1.2. Communication Protocol 10
1.1.2.1. Light Ethereum Subprotocol (LES) 10
2.2.1. HD (Hierarchical Deterministic) wallet & mnemonics 16
3.2. The Ethereum Virtual Machine 18
3.2.5. Storage, Memory and the Stack 19
3.2.8. Delegatecall / Callcode and Libraries 19
3.3.5. Networks & Chains (Configuration) 25
3.3.6. Proof of Authority (Consensus Algorithm Configuration) 27
3.3.6.1. Setting up a Proof of Authority network 27
3.3.6.2.1. Non-reporting contract: safeContract 31
3.3.6.2.2. Reporting Contract: contract 33
3.4.1. Installation and configuration 36
3.4.1.1. Import existing DEN (from Ganache) 39
3.5. Ropsten (Test Network) 40
3.6. Solidity – Smart Contract Programming Language 42
3.6.1.1. Structure of a Contract 44
3.6.1.3. Units and Globally Available Variables 46
3.6.1.3.3. Special Variables and Functions 46
Block and Transaction Properties 46
3.6.1.4. Expressions and Control Structures 46
3.6.1.5.1. Visibility and Getters 47
3.7. web3.js - Ethereum JavaScript API 49
3.7.1. Installation & Integration 49
3.7.2. Instantiation – setting a provider 50
3.7.2.1. Proprietary (HD Wallet) Provider 51
3.7.3.1. web3.eth.accounts.create 51
3.7.4.1. web3.eth.accounts.wallet 52
3.7.4.2. web3.eth.accounts.signTransaction 53
3.7.4.3. web3.eth.personal.unlockAccount 54
3.7.4.4. Proprietary & Tool Specific 54
4.1.2. Solidity Development 62
4.2.3. Solidity Development 66
6.2. Glossary (terms, abbreviations, acronyms) 71
A. Appendix - Truffle (Ethereum Development Framework) 72
A.2. Development (Ethereum Pet Shop) 72
A.2.2. Create directory structure: 72
A.2.3. Download and install: 73
A.2.4. Writing the smart contract 73
A.2.6. Migration (Deployment & Versioning) & Installation of Ganache (Ethereum Node) 75
A.2.7. Testing the smart contract 81
A.2.9. Writing Tests in JavaScript 82
A.2.10. Interacting with your contracts 83
A.2.11. Package management via EthPM 86
A.2.12. Package management via NPM 86
A.2.13. Debugging your contracts 86
A.2.14. Using Truffle Develop and the console 86
A.2.15. Writing external scripts 86
A.2.16. Using the build pipeline 86
A.2.18. Networks and app deployment 87
A.2.19. Creating a user interface to interact with the smart contract 87
A.2.20. Interacting with the dapp in a browser 90
A.2.21. Installing and configuring lite-server 90
B. Appendix – Azure Blockchain Workbench 96
B.1. Create Blockchain app 102
B.1.2. Smart contract code file 103
B.1.4. Add blockchain application to Blockchain Workbench 104
Illustration Index
Illustration 1: Elimination of Intermediary: Move from Centralized Ledger to Distributed Ledger 8
Illustration 2: Chain of Blocks 8
Illustration 3: Blockchain: Ethereum: Information Flow 12
Illustration 4: Blockchain: Ethereum: Interfaces 13
Illustration 5: Soft- versus Hard-Fork 14
Illustration 6: Infura: Sign-Up 34
Illustration 7: MetaMask: Add Chrome Extension 36
Illustration 8: MetaMask: Browser Icon 36
Illustration 9: MetaMask: Privacy Notice 37
Illustration 10: MetaMask: Create DEN (HD Wallet) 38
Illustration 11: MetaMask: Mnemonic 38
Illustration 12: Testnetwork: Ropsten: Metamask: Create Account 40
Illustration 13: Testnetwork: Ropsten: Metamask: Account 40
Illustration 14: Testnetwork: Ropsten: Faucet 41
Illustration 15: Solidity Extension 62
Illustration 16: IntelliJ: New project from existing sources 63
Illustration 17: IntelliJ: Create project from existing resource 64
Illustration 18: IntelliJ: Project setting 64
Illustration 19: IntelliJ: Import Source Files 65
Illustration 20: IntelliJ: No Frameworks Detected 65
Illustration 21: Intellij-Solidity Plug-In 66
Index of Tables
Table 1: References 71
Table 2: Glossary 71
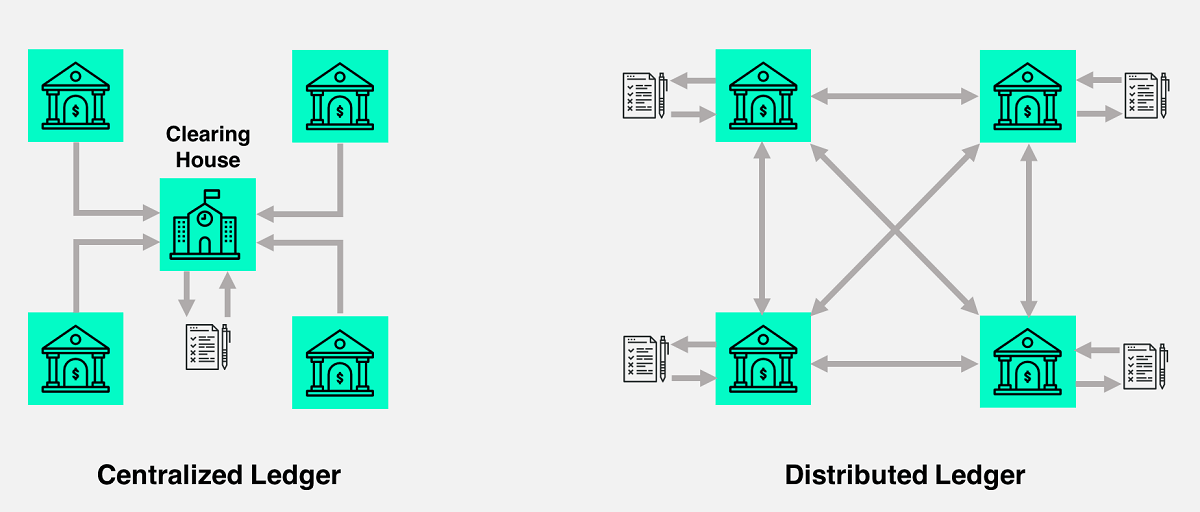
«Elimination» Intermediary: Centralized Ledger -> Distributed Ledger: One of the main drivers for blockchain is the “elimination” of the intermediary e.g. bank and moving from a centralized- to a distributed-ledger approach where the ledger is not hosted on a central node but instead on all nodes participating in the network. There exist different reasons to do so: I don’t have access to the intermediary, I don’t have trust in the intermediary, the fees of the intermediary are too high, the transaction handling of the intermediary is too slow, etc. On the cons side with the elimination of the intermediary as well some regulatory aspects and expectations enforced by the intermediary are eliminated like for example the know your customer principle in the context of the prevention of money laundering act.
Illustration
1: Elimination of Intermediary: Move from Centralized Ledger to
Distributed Ledger
Ledger -> Blockchain: The
ledger is a (time sorted) list of transactions and at a time when a
certain number of transactions respective the current block size
limit has been reached these transactions are put into a block1.
This block is then chained with the previous block by
writing the address respective hash-value of the
previous block into the current block and last but not least the
transactions in the block are secured by calculating the hash-value
of the contained transactions and persisting this value as well in
the current block. The hash value guarantees that the transactions
and previous block cannot be tampered with otherwise the hash value
is not valid anymore. The resulting chain is secure and
immutable.
Blocks are created aka mined and the hash values
calculated by special nodes in the network called mining nodes.
Because there exist a lot of nodes that can hand in new transactions
into the network and because there exist a lot of mining nodes it can
happen that several blocks, containing different set of transactions,
are created at the same time and the chain is getting forked. A fork
can as well happen when some part of the network and the nodes
contained in this network segment are getting separated from the
others. But in the end, after some time the chain focuses again on a
single branch, namely the longest where most of the nodes are working
on. The longest in this context is the branch respective chain where
most of the cumulative effort in terms of block hash calculation was
invested in. Due to this behavior one should wait until the block
containing the transaction has reached a certain depth before
shipping the goods related to this transaction to make sure the
transaction is not on a temporary branch that is getting reverted.
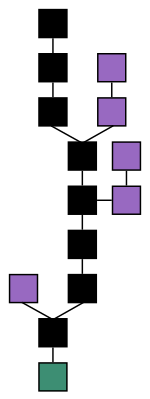 Illustration
2: Chain of Blocks
Illustration
2: Chain of Blocks
Transaction: A transaction contains: the from- respective sender-address2, the to- respective receiver-address, the amount that should be transferred, the transaction-fee the miner gets as reward when mining this transaction and optional some data respective code in case this transaction runs in the context of smart contracts. And last but not least the transaction is signed with the private-key of the sender to secure the transaction and making sure that nobody can modify the content (e.g. amount or receiver) of the transaction.
Network: A network consists of regular-nodes and mining-nodes. There exist separate networks for the different blockchain technologies e.g. bitcoin and ethereum and within the different technologies there exist further separate networks for different purposes e.g.: production network (the official public network where money/coins are traded), networks for testing and even different networks for private or consortium purpose.
Cryptocurrency: Cryptocurrency is the term for the currency that is used in the context of blockchain when transferring assets (money/coins) within a transaction. A cryptocurrency is bound to a blockchain i.e. cannot be used across different blockchains3 and the value of the currency grows with the number of participants, transactions and goods that are exchanged and of course with the supply and demand. The two most famous cryptocurrencies are: bitcoin and ether.
Coins versus Tokens: Both are cryptocurrencies, but while a coin – Bitcoin, Litecoin, Dogecoin – operates on its own blockchain, a token lives on top of an existing blockchain infrastructure like Ethereum. Coins can be created by starting a new blockchain network (and e.g. giving it the name of your coin) or hard forking an existing blockchain by modifying the underlying software and/or configuration (see chapter 2.1 and e.g. giving the fork the name of your coin). Tokens are created respective traded using smart contracts (see below) which manage the exchange of assets (e.g. a concert ticket / token) for coins.
Consensus Algorithm: To calculate the hash value in a block there exist different approaches aka consensus algorithms used in different networks. The most famous algorithm that is used in the public bitcoin and ethereum network is the proof-of-work algorithm. In the proof-of-work algorithm the difficulty of the algorithm is permanently adjusted to make sure that an average of 6 blocks per hour are getting mined and to make sure that the chain is not spammed with transactions (besides that every transaction costs coins). In private and consortium networks where the participant nodes are known and trusted, the proof-of-authority algorithm is normally getting used. In these networks mining- aka authority-nodes are only added to the network if they are trusted by the other miners. Further consensus algorithms we will not go into are: proof-of-stake, proof-of-burn, proof-of-activity.
Wallet: A wallet stores the public- and private-keys of a participant, is connected to a node and hence meets the conditions to create and participate in transactions. Loosing a wallet means loosing all coins because the private-key to create and sign transactions and thus spending coins belonging to this account (public-key) is lost. And therefore a wallet respective its public and private keys should always be backed up!
Smart-Contract: A smart-contract is a piece
of code that runs in the network, has a public-key and can therefore
participate in transactions and accordingly receive and spend coins.
Furthermore a smart contract exposes an interface (ABI: Application
Binary Interface) whose methods can be invoked in the context of a
transaction.
A smart contract has/needs no private-key because
the smart-contract code and virtual machine (bitcoin, ethereum, etc.)
are carefully defined and fully transparent (source code available)
and therefore everyone will always agree on what the outcome of the
operation was. This includes whether or not the contract sent a
transaction to any other contract. Because everyone can agree on the
origin of the message, no further degree of verification (such as
that provided by a signature) is necessary.
Dapps Decentralized Application:
Dapps are programs that run on top of smart contracts and communicate
with them via their exposed ABI in the context of a transaction.
When we compare blockchain to a database and smart-contracts to
stored procedures then Dapps are the applications that run on top of
the stored procedures.
Pros and Cons: Some pros and cons of using blockchain have already been listed in the beginning of this chapter “«Elimination» Intermediary”. For a “full” list of pros and cons see [4]. But two arguments that were not listed I want to discuss here:
Pros: Transparency: One of the pros of the blockchain is that everyone posses the ledger and can therefore see all the transactions and transfers that were made. BUT even if someone can see all the transactions that were made he still cannot see the true identity of the person behind the account that participated in the transaction, which gives therefore leeway to illegal activities respective transactions.
Cons: Energy: Due to the proof-of-work consensus algorithm a lot of computing power and energy is spent to compute the hash value of a block. This becomes a growing pollution of the environment and therefore wherever possible a different consensus algorithm should be used.
Funny: Blockchain & Cryptocurrency explained see [13].
The remainder of this document (starting with chapter 3) gives an introduction on blockchain technology with focus on the ethereum implementation.
In red font are the different issues the blockchain exposes and risks you need to consider.
In yellow highlighted are keywords, definitions and aspects that require your attention.
The architecture overview is based on ethereum but conceptual identical to other blockchain implementations.
An Ethereum node can be addressed using the URL scheme "enode" notation.
The hexadecimal node ID is encoded in the username portion of the URL, separated from the host by an @ sign. The hostname can only be given as an IP address, DNS domain names are not allowed. The port in the host name section is the TCP listening port. If the TCP and UDP (discovery) ports differ, the UDP port is specified as query parameter "discport".
In the following example, the node URL describes a node with IP address 10.3.58.6, TCP listening port 30303 and UDP discovery port 30301.
enode://6f8a80d14311c39f35f516fa664deaaaa13e85b2f7493f37f6144d86991ec012937307647bd3b9a82abe2974e1407241d54947bbb39763a4cac9f77166ad92a0@10.3.58.6:30303?discport=30301
The enode url scheme is used by the Node discovery protocol and can be used in the bootnodes command line option of the client.
More information regarding the node address format can be found in [26].
Ethereum nodes use a peer-to-peer communication - listening (TCP) port and a discovery (UDP) port, both on 30303 by default.
peer-to-peer communication: Peer-to-peer communications between nodes running Ethereum/Whisper/&c. clients run using the underlying ÐΞVp2p Wire Protocol. ÐΞVp2p nodes communicate by sending messages using RLPx (Recursive Length Prefix), an encrypted and authenticated transport protocol.
discovery (UDP): ÐΞVp2p nodes find
peers through the RLPx discovery protocol DHT (Distributed Hash
Table) – an UDP-based RPC protocol for decentralized peer-to-peer
computer networks
Ethereum is “pseudo”
decentralized because the first
time a node connects to the chain it needs a bootnode
telling him which peers he can connect to. From this point on the
node directly connects to and synchronizes with his peers, performs
node discovery with his peers and does not need the bootnode
anymore. Bootstrap nodes maintain a list of all nodes that connected
to them in a period of time. Bootnodes
are hardcoded into the source code
of the chain but can be overridden by configuration. Instead
of using bootnodes it is possible to
provide (in private/consortium chains) a list of static/trusted
nodes to connect to.
Further information as well regarding
“bootnodes (blockchain)
being down”
due to memory bug attack
see [33]!
Dynamic
IP addresses are supported as long
as at least the boot-node or one of its peers is still reachable and
can be updated with the new changed IP. From
there the information is distributed to the other peers.
Additional information regarding the different protocols can be found in [27].
Light Clients & Light Ethereum Subprotocol (LES): Work in progress: LES is a sub-protocol of the ÐΞVp2p Wire Protocol. In Ethereum, a light client is a client that downloads only block headers by default, and verifies only a small portion of what needs to be verified. Light clients do not interact directly with the blockchain; they instead use full nodes as intermediaries. Light clients rely on full nodes for many operations, from requesting the latest headers to asking for the balance of an account. As light clients need to send several requests to do simple operations, the overall network bandwidth needed is short term higher than that of a full node BUT only when the client is in use, compared to a full-node that is always online and participates entirely in all blockchain communications. Furthermore the amount of resources and storage needed is several orders of magnitude lower than that of a full node while achieving a very high level of security. Requiring only about 100 MB of storage and low computational power, a light node can run on a mobile device! But consider:
Work in Progress: Light Clients and LES are still experimental and therefore instability is to be expected.
Incentive running
a full node: Having the possibility of running a light client
there is no incentive to invest money in memory, SSD-disk-space, CPU
and bandwidth to run a full node. This light client trend will then
backfire on the entire network balance because more and more light
clients rely on a decreasingly number of full nodes and therefore
destabilizing the entire chain!
There are different
discussions ongoing how to reward participants that are running a
full node. For example paying a fee when a transaction is submitted
to a full-node similar to paying fees paid miners for block mining.
Light clients do not expose peer-to-peer communication and discovery (UDP) ports i.e. there is no incoming communication on these ports and protocols (because a light client is only up when used and relies on full-nodes i.e. cannot act and reply on its own)! But light clients rely on full nodes and LES as sub-protocol of the ÐΞVp2p Wire Protocol; therefore communication outgoing is on the same ports: peer-to-peer communication (TCP) port and a discovery (UDP) port, both on 30303.
JSON RPC: Dapps connect to a node and communicate with smart contracts via the JSON RPC protocol. JSON RPC in the context of ethereum can run on top of different transport layer protocols namely: HTTPS( port 8545), WebSocket (port 8546) and IPC (Inter Process Communication) running locally on the file system. But consider:
Encryption: Some functions (even if not the official by default exposed JSON RPC functions) are sending credentials over the wire and therefore special care regarding transport protocol encryption should be taken when using these functions, even more if the node connecting to is not running locally.
Unlocked Accounts: If you have RPC on (ie, run geth/parity with --rpc) AND unlock the account AND have no firewall at all AND have --rpcaddr set to "0.0.0.0" then anyone can easily scan your node, retrieve all accounts: web3.eth.getAccounts([callback]) (Returns a list of accounts the node controls) and transfer money from all unlocked accounts using web3.eth.signTransaction(transactionObject, address [, callback]) and web3.eth.sendSignedTransaction(signedTransactionData [, callback]). In this way cybercriminal groups have managed in just Q2 2018 to steal a total 38,642 Ether, worth more than $20,500,000!
WebSocket: Security Issues: Disabling APIs – see [34]: The disabling of APIs and function calls is not working as expected on the WebSocket transport layer protocol (HTTPS instead is working as expected) therefore the WebSocket port and communication should be disabled entirely (--no-ws or just used locally which is the default) and instead the HTTPS protocol should be used and exposed! (at least for the current parity version 1.11.8)4
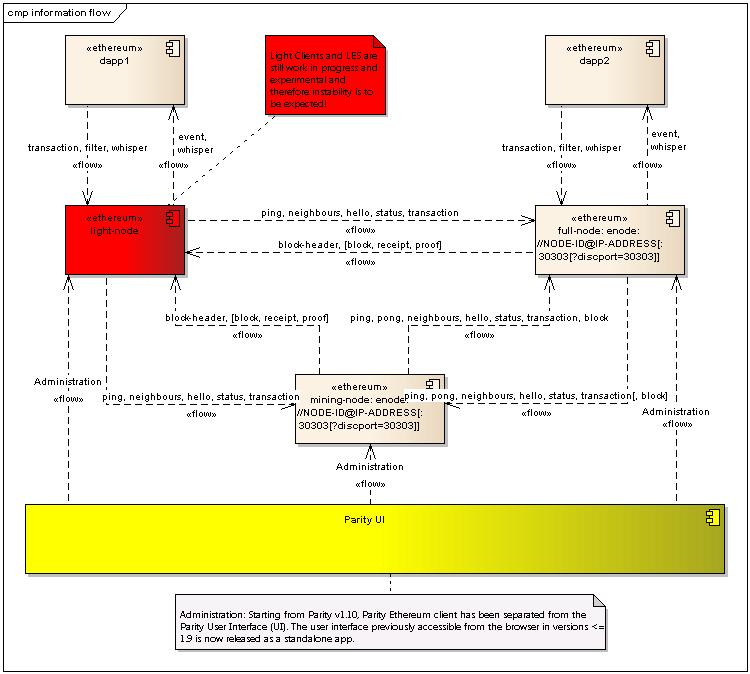 Illustration
3: Blockchain: Ethereum: Information Flow
Illustration
3: Blockchain: Ethereum: Information Flow
Full-nodes and mining-nodes are very similar and run on the same software e.g. parity or geth, with the main difference that mining-nodes produce blocks and require a lot computing power. For this reason on the full-node outgoing flow we put “[block]” in square brackets meaning that full-nodes, because they have all information, can provide block information to other nodes but full-nodes do not produce blocks and spread them into the network.
Light nodes only retrieve and store all block-headers. “[block, receipt, proof]” information is only retrieved on demand when needed and therefore put into square brackets.
“ping”, “pong” and “neighbor” information is exchanged as part of the node discovery. But light clients do not expose a discovery port i.e. cannot receive a “ping” and therefore do not send a “pong”.
“hello” and “status” is exchanged when two nodes connect to each other, exchange their status and start synchronizing the chain.
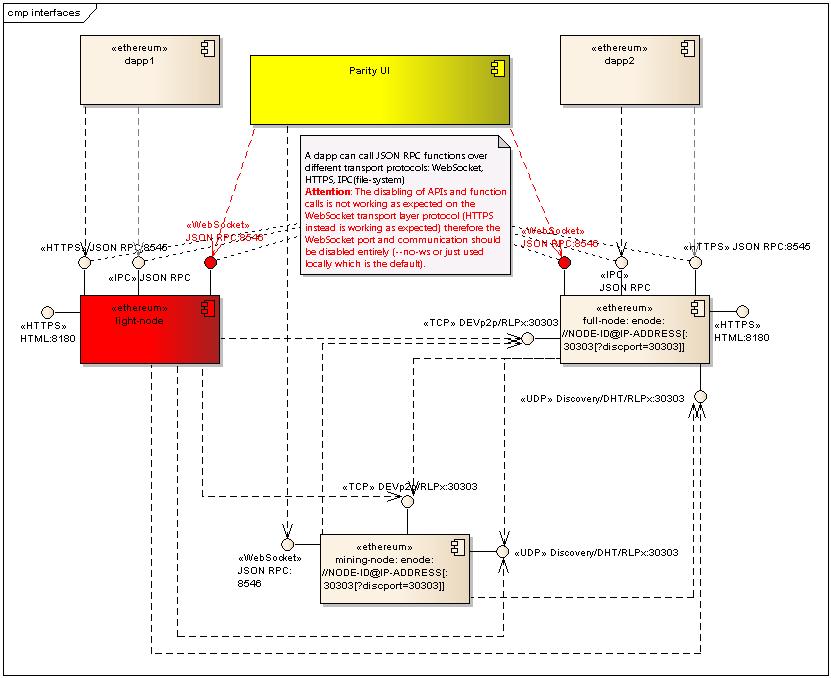 Illustration
4: Blockchain: Ethereum: Interfaces
Illustration
4: Blockchain: Ethereum: Interfaces
Based on the introduction and overview given in chapter 1, this chapter further details and defines terms used in the blockchain context.
Besides temporary forks that happen when different miners create blocks at the same time or due to temporary network segregation see chapter 1, a hard- respective soft-fork is caused by a non-forward- respective forward-compatible change of the blockchain protocol rule-set in the underlying node software and/or configuration.
 Illustration
5: Soft- versus Hard-Fork
Illustration
5: Soft- versus Hard-Fork
Soft fork: A soft fork is a forward compatible change and tightens the rule-set of the blockchain protocol. All transactions (and blocks) created using the new software will be accepted by all nodes regardless whether they are running the old or new software. Transactions (and blocks) that are created using the old software will be accepted by nodes running the old software but will only be accepted by nodes running the new software if they don’t violate the new tightened protocol rule-set.
Sequence Flow: Mining nodes running
the old software will accept and mine all transactions coming from
nodes running the old or new software. Mining nodes running the new
software will accept and mine all transactions from nodes running
the new software but will only accept transactions from nodes
running the old software if they do not violate the new tightened
protocol rule-set.
Resulting “old” blocks (blocks produced
by miners running the old software) are accepted by all nodes
running the old software but nodes running the new software will
only accept the “old” blocks if they do not contain transactions
that violate the the new tightened protocol rule-set. Resulting
“new” blocks are accepted by all nodes running the old or new
software.
Based on these facts all full-nodes and mining-nodes
running the old or new software can coexist and work on the same
blockchain until the first node running the old software creates a
transaction that violates the new tightened protocol rule-set and if
this transaction gets mined by a miner running the old software. At
this point the chain will fork and the block will only get added to
the chain of the nodes running the old software. From this
point/block on the two chains will run and extend in parallel. The
“old” chain (i.e.
the chain of the nodes running the old software) has (initially)
more hashing power i.e.
more mining nodes and will therefore grow faster and accordingly
ignore the new chain which is also valid but shorter. The new chain
will ignore the old chain because it is invalid i.e.
contains block(s) containing invalid transaction(s). But as soon as
the new chain attracts more mining power and grows longer than the
old chain, then all of a sudden all the old nodes will switch over
to the new chain because it is valid (i.e.
valid according to the old and new rules i.e.
forward compatible) and because it is longer and from this point on
there again only exists one chain for all nodes.
UASF versus MASF: Soft forks can either be user activated (UASF: User Activated Soft Fork) or miner activated (MASF: Miner Activated Soft Fork). UASF is when the majority of users respective their full-nodes upgrade their software. In this scenario the Miners have to upgrade their software in order to still earn coins, because there are only a few “old” nodes with little financial power left, creating few transactions and therefore paying few transaction fees to the “old” miners. MASF is when the majority of miners respective their nodes upgrade their software. In this scenario the Users respective their full nodes have to upgrade their software, otherwise they have to wait for a very long time until their transactions will get mined up to the point when their transactions will not get mined anymore i.e. when there are no miners left running the old software anymore.
New Features: At first sight it seems impossible to add new features and functionality using a soft fork because a soft fork tightens the existing blockchain protocol rule-set that is used to (create and) validate transactions and blocks. But the transactions protocol exposes various places where additional data and functionality can be introduced without violating the existing protocol rule-set. And this is how new features can be introduced using a soft-fork.
Bitcoin: The bitcoin blockchain in this context is a bit more advanced because blocks include a version field see [8] respective version vector see [9]. The version field supports the definition of thresholds how long (percentage of nodes running the new software) to support old and new version in parallel and when (percentage of nodes running the new software) to enforce a soft-fork and only accept “new” blocks. In addition the version vector supports the concept of several soft-forks running in parallel.
Hard Fork: Bilateral versus Strictly Expanding: A hard fork is a non-forward compatible change. Hard forks require “immediately” that all nodes upgrade their software because “old” nodes will not accept (certain) “new” transactions and blocks and therefore no soft migration is possible compared to a soft-fork but instead a “big-bang” upgrade is required.
Strictly Expanding Hard Fork: A strictly expanding hard fork is backward compatible and all transactions (and blocks) created using the old software will be accepted by all nodes regardless whether they are running the old or new software. Transactions (and blocks) that are created using the new software will be accepted by nodes running the new software but will only be accepted by nodes running the old software if they don’t violate the old tighter protocol rule-set.
Bilateral Hard Fork: A bilateral hard fork is neither backward- nor forward-compatible.
Whether a fork takes place or not is finally decided by the miners whether the majority of them update to the new software version or not. Because in the end only miners can create blocks and add them to the chain.
The DAO: A decentralized autonomous
organization and a form of investor directed venture capital fund,
written in Solidity and deployed as smart-contract on 30.04.2016
attracted in 20 days crowdsale more than 150 Mio US$ Ether. BUT the
software had a bug and a hacker transferred a third of the entire
fund to his account!
A soft-fork was planned to restrict the
protocol rule-set and reject all blocks containing a transaction to
or from the hacker account. BUT this software change could have
resulted in DoS attacks where hackers could flood the network with
computation intensive (and therefore ether-expensive) transactions
and as last transaction in a block they could have created a
transaction to or from the DAO hacker account which would then reject
the entire block and giving the hackers back their money they
“invested” before in the computation intensive transactions.
Therefore in the end a hard-fork was performed which splitted the
chain into two separate networks.
There exist dozens of articles about soft- and hard-forks see [10].
See chapter 1 A wallet stores the public- and private-keys of a participant, is connected to a full-node and hence meets the conditions to create and participate in transactions. Loosing a wallet means loosing all coins because the private-key to create and sign transactions and thus spending coins belonging to this account (public-key) is lost. And therefore a wallet respective its public and private keys should always be backed up!
When choosing a wallet, the owner must keep in mind who is supposed to have access to (a copy of) the private keys and thus has potentially access to the coins/asset. Just like with a bank, the user needs to trust the provider to keep the coins safe. Downloading a wallet from a wallet provider to a computer or phone does not automatically mean that the owner is the only one who has a copy of the private keys. For example with Coinbase, it is possible to install a wallet on a phone and to also have access to the same wallet through their website.
A backup of a wallet can come in different forms like:
A (encrypted) file like wallet.dat or wallet.bin which contains all the private keys.
A mnemonic sentence from which the root key can be generated, from which all the private keys can be recreated. Preferably these words could be remembered or written down and stored on other physical locations. For more information on mnemonics see next chapter 2.2.1 below.
A private key like: KxSRZnttMtVhe17SX5FhPqWpKAEgMT9T3R6Eferj3sx5frM6obqA
When the private keys and the backup are lost then that coins are lost forever. When using a webwallet, the private keys are managed by the provider. When owning coins, those trusted with managing the private keys should be carefully selected. An (encrypted) copy of the wallet should be kept in a trusted place. Preferably off-line. Some people 'write' their mnemonic sentence or private key on metal, because it is robust.
Alternatively a “paranoid” user can write the code to create a public-/private-key pair and the code to sign the transaction with the private-key himself see chapter 3.7.3 and 3.7.4.
Further interesting articles see [14].
Most content in this chapter is extracted from the article “Deterministic Wallet” see [15].
A deterministic wallet is a system respective algorithm of deriving keys from a single starting point known as a seed. The seed allows a user to easily back up and restore a wallet without needing any other information and can allow the creation of public addresses without the knowledge of the private key. Seeds are typically serialized into human-readable words in a Mnemonic phrase. In other words instead of memorizing all the public- / private-key pairs contained in the wallet the user only needs to memorize the mnemonic sentence because from this mnemonic all public- / private-key pairs can be derived (calculated).
Deterministic wallets can generate an unlimited number of addresses on the fly and as the addresses are generated in a known fashion rather than randomly some clients can be used on multiple devices without the risk of losing funds. Users can conveniently create a single backup of the seed in a human readable format that will last the life of the wallet, without the worry of this backup becoming stale.
Certain types of deterministic wallet (BIP0032, Armory, Coinkite and Coinb.in ) additionally allow for the complete separation of private and public key creation for greater security and convenience. In this model a server can be set up to only know the Master Public Key of a particular deterministic wallet. This allows the server to create as many public keys as is necessary for receiving funds, but a compromise of the MPK will not allow an attacker to spend from the wallet.
Mnemonic (dt “Eselsbrücke”): See [16]: Pronounced “ne-manik,” in its purest form a mnemonic is a pattern of letters, words, or associations which allows the user to easily remember information, and has been used by humans for thousands of years. In other words, it can be a very useful tool to help us memorize important information we need to remember.
Further interesting articles see [14].
Ethereum is an open-source, blockchain-based distributed computing platform and operating system featuring smart contract (scripting) functionality.
Ether is the cryptocurrency of the ethereum
blockchain. Ether can be transferred between accounts and used to
compensate participant mining nodes for computations performed.
Ethereum provides a decentralized Turing-complete virtual machine,
the Ethereum Virtual Machine (EVM), which can execute smart
contracts (scripts) on a network of nodes. "Gas",
an internal transaction fee/pricing mechanism, is used to mitigate
spam and allocate resources on the network.
Ethereum has a
metric system of denominations used as units of ether. The
smallest denomination aka base unit of ether is called Wei.
Below is a list of the named denominations and their value in Wei.
ether = 1e18 wei
milliether (finney) = 1e15 wei
microether (szabo) = 1e12 wei
gwei (shannon) = 1e9 wei
mwei (lovelace) = 1e6 wei
kwei (babbage) = 1e3 wei
Further detailed information about ethereum can be found in the ethereum white paper see [5] and yellow paper see [6] which are the basis for ethereum.
Each network version gets a separate name (and id). Here is an overview – see as well [12].
Olympic (0) is also
regularly referred to as Ethereum 0.9; it launched early 2015
and was the first public Testnet. Deprecated in mid 2015 and
replaced by Morden.
Frontier (1) the
official 1.0 release was launched as public main network
in the summer of 2015. Forked to Homestead in early 2016.
Morden (2) was the
Frontier-equivalent testnet; it launched with Frontier and
basically replaced Olympic. Deprecated in late 2016 and
replaced by Ropsten.
Homestead (1) was the first major upgrade (1.1) of the Frontier network in March 2016. It did not replace Frontier but upgraded it.
Ropsten (3) is a new Homestead-equivalent testnet launched in late 2016 due to multiple issues in the old testnet; it finally replaced Morden. Ropsten was attacked in February 2016 and declared dead. But with great effort it has been revived on March 2017.
PoW
Supported by geth and parity
Best reproduces the current production environment
Chaindata size 15 GB - Apr 2018
Ether can be mined. Or requested from a faucet:
Commands:
geth --testnet or geth --networkid 3
parity --chain ropsten
Kovan (42) is the first proof-of-authority (PoA) testnet issued by Ethcore, Melonport, and Digix after the Ropsten attacks.
PoA (Immune to spam attacks)
Supported by parity only
Chaindata size 13 GB - Apr 2018
Ether can't be mined. It has to be requested from the faucet: https://github.com/kovan-testnet/faucet
Command: parity --chain kovan
Rinkeby, another PoA testnet is currently being drafted.
PoA (Immune to spam attacks)
Supported by geth only
Chaindata size 6 GB - Apr 2018
Ether can't be mined. It has to be requested from a faucet: https://faucet.rinkeby.io/
Command: geth --rinkeby or geth --networkid 4
The current protocol version is Homestead and Ropsten is is the public Homestead equivalent testnet.
Despite the differences in name, Olympic, Morden and Ropsten have the network ids 0, 2 and 3. Frontier, Homestead are the main network with id 1. You can run your own chain by specifying a network id other than 0, 1, 2, or 3.
Most content in this chapter is extracted from the article “Introduction to Smart Contracts” see [17].
The Ethereum Virtual Machine or EVM is the runtime environment for smart contracts in Ethereum. It is not only sandboxed but actually completely isolated, which means that code running inside the EVM has no access to network, filesystem or other processes. Smart contracts even have limited access to other smart contracts.
There are two kinds of accounts in Ethereum which share the same address space: External accounts that are controlled by public-private key pairs (i.e. humans) and contract accounts which are controlled by the code stored together with the account.
The address of an external account is determined from the public key while the address of a contract is determined at the time the contract is created respective deployed (it is derived from the creator address and the number of transactions sent from that address, the so-called “nonce”).
Regardless of whether or not the account stores code, the two types are treated equally by the EVM.
Every account has a persistent key-value store mapping 256-bit words to 256-bit words called storage.
Furthermore, every account has a balance in Ether (in “Wei” to be exact) which can be modified by sending transactions that include Ether.
A transaction is a message that is sent from one account to another account (which might be the same or the special zero-account, see below). It can include binary data (its payload) and Ether.
If the target account contains code, that code is executed and the payload is provided as input data.
If the target account is the zero-account (the account with the address 0), the transaction creates a new contract. As already mentioned, the address of that contract is not the zero address but an address derived from the sender and its number of transactions sent (the “nonce”). The payload of such a contract creation transaction is taken to be EVM bytecode and executed. The output of this execution is permanently stored as the code of the contract. This means that in order to create a contract, you do not send the actual code of the contract, but in fact code that returns that code.
Upon creation, each transaction is charged with a certain amount of gas, whose purpose is to limit the amount of work that is needed to execute the transaction and to pay for this execution. While the EVM executes the transaction, the gas is gradually depleted according to specific rules.
The gas price is a value set by the creator of the transaction, who has to pay gas_price * gas up front from the sending account. If some gas is left after the execution, it is refunded in the same way.
If the gas is used up at any point (i.e. it is negative), an out-of-gas exception is triggered, which reverts all modifications made to the state in the current call frame.
With Bitcoin miners prioritise transaction with the highest mining fees. The same is true of Ethereum where miners are free to ignore transactions whose gas price limit is too low.
The gas price per transaction or contract is set up to deal with the Turing Complete nature of Ethereum and its EVM (Ethereum Virtual Machine Code) – the idea being to limit infinite loops. So for example 10 Szabo, or 0.00001 Ether or 1 Gas can execute a line of code or some command. If there is not enough Ether in the account to perform the transaction or message then it is considered invalid. The idea is to stop denial of service attacks from infinite loops, encourage efficiency in the code – and to make an attacker pay for the resources they use, from bandwidth through to CPU calculations through to storage.
Each account has a persistent memory area which is called storage. Storage is a key-value store that maps 256-bit words to 256-bit words. It is not possible to enumerate storage from within a contract and it is comparatively costly to read and even more so, to modify storage. A contract can neither read nor write to any storage apart from its own.
The second memory area is called memory, of which a contract obtains a freshly cleared instance for each message call. Memory is linear and can be addressed at byte level, but reads are limited to a width of 256 bits, while writes can be either 8 bits or 256 bits wide. Memory is expanded by a word (256-bit), when accessing (either reading or writing) a previously untouched memory word (ie. any offset within a word). At the time of expansion, the cost in gas must be paid. Memory is more costly the larger it grows (it scales quadratically).
The EVM is not a register machine but a stack machine, so all computations are performed on an area called the stack. It has a maximum size of 1024 elements and contains words of 256 bits. Access to the stack is limited to the top end in the following way: It is possible to copy one of the topmost 16 elements to the top of the stack or swap the topmost element with one of the 16 elements below it. All other operations take the topmost two (or one, or more, depending on the operation) elements from the stack and push the result onto the stack. Of course it is possible to move stack elements to storage or memory, but it is not possible to just access arbitrary elements deeper in the stack without first removing the top of the stack.
The instruction set of the EVM is kept minimal in order to avoid incorrect implementations which could cause consensus problems. All instructions operate on the basic data type, 256-bit words. The usual arithmetic, bit, logical and comparison operations are present. Conditional and unconditional jumps are possible. Furthermore, contracts can access relevant properties of the current block like its number and timestamp.
Contracts can call other contracts or send Ether to non-contract accounts by the means of message calls. Message calls are similar to transactions, in that they have a source, a target, data payload, Ether, gas and return data. In fact, every transaction consists of a top-level message call which in turn can create further message calls.
A contract can decide how much of its remaining gas should be sent with the inner message call and how much it wants to retain. If an out-of-gas exception happens in the inner call (or any other exception), this will be signalled by an error value put onto the stack. In this case, only the gas sent together with the call is used up. In Solidity, the calling contract causes a manual exception by default in such situations, so that exceptions “bubble up” the call stack.
As already said, the called contract (which can be the same as the caller) will receive a freshly cleared instance of memory and has access to the call payload - which will be provided in a separate area called the calldata. After it has finished execution, it can return data which will be stored at a location in the caller’s memory preallocated by the caller.
Calls are limited to a depth of 1024, which means that for more complex operations, loops should be preferred over recursive calls.
There exists a special variant of a message call, named delegatecall which is identical to a message call apart from the fact that the code at the target address is executed in the context of the calling contract and msg.sender and msg.value do not change their values.
This means that a contract can dynamically load code from a different address at runtime. Storage, current address and balance still refer to the calling contract, only the code is taken from the called address.
This makes it possible to implement the “library” feature in Solidity: Reusable library code that can be applied to a contract’s storage, e.g. in order to implement a complex data structure.
It is possible to store data in a specially indexed data structure that maps all the way up to the block level. This feature called logs is used by Solidity in order to implement events. Contracts cannot access log data after it has been created, but they can be efficiently accessed from outside the blockchain. Since some part of the log data is stored in bloom filters, it is possible to search for this data in an efficient and cryptographically secure way, so network peers that do not download the whole blockchain (“light clients”) can still find these logs.
Contracts can even create other contracts using a special opcode (i.e. they do not simply call the zero address). The only difference between these create calls and normal message calls is that the payload data is executed and the result stored as code and the caller / creator receives the address of the new contract on the stack.
The only possibility that code is removed from the blockchain is when a contract at that address performs the selfdestruct operation. The remaining Ether stored at that address is sent to a designated target and then the storage and code is removed from the state.
A node is a computer, that is part of the ethereum network. This node either stores a part (light client) or a full (full node) copy of the blockchain and updates the blockchain continuously. Furthermore there exist mining-nodes that confirm transactions aka perform mining.
See [7]: What does the client software do?
It downloads the whole blockchain onto your system on a regular basis, keeping the tab on the whole network. It verifies all transactions and contracts on the blockchain. If you are building your own contracts, it broadcasts them to the network so that they are included in the next block and confirmed by the miners. Client software can also do the mining but these days you may need a super-computer do make any ether this way.
Both geth and parity require 2-4GB of RAM and 50-100GB of hard drive space for storing the blockchain. And both require extensive memory so ~4GB swap needs to be set up.
There exist different ethereum clients (listed here descending, according to popularity): go-ethereum (geth), Parity, cpp-ethereum, pyethapp, ethereumjs-lib, Ethereum(J), ruby-ethereum, ethereumH. But there exists no resilient comparison between them. Some people suggest parity because it is popular, flexible and seems to be a little bit faster than the others. What I’ve seen so far is that the test network support is different (especially regarding PoA) – see chapter 3.1.
In this document we will focus on the parity client/node. Most content in this chapter is extracted from the parity wiki see [18].
Summary: Parity is an Ethereum client, written from the ground-up for correctness-verifiability, modularisation, low-footprint and high-performance. To this end it utilizes the Rust language, a hybrid imperative/OO/functional language with an emphasis on efficiency.
You can download and run the binaries, you can build the binaries from source, you can run parity in a docker container or you can run parity in the cloud e.g. Microsoft Azure.
Precondition is that you’ve docker installed – see chapter “Installation” and “Network” in [3].
Lately the parity docker image support has been improved greatly and different base images are available out of the box see [20].
But in case you want to build it on docker yourself follow the instruction in this chapter. All details respective output and issues encountered can be found in appendix C. Listed here is the final resulting dockerfile:
# Get an image as basis for building the app
FROM ubuntu AS builder
# Set the working directory to /app
WORKDIR /app
# 1. Download and install all packages required to build parity
RUN apt-get update -y && apt-get install -y build-essential && apt-get install -y libudev-dev && apt-get install -y git && apt-get install -y curl && curl https://sh.rustup.rs -sSf > rustup.sh && chmod +x rustup.sh && ./rustup.sh -y && git clone https://github.com/paritytech/parity
# (2. Optionally download and install the test packages required to run the parity tests)
#RUN cd parity && git submodule init && git submodule update
# 3. Finally run the compilation and build the parity node
# There is an issue running “source $HOME/.cargo/env”, replacing with “. $HOME/.cargo/env”
RUN cd parity && . $HOME/.cargo/env && cargo build
# Run app.py when the container launches
#CMD ["python", "app.py"]
docker build -t becke-ch--parity--s0-v1:s0-0-v1-0 .
docker run --net docker--s0-0-v1-0 --ip 10.0.0.10 -it becke-ch--parity--s0-v1
Full Node: Running a full node with the stadard configuration for the Ethereum Mainnet requires a lot of computer ressources. The blockchain download and validation process is particularly heavy on CPU and disk IO. It is therefore recommended to run a full node on a computer with multi-core CPU, 4GB RAM and a SSD drive with at least 60GB free space. Internet connection can also be a limiting factor. A decent DSL connection is required.
Light Node: Running a light node using the flag --light does not require to download and perform validation of the whole blockchain. A light node relies on full node peers to receive block headers and verify transactions. It is therefore far less resource demanding than a full node. For additional information see as well chapter 1.1.2.1.
--warp: State snapshotting, or warp-sync, allows for an extremely fast “synchronization” that skips almost all of the block processing, simply injecting the appropriate data directly into the database. Parity 1.6 or 1.7, --warp does nothing as it is enabled by default.
parity --chain ropsten : Connect to the Ropsten testnet.
parity --chain kovan : Connect to the Kovan testnet.
parity --bootnodes enode://YOUR_BOOT_NODE_ID_HERE@127.0.0.1:30303 : You can override the normal boot nodes with --bootnodes, i.e., you might run a local bootnode and sync from that. Further information on bootnodes see chapter 1.1.2 and regarding configuration see chapter 3.3.4, 3.3.4.1 and 3.3.4.2.
parity
--reserved-peers /path/to/reserved.txt : Instead of using
a bootnode to discover and connect to peers maintain a permanent
connection to own set of nodes, you can wire them with the
--reserved-peers feature.
Simply place all node addresses you want to connect to (enode://...,
one per line) into a text file, e.g., reserved.txt.
Using
a list of reserved peers hinders the dynamics of of a network to grow
(and shrink) because maintaining and distributing such a file between
the nodes is painful and against a decentralized approach. And there
exist better ways and technologies to restrict nodes respective IP
ranges.
parity --chain /path/to/chain-config.json --config /path/to/node-config.toml --base-path /path/to/base-data-storage/ --jsonrpc-interface [IP] --jsonrpc-apis [APIS]: Start parity on a private/consortium chain defined in the “--chain” configuration, with a customized node configuration according to “--config”, with a dedicated base data storage location “--base-path” and accessible via JSON-RPC over HTTP on a (fix) IP address “--jsonrpc-interface [IP]”. For example see PoA chain in chapter 3.3.6.1.
--chain:
Create a directory per chain, whereat the directory name contains
the chain name, as specified in the chain configuration file in the
parameter “"name"”
see chapter 3.3.5.1:
“--chain
/data/becke-ch--parity-chain--sX-vY/chain-config.json”.
$ mkdir -p /data/becke-ch--parity-chain--s0-v1
$ touch /data/becke-ch--parity-chain--s0-v1/chain-config.json
--config
&
--base-path:
Create a directory per node, whereat the directory name contains the
node- respective host name: “becke-ch--parity-node--sX-vY”:
starting with the (authority) organization name e.g. “becke-ch”
and where “X” is an integer differentiating the various nodes
(their scope/purpose) and “Y” is an integer that is incremented
in case a new major version of the node is required. Below this
directory create two sub-directories: “configuration”
and “data”. The
“configuration”
directory contains the node configuration file according to chapter
3.3.4 and the “data”
directory stores the node base- & chain-data.
“--config
/data/becke-ch--parity-node--sX-vY/configuration/node-config.toml”
“--base-path
/data/becke-ch--parity-node--sX-vY/data/”
$ mkdir -p /data/becke-ch--parity-node--s0-v1/data
$ mkdir -p /data/becke-ch--parity-node--s0-v1/configuration
$ touch /data/becke-ch--parity-node--s0-v1/configuration/node-config.toml
--jsonrpc-interface [IP]: Varying see chapter 3.3.4 and 3.3.4.2.
--jsonrpc-apis [APIS]: Optional/exceptional see chapter 3.3.4, 3.3.4.1 and 3.3.4.2.
“Minimal”: Minimal according to my point of view in matters of clean separation and reasonable functionality with minimal security exposure:
$ parity --chain /data/becke-ch--parity-chain--s0-v1/chain-config.json --config /data/becke-ch--parity-node--s0-v1/configuration/node-config.toml --base-path /data/becke-ch--parity-node--s0-v1/data/ --jsonrpc-interface 10.0.0.10
“Extended”:
$ parity --chain /data/becke-ch--parity-chain--s0-v1/chain-config.json --config /data/becke-ch--parity-node--s0-v1/configuration/node-config.toml --base-path /data/becke-ch--parity-node--s0-v1/data/ --jsonrpc-interface 10.0.0.10 --jsonrpc-apis web3,eth,pubsub,net,shh,shh_pubsub
Follow the installation in chapter 3.3.1.1 and setup see chapter above.
Because docker in some environments (e.g. Azure Container Instance (ACI)) has issues mounting more than one directory, link the chain configuration file into the node configuration directory (Attention symbolic links are not working in docker – use hard link instead!):
$ ln /data/becke-ch--parity-chain--s0-v1/chain-config.json /data/becke-ch--parity-node--s0-v1/configuration/
Run docker, mount the node (and chain)
directory and pass the chain-configuration-, node-configuration- and
base-data-storage-path as startup parameters: “--chain”,
“--config” and
“--base-path”
Do
NOT map the parity ports using “-p”
otherwise you will get conflicts with several docker nodes running
on your host! Instead see chapter “Network” in [3] run
the container on an existing bridge (and if visibility is required
outside of the host, expose this bridge via a physical NIC
externally).
Run the docker containers on fix IP addresses to make sure that they will find each other even after a restart. It is mandatory at least for the boot-nodes to run on fix IP addresses otherwise the other nodes in the network cannot startup (in case the boot-node is hard-coded / configured)!
“Minimal”:
$ docker run -ti --net docker--s0-0-v1-0 --ip 10.0.0.10 -v /data/becke-ch--parity-node--s0-v1/:/data/becke-ch--parity-node--s0-v1/ parity/parity:v1.11.8 --chain /data/becke-ch--parity-node--s0-v1/configuration/chain-config.json --config /data/becke-ch--parity-node--s0-v1/configuration/node-config.toml --base-path /data/becke-ch--parity-node--s0-v1/data/ --jsonrpc-interface 10.0.0.10
“Extended”:
$ docker run -ti --net docker--s0-0-v1-0 --ip 10.0.0.10 -v /data/becke-ch--parity-node--s0-v1/:/data/becke-ch--parity-node--s0-v1/ parity/parity:v1.11.8 --chain /data/becke-ch--parity-node--s0-v1/configuration/chain-config.json --config /data/becke-ch--parity-node--s0-v1/configuration/node-config.toml --base-path /data/becke-ch--parity-node--s0-v1/data/ --jsonrpc-interface 10.0.0.10 --jsonrpc-apis web3,eth,pubsub,net,shh,shh_pubsub
Based on chapter 1.1.2.2 parity exposes the following JSON RPC APIs by default – see below and next to them I’ve listed the web3js (see chapter 3.7.7) packages they map to:
web3: Most functions correspond to functions with the same name in “web3.utils” package.
eth: Most functions correspond to functions with the same name in “web3.eth” package. The web3.eth package allows you to interact with an Ethereum blockchain and Ethereum smart contracts.
pubsub: Most functions correspond to functions with the same name in “web3.eth.subscribe” package. The web3.eth.subscribe function lets you subscribe to specific events in the blockchain.
net: Most functions correspond to functions with the same name in “web3.*.net” package. The web3.*.net package allows you to interact with the Ethereum nodes network properties.
parity: N/A web3js. These functions are parity specific and have no web3js counterpart package.
parity_pubsub: N/A web3js. These functions are parity specific and have no web3js counterpart package.
traces: N/A web3js. These functions have no web3js counterpart package. The trace module is for getting a deeper insight into transaction processing. It includes two sets of calls; the transaction trace filtering API and the ad-hoc tracing API.
shh: Most functions correspond to functions with the same name in “web3.shh” package. The web3.shh package allows you to interact with the whisper protocol for broadcasting.
rpc: N/A. No documentation available at all?!
And the following JSON RPC APIs are NOT exposed by default:
personal: Most functions correspond to functions with the same name in “web3.eth.personal” package. The web3.eth.personal package allows you to interact with the Ethereum node’s accounts. Many of these functions send sensitive information, like password. Never call these functions over a unsecured Websocket or HTTP provider, as your password will be sent in plain text!
parity_accounts: N/A web3js. These functions are parity specific and have no web3js counterpart package.
parity_set: N/A web3js. These functions are parity specific and have no web3js counterpart package.
signer: N/A. These functions have no web3js counterpart package.
secretstore: N/A. These functions have no web3js counterpart package. Is available in default Parity client. Is considered unsafe and must be enabled separately! Contains dangerous methods and must be enabled with caution!
Finally I suggest to enable the following minimal set of APIs (in the configuration file – see chapter below):
apis = ["web3", "eth", "pubsub", "net", "shh", "shh_pubsub"]
The following (proprietary and/or not documented) APIs I’ve removed from the minimal default: parity, parity_pubsub, traces and rpc!
As shown in chapter 3.3.2 parity can be started without any specific node configuration. In this case the default configuration is used which matches the configuration of the other nodes in the public blockchain.
Configuration can either be provided as command line arguments or in a configuration file. Should the command line arguments and the config file disagree about a setting, the CLI takes precedence. Therefore the config file should contain the default, minimal and most restrictive configuration settings relevant for all participating nodes and (temporary) exception and dynamic behaviors should be provided via command line!
The config file: “--config /data/becke-ch--parity-node--sX-vY/configuration/node-config.toml” should contain the following information:
apis
=
[...]: By default only the minimal set of APIs as
listed in the previous chapter should be exposed.
Attention
due to a security issue
in the parity WebSocket implementation, the disabling of WebSocket
APIs
is not working as
expected
– see chapter 1.1.2.2. In other words you can configure it but it
will get ignored under
certain circumstances and
therefore the WebSocket interface should
not be exposed at all
– see
next chapter below!:
[rpc]
apis = ["web3", "eth", "pubsub", "net", "shh", "shh_pubsub"]
[websockets]
apis = ["web3", "eth", "pubsub", "net", "shh", "shh_pubsub"]
bootnodes
=
[“enode://YOUR_BOOT_NODE_ID_HERE@IP_ADDRESS:30303”]:
The configuration file should contain the initial boot node(s) of the
chain founder(s). For (temporary) exception see next chapter. For
additional remarks regarding boot nodes see chapter 1.1.2.
Using
a list of reserved peers instead hinders the dynamics of of a network
to grow (and shrink) because maintaining and distributing such a file
between the nodes is painful and against a decentralized approach.
And there exist better ways and technologies to restrict nodes
respective IP ranges.
[network]
bootnodes = ["enode://2806efe7adb55d001d9ffabefab6a1711540672ae84308133940c366dc08aaf3080839e14da17e3d694156f54c4cf33397fe00ac6aa377454433dc81aeb906f3@10.0.0.10:30303"]
The resulting configuration looks as follows:
[network]
bootnodes = ["enode://2806efe7adb55d001d9ffabefab6a1711540672ae84308133940c366dc08aaf3080839e14da17e3d694156f54c4cf33397fe00ac6aa377454433dc81aeb906f3@10.0.0.10:30303"]
[rpc]
apis = ["web3", "eth", "pubsub", "net", "shh", "shh_pubsub"]
[websockets]
apis = ["web3", "eth", "pubsub", "net", "shh", "shh_pubsub"]
--bootnodes enode://YOUR_BOOT_NODE_ID_HERE@IP_ADDRESS:30303: In case a bootnode changes (dynamic IP address or downtime) this information should be provided as startup parameter overriding the default configuration in the config file see previous chapter. For additional remarks regarding boot nodes see chapter 1.1.2.
--bootnodes enode://2806efe7adb55d001d9ffabefab6a1711540672ae84308133940c366dc08aaf3080839e14da17e3d694156f54c4cf33397fe00ac6aa377454433dc81aeb906f3@10.0.0.10:30303
--jsonrpc-interface=[IP]:
To access the node via HTTP from
externally (respective
from the host where
the docker container node
is running)
the IP address where the interface is
listening respective assigned to should be allowed. Because
the IP address of the node respective interface might change in case
of dynamic IPs this information
should be provided as CLI parameter (in
the sample below replace
“10.0.0.10”
with the IP address where your
node is running respective the interface is
listening!).
--ws-interface=[IP]:
Because there exists a security issue with the parity
WebSocket
implementation
and the disabling of exposed APIs, see previous
chapter above and
chapter
1.1.2.2, the
IP address where the interface is listening respective assigned to
should NOT
be
allowed! Instead
only the “--jsonrpc-interface=[IP]”
should be allowed!
For HTTP and WebSocket the
default interface is “local”.
--jsonrpc-interface 10.0.0.10
--jsonrpc-apis
[APIS]: In exceptional cases when additional
administration APIs (for a list see chapter 3.3.3) are required they
can temporarily (for a short time) be activated via command line and
they will then oversteer the configuration in the config file see
previous chapter.
--ws-apis
[APIS]:
As already mentioned above the disabling of WebSocket APIs is not
working as
expected
and
therefore should not be used (currently)!
--jsonrpc-apis web3,eth,pubsub,net,shh,shh_pubsub
By default, when simply running parity, Parity Ethereum will connect to the official public Ethereum network.
In order to run a chain different to the official public Ethereum one, Parity has to run with the --chain option e.g. “parity --chain ropsten”:
mainnet (default) main Ethereum network
kovan or testnet the fast Ethereum test network
ropsten the old Ethereum test network
classic Ethereum Classic network
classic-testnet original Morden testnet and current Ethereum Classic testnet
expanse Expanse network
dev a Private development chain to be used locally, submitted transactions are inserted into blocks instantly without the need to mine
Musicoin Musicoin network
ellaism Ellaism network
For more information on networks see chapter 3.1.
Parity supports private chains and private network configurations via Chain specification file provided with --chain. In addition to the usual Proof of Work Chains, Parity also includes Proof of Authority Chains which do not require mining:
JSON chain spec format:
{
"name": "becke-ch--parity-chain--sX-vY",
"engine": {
"ENGINE_NAME": {
"params": {
ENGINE_PARAMETERS
}
}
},
"genesis": {
"seal": {
ENGINE_SPECIFIC_GENESIS_SEAL
},
"difficulty": "0x20000",
"gasLimit": "0x2fefd8"
},
"params": {
"networkID" : "0xYOUR_NETWORK_ID",
"maximumExtraDataSize": "0x20",
"minGasLimit": "0x1388"
},
"accounts": {
GENESIS_ACCOUNTS
}
}
"name" field contains any name used to identify the chain. It is used as a folder name for database files. (avoid using spaces in the name! If it contains spaces, then use parameter "dataDir" without spaces!): “becke-ch--parity-chain--sX-vY”: starting with the (authority) organization name and where “X” is an integer differentiating the various private/consortium chains (their scope/purpose) and “Y” is an integer that is incremented in case a new major version of the chain is required
"engine" field describes the consensus engine used for a particular chain. See: [21] – for implementation of PoA see chapter 3.3.6.1.
"genesis"
contains the genesis block (first block in the chain) header
information.
Every time we launch Ethereum, we actually
recreate this genesis block from scratch. Syncing the blockchain
with peers only begins at block 1.
"seal" is consensus engine specific and is further described in Consensus Engines. See: [21] – for implementation of PoA see chapter 3.3.6.1.
"difficulty" is the difficulty of the genesis block. This parameter is required for any type of chain but can be of arbitrary value if a PoA engine is used. Set this value low so you don’t have to wait too long for mining blocks.
"gasLimit" is the gas limit of the genesis block. It affects the initial gas limit adjustment. Set this value high to avoid being limited when testing.
"params" contains general chain parameters:
"networkID" : DevP2P supports multiple networks, and ID is used to uniquely identify each one which is used to connect to correct peers and to prevent transaction replay across chains. Make sure that the ID does not collide with the ID of the existing networks see chapter 3.3.5.
"maximumExtraDataSize": determines how much extra data the block issuer can place in the block header.
"minGasLimit": gas limit can adjust across blocks, this parameter determines the absolute minimum it can reach.
Optional:
"gasLimitBoundDivisor": U256 - How much the block gas limit can change between blocks. Miners can vote to bring the block gas limit up or down (via the flag --gas-floor-target), the new gas limit is callculated according to the formula: current_gas_limit*(1 ± 1/gasLimitBoundDivisor).
"validateChainIdTransition": Optional, will be included for block 0 by default - Block before which any chain_id in the signature of a replay-protected transaction is accepted. After this transition block, the transactions’ chain_id must match with the spec chain_id to be considered valid.
"eip155Transition": See EIP [32].
"eip140Transition": See EIP [32].
"eip211Transition": See EIP [32].
"eip214Transition": See EIP [32].
"eip658Transition": See EIP [32].
"accounts" contains optional contents of the genesis block, such as simple accounts with balances or contracts. Parity does not include the standard Ethereum builtin contracts by default. These are necessary when writing new contracts in Solidity since compiled Solidity often refers to them. To make the chain behave like the public Ethereum chain the 4 contracts need to be included in the spec file, as shown in the example below:
"accounts": {
"0x0000000000000000000000000000000000000001": { "balance": "1", "builtin": { "name": "ecrecover", "pricing": { "linear": { "base": 3000, "word": 0 } } } },
"0x0000000000000000000000000000000000000002": { "balance": "1", "builtin": { "name": "sha256", "pricing": { "linear": { "base": 60, "word": 12 } } } },
"0x0000000000000000000000000000000000000003": { "balance": "1", "builtin": { "name": "ripemd160", "pricing": { "linear": { "base": 600, "word": 120 } } } },
"0x0000000000000000000000000000000000000004": { "balance": "1", "builtin": { "name": "identity", "pricing": { "linear": { "base": 15, "word": 3 } } } }
}
Other types of accounts that can be specified:
simple accounts with some balance "0x...": { "balance": "100000000000" }
full account state "0x...": { "balance": "100000000000", "nonce": "0", "code": "0x...", "storage": { "0": "0x...", ... } }
contract constructor, similar to sending a transaction with bytecode "0x...": { "balance": "100000000000", "constructor": "0x..." }. The constructor bytecode is executed when the genesis is created and the code returned by the “constructor” is stored in the genesis state.
Proof of Authority does not depend on nodes solving arbitrarily difficult mathematical problems, but instead uses a set of “authorities” - nodes that are explicitly allowed to create new blocks and secure the blockchain. The block has to be signed off by the majority of authorities, in which case it becomes a part of the permanent record. This makes it easier to maintain a private chain and keep the block issuers accountable.
For consortium setting there are no disadvantages of PoA network as compared to PoW. It is more secure (since an attacker with unwanted connection or hacked authority can not overwhelm a network potentially reverting all transactions), less computationally intensive (mining with difficulty which provides security requires lots of computation), more performant (Aura consensus provides lower transaction acceptance latency) and more predictable (blocks are issued at steady time intervals). PoA deployments are used by the enterprise and by the public (e.g. popular Kovan test network).
The two available algorithms are the Aura and Tendermint. Because Tendermint is still experimental we will focus on Aura (authorityRound) in the following sub chapters.
Pick real world entities that should control the network, so called authorities. E.g different organizations that want to collaborate without an intermediary. Optionally establish the authority as a new organization and give it a DNS name e.g. “becke.ch” (respective “becke-ch” depending on the context).
Nominate a promoter respective administrator of the authority round / chain, responsible for specifying and distributing the configurations and running an (initial) boot node the others can connect to.
Each authority should create two accounts – an authority account and a user account. The authority account is used by the node itself to issue blocks. To issue blocks the node requires the password (file) for this authority account AND because this is a security issue (from my point of view) and as well for separation of concerns, we use a separate user account that has the ethers required to send transactions. The accounts can be created by using a wallet or simply running the code shown in chapter 3.7.3 or reusing an existing account (public- / private-key pair).
Each authority sends its authority account (public key) and user account (public key) to the authority round administrator.
The administrator creates the configuration files:
Prepares the network configuration as shown below and stores it in a file:
$ vi /data/becke-ch--parity-chain--s0-v1/chain-config.json
{
"name": "becke-ch--parity-chain--s0-v1",
"engine": {
"authorityRound": {
"params": {
"stepDuration": "5",
"validators" : {
"list": ["0xDfBad97d7AD160804762c36C255082a705D985E8","0x1C8592BFB4f2A842fC2eFBEB54463638739c2B93","0x169b1feCEb85044b36d6B7A3f2076Af6b372843A"]
}
}
}
},
"genesis": {
"seal": {
"authorityRound": {
"step": "0x0",
"signature": "0x0000000000000000000000000000000000000000000000000000000000000000000000000000000000000000000000000000000000000000000000000000000000"
}
},
"difficulty": "0x20000",
"gasLimit": "0x2fefd8"
},
"params": {
"networkID" : "0x777",
"maximumExtraDataSize": "0x20",
"minGasLimit": "0x1388",
"gasLimitBoundDivisor": "0x400",
"eip155Transition": 0,
"validateChainIdTransition": 0,
"eip140Transition": 0,
"eip211Transition": 0,
"eip214Transition": 0,
"eip658Transition": 0
},
"accounts": {
"0x0000000000000000000000000000000000000001": { "balance": "1", "builtin": { "name": "ecrecover", "pricing": { "linear": { "base": 3000, "word": 0 } } } },
"0x0000000000000000000000000000000000000002": { "balance": "1", "builtin": { "name": "sha256", "pricing": { "linear": { "base": 60, "word": 12 } } } },
"0x0000000000000000000000000000000000000003": { "balance": "1", "builtin": { "name": "ripemd160", "pricing": { "linear": { "base": 600, "word": 120 } } } },
"0x0000000000000000000000000000000000000004": { "balance": "1", "builtin": { "name": "identity", "pricing": { "linear": { "base": 15, "word": 3 } } } },
"0x26D9E695Bd95fD6cd9e2C08Fc3450FCD6958fC1E": { "balance": "10000000000000000000000" },
"0xDdf06643ec9970568424c690c27462e090B9bd66": { "balance": "10000000000000000000000" },
"0x9929ff47aDFb2D3D2Ab5D65E156d9a9EA46B5435": { "balance": "10000000000000000000000" }
}
}
"name" see previous chapter 3.3.5.1 e.g. “becke-ch--parity-chain--s0-v1”
"stepDuration" determines the lowest interval between blocks in seconds, too low might cause reorgs if the system clocks are not synchronized, too high leads to slow block issuance.
”validators"
: {"list":
["0xDfBad97d7AD160804762c36C255082a705D985E8","0x1C8592BFB4f2A842fC2eFBEB54463638739c2B93","0x169b1feCEb85044b36d6B7A3f2076Af6b372843A"]}":
is the list of addresses of the authorities which will be allowed
to issue blocks. Initially this list contains the initial founders
of this authority round / chain. These accounts were sent to the
administrator in the previous step. This list will grow as more
authorities join the round respective organization. For additional
information see chapter 3.3.6.2.
The account
“0xDfBad97d7AD160804762c36C255082a705D985E8”
belongs to the administrator.
Instead of changing the “list”
every time a new authority is added in addition I suggest to
specify:
"safeContract" Address of a non-reporting contract that indicates the list of authorities – see chapter 3.3.6.2 and 3.3.6.2.1. OR
"contract” Address of a reporting contract that indicates the list of authorities and enables reporting their misbehavior – see chapter 3.3.6.2 and 3.6.1.5. And decides on consequences e.g. blocking them temporarily or banning them entirely. OR
“multi”: Combines these approaches: “list, “safeContract” and “contract”. in the example below we start with a hardcoded “list” of authorities in block “0”, switch over to a “safeContract” based authority list at block “10” and finally switch over to a “contract” based authority list at block “20”:
"validators" : {
"multi": {
"0": { "list": ["0xc6d9d2cd449a754c494264e1809c50e34d64562b"] },
"10": { "safeContract": ["0xd6d9d2cd449a754c494264e1809c50e34d64562b"] },
"20": { "contract": "0xc6d9d2cd449a754c494264e1809c50e34d64562b" }
}
}
"accounts"
contains the standard Ethereum builtin
contracts (ecrecover,
sha256,
etc.), required
to use the Solidity contract writing language. And
additionally (for reason of security and separation of concerns)
the accounts section contains the user-accounts of the
individual authorities that were sent to the administrator in
the previous step (3.). And these are as well the accounts to which
the administrator initially assigns ether as part of the chain
configuration.
The user account
“0x26D9E695Bd95fD6cd9e2C08Fc3450FCD6958fC1E”
belongs to the administrator.
The administrator prepares the node configuration as shown in chapter 3.3.4, 3.3.4.1 and store it in a file. The bootnode line is commented because (of course) we don’t know its value until the first time we’ve started the node:
$ vi /data/becke-ch--parity-node--s0-v1/configuration/node-config.toml
[network]
#bootnodes = ["enode://2806efe7adb55d001d9ffabefab6a1711540672ae84308133940c366dc08aaf3080839e14da17e3d694156f54c4cf33397fe00ac6aa377454433dc81aeb906f3@172.17.0.2:30303"]
[rpc]
apis = ["web3", "eth", "pubsub", "net", "shh", "shh_pubsub"]
[websockets]
apis = ["web3", "eth", "pubsub", "net", "shh", "shh_pubsub"]
Run the node as described in chapter 3.3.2 respective 3.3.2.1
“Minimal”:
raoul-becke--s0-v1@hp-elitebook-850-g5--s0-v1:~$ docker run -ti --net docker--s0-0-v1-0 --ip 10.0.0.10 -v /data/becke-ch--parity-node--s0-v1/:/data/becke-ch--parity-node--s0-v1/ parity/parity:v1.11.8 --chain /data/becke-ch--parity-node--s0-v1/configuration/chain-config.json --config /data/becke-ch--parity-node--s0-v1/configuration/node-config.toml --base-path /data/becke-ch—parity-node--s0-v1/data/ --jsonrpc-interface 10.0.0.10
Loading config file from /data/becke-ch--parity-node--s0-v1/configuration/node-config.toml
2018-09-13 06:09:00 UTC Starting Parity/v1.11.8-stable-c754a02-20180725/x86_64-linux-gnu/rustc1.27.2
2018-09-13 06:09:00 UTC Keys path /data/becke-ch--parity-node--s0-v1/data//keys/becke-ch--parity-chain--s0-v1
2018-09-13 06:09:00 UTC DB path /data/becke-ch--parity-node--s0-v1/data//chains/becke-ch--parity-chain--s0-v1/db/675318460daeba05
2018-09-13 06:09:00 UTC Path to dapps /data/becke-ch--parity-node--s0-v1/data//dapps
2018-09-13 06:09:00 UTC State DB configuration: fast
2018-09-13 06:09:00 UTC Operating mode: active
2018-09-13 06:09:00 UTC Configured for becke-ch--parity-chain--s0-v1 using AuthorityRound engine
2018-09-13 06:09:05 UTC Public node URL: enode://3b9d3ff377a6f49e812c1ecfb89f52ddd300b1ff4610a74a7289ab4da110751b7bf41f1a2e85b4e8fb19d852ce4ea6b96e221910f58830e2ce0b3b61d65f3423@10.0.0.10:30303
2018-09-13 06:09:30 UTC 0/25 peers 8 KiB chain 9 KiB db 0 bytes queue 448 bytes sync RPC: 0 conn, 0 req/s, 0 µs
...
Stop the node by pressing “Ctrl+C” and adapt the node configuration with the bootnode information we got from the startup:
$ vi /data/becke-ch--parity-node--s0-v1/configuration/node-config.toml
[network]
bootnodes = ["enode://3b9d3ff377a6f49e812c1ecfb89f52ddd300b1ff4610a74a7289ab4da110751b7bf41f1a2e85b4e8fb19d852ce4ea6b96e221910f58830e2ce0b3b61d65f3423@10.0.0.10:30303"]
[rpc]
apis = ["web3", "eth", "pubsub", "net", "shh", "shh_pubsub"]
[websockets]
apis = ["web3", "eth", "pubsub", "net", "shh", "shh_pubsub"]
The authority account that signs consensus messages and issues blocks needs to be added to the node that is performing these actions:
The authority account must be listed in the validators list (see above) (and belongs to the authority maintaining this node).
parity_newAccountFromSecret:
Assuming that the authority used the method listed in chapter 3.7.3
to create the account, they already have the private key for this
account and therefore use the method “parity_newAccountFromSecret”
to add this account to the node store.
To
perform this action we need to allow “parity_accounts”
API BUT
be careful when
exposing
this API
because it
is
potentially unsafe, therefore stop
parity right after
the account has been added:
docker run -ti --net docker--s0-0-v1-0 --ip 10.0.0.10 -v /data/becke-ch--parity-node--s0-v1/:/data/becke-ch--parity-node--s0-v1/ parity/parity:v1.11.8 --chain /data/becke-ch--parity-node--s0-v1/configuration/chain-config.json --config /data/becke-ch--parity-node--s0-v1/configuration/node-config.toml --base-path /data/becke-ch--parity-node--s0-v1/data/ --jsonrpc-interface 10.0.0.10 --jsonrpc-apis web3,eth,pubsub,net,shh,shh_pubsub,parity_accounts
The private key and password need to be replaced with the one of the authority (the private key listed here belongs to the authority round administrator “0xDfBad97d7AD160804762c36C255082a705D985E8”):
curl --data '{"method":"parity_newAccountFromSecret","params":["0x3930fe64c8381001a351068688542ae71cb5c9badeccd74744cab889da9b2771","hunter2"],"id":1,"jsonrpc":"2.0"}' -H "Content-Type: application/json" -X POST 10.0.0.10:8545
{"jsonrpc":"2.0","result":"0xdfbad97d7ad160804762c36c255082a705d985e8","id":1}
Optional: To check whether the account was added successfully run “parity_allAccountsInfo”:
curl --data '{"method":"parity_allAccountsInfo","params":[],"id":1,"jsonrpc":"2.0"}' -H "Content-Type: application/json" -X POST 10.0.0.10:8545
{"jsonrpc":"2.0","result":{"0xdfbad97d7ad160804762c36c255082a705d985e8":{"meta":"{}","name":"","uuid":"6d8449ba-90c3-8870-107f-d0c2c3cff33d"}},"id":1}
--engine-signer
[ADDRESS]: Specify the authority address which should
be used to sign consensus messages and issue blocks (relevant only
to non-PoW chains). This parameter is provided as command line
argument because it is (of course) different for each authority
node.5
--password
[FILE]: Provide a file containing a password for
unlocking an account (leading and trailing whitespace is trimmed).
This password is required to unlock the account that was provided
in the parameter “--engine-signer
[ADDRESS]” see above.6
$ vi /data/becke-ch--parity-node--s0-v1/configuration/engine-signer.pwd
hunter2
docker run -ti --net docker--s0-0-v1-0 --ip 10.0.0.10 -v /data/becke-ch--parity-node--s0-v1/:/data/becke-ch--parity-node--s0-v1/ parity/parity:v1.11.8 --chain /data/becke-ch--parity-node--s0-v1/configuration/chain-config.json --config /data/becke-ch--parity-node--s0-v1/configuration/node-config.toml --base-path /data/becke-ch--parity-node--s0-v1/data/ --jsonrpc-interface 10.0.0.10 --engine-signer 0xDfBad97d7AD160804762c36C255082a705D985E8 --password /data/becke-ch--parity-node--s0-v1/configuration/engine-signer.pwd
Optional: For example in case we need to interact with the account information: “personal” and/or “parity_accounts”; docker needs to be started as follows BUT attention be careful when exposing these APIs because they are potentially unsafe – alternative safer approaches to create accounts and sign transactions see 3.7.3 and 3.7.4:
docker run -ti --net docker--s0-0-v1-0 --ip 10.0.0.10 -v /data/becke-ch--parity-node--s0-v1/:/data/becke-ch--parity-node--s0-v1/ parity/parity:v1.11.8 --chain /data/becke-ch--parity-node--s0-v1/configuration/chain-config.json --config /data/becke-ch--parity-node--s0-v1/configuration/node-config.toml --base-path /data/becke-ch--parity-node--s0-v1/data/ --jsonrpc-interface 10.0.0.10 --jsonrpc-apis web3,eth,pubsub,net,shh,shh_pubsub,personal,parity_accounts
BUT instead of using the UI see chapter 3.3.7, to interact with the accounts, which is based on the WebSocket transport layer protocol, which has security issues regarding disabling of APIs; I rather suggest to directly use HTTPS and communicate with the node using “curl --data ‘{KEY-VALUE-PAIRS}’ -H “Content-Type: application/json" -X POST 10.0.0.10:8545”:
curl --data '{"method":"personal_listAccounts","params":[],"id":1,"jsonrpc":"2.0"}' -H "Content-Type: application/json" -X POST 10.0.0.10:8545
curl --data '{"method":"parity_allAccountsInfo","params":[],"id":1,"jsonrpc":"2.0"}' -H "Content-Type: application/json" -X POST 10.0.0.10:8545
curl --data '{"jsonrpc":"2.0","method":"parity_newAccountFromPhrase","params":["node0", "node0"],"id":0}' -H "Content-Type: application/json" -X POST 10.0.0.10:8545
...
The administrator distributes the config files: “/data/becke-ch--parity-chain--s0-v1/chain-config.json” and “/data/becke-ch—parity-node--s0-v1/configuration/node-config.toml” to the different authorities.
Each authority stores the config files and starts a parity node (applying some of the steps already listed above) as follows:
docker run -ti --net docker--s0-0-v1-0 --ip 10.0.0.10 -v /data/becke-ch--parity-node--s1-v1/:/data/becke-ch--parity-node--s1-v1/ parity/parity:v1.11.8 --chain /data/becke-ch--parity-node--s1-v1/configuration/chain-config.json --config /data/becke-ch--parity-node--s1-v1/configuration/node-config.toml --base-path /data/becke-ch--parity-node--s1-v1/data/ --jsonrpc-interface 10.0.0.11 --jsonrpc-apis web3,eth,pubsub,net,shh,shh_pubsub,parity_accounts
The private key and password need to be replaced with the one of the authority (the private key listed here belongs to the authority account “0x1C8592BFB4f2A842fC2eFBEB54463638739c2B93”):
curl --data '{"method":"parity_newAccountFromSecret","params":["0x19fd5781e9ba1c21b1a56b5a2f867778a15978fcda2cfc31fc744e71e273348d","hunter3"],"id":1,"jsonrpc":"2.0"}' -H "Content-Type: application/json" -X POST 10.0.0.11:8545
{"jsonrpc":"2.0","result":"0xdfbad97d7ad160804762c36c255082a705d985e8","id":1}
$ vi /data/becke-ch--parity-node--s1-v1/configuration/engine-signer.pwd
hunter3
docker run -ti --net docker--s0-0-v1-0 --ip 10.0.0.10 -v /data/becke-ch--parity-node--s1-v1/:/data/becke-ch--parity-node--s1-v1/ parity/parity:v1.11.8 --chain /data/becke-ch--parity-node--s1-v1/configuration/chain-config.json --config /data/becke-ch--parity-node--s1-v1/configuration/node-config.toml --base-path /data/becke-ch--parity-node--s1-v1/data/ --jsonrpc-interface 10.0.0.11 --engine-signer 0x1C8592BFB4f2A842fC2eFBEB54463638739c2B93 --password /data/becke-ch--parity-node--s1-v1/configuration/engine-signer.pwd
Additional user nodes can connect to the network as well.
Use the network just like a public Ethereum network (transactions, contracts etc.).
Hacker note: When a hacker tries to modify: “chain-config.json”, starts his own node and joins the network then the following will happen:
accounts: If the hacker changes the accounts section e.g. inserting an account and assigning ether to it, then the network will not allow him to join the other peers and he will start a chain of his own (basically because he is changing the root genesis block).
validators: If the hacker changes the “validators” list and adds his own node/authority-account to the list of validators then the other peers will not accept transactions mined by his node/authority-account because his account is not in the list of validators accepted by the other authorities and the chain will fork. One branch contains the hacker node and the other branch contains the rest of the authorities/nodes which are trusting each other.
A number of Engines available in Parity achieve consensus by referring to a list of “validators” (referred to as authorities if they are linked to physical entities). Validators are a group of accounts which are allowed to participate in the consensus, they validate the transactions and blocks to later sign messages about them.
Since parity 1.7 the list can also be a part of the blockchain state by being stored in an Ethereum contract.
It is best to include the contract in the genesis, placing the bytecode as a “constructor” in the “accounts” field like so:
{
"name": "becke-ch--parity-chain--s0-v1",
"engine": {
"authorityRound": {
"params": {
"stepDuration": "5",
"validators": {
"safeContract": "0x0000000000000000000000000000000000000010"
}
}
}
},
…
"accounts": {
"0x0000000000000000000000000000000000000001": { "balance": "1", "builtin": { "name": "ecrecover", "pricing": { "linear": { "base": 3000, "word": 0 } } } },
…
"0x0000000000000000000000000000000000000010": { "balance": "1", "constructor": "0x6080...50029"},
"0x26D9E695Bd95fD6cd9e2C08Fc3450FCD6958fC1E": { "balance": "10000000000000000000000" },
…
}
}
And (of course) in addition this contract needs to be referenced from the validators section as safeContract – see chapter 3.3.6.2.1 or as contract – see chapter 3.3.6.2.2.
If the constructor takes arguments they must be encoded and appended to the contract bytecode (using e.g. ethabi). Also if the contract initializes any address with msg.sender (for example as a contract owner) you must take into account that when defining the contract in genesis, msg.sender will be set to the system address (SYSTEM_ADDRESS: 2^160 – 2).
Additional information see [35].
Compared to the reporting contract – see chapter 3.3.6.2.2 - this contract does not offer functionality to report bad behavior of validators and to act on such behavior. Basically it just returns an array of validators: getValidators
The function getValidators should always return the active set or the initial set if the contract hasn’t been activated yet. Switching the set should be done by issuing a InitiateChange event with the parent block hash and new set, storing the pending set, and then waiting for call to finalizeChange (by the SYSTEM_ADDRESS: 2^160 - 2) before setting the active set to the pending set.
A very simple contract that just replaces the static validators list shown in chapter 3.3.6.1 could look as follows:
pragma solidity ^0.4.22;
contract ValidatorSet {
// Current list of addresses entitled to participate in the consensus.
address[] validators;
/// Issue this log event to signal a desired change in validator set.
/// This will not lead to a change in active validator set until
/// finalizeChange is called.
///
/// Only the last log event of any block can take effect.
/// If a signal is issued while another is being finalized it may never
/// take effect.
///
/// _parentHash here should be the parent block hash, or the
/// signal will not be recognized.
event InitiateChange(bytes32 indexed _parentHash, address[] _newSet);
constructor() public {
validators.push(0xDfBad97d7AD160804762c36C255082a705D985E8);
validators.push(0x1C8592BFB4f2A842fC2eFBEB54463638739c2B93);
validators.push(0x169b1feCEb85044b36d6B7A3f2076Af6b372843A);
}
/// Called when an initiated change reaches finality and is activated.
/// Only valid when msg.sender == SYSTEM (EIP96, 2**160 - 2).
///
/// Also called when the contract is first enabled for consensus. In this case,
/// the "change" finalized is the activation of the initial set.
function finalizeChange() external{
}
/// Get current validator set (last enacted or initial if no changes ever made).
function getValidators() external view returns (address[]){
return validators;
}
}
This contract can be compiled as follows – additional information see chapter 3.6.2
solc ValidatorSetImpl.sol --combined-json abi,asm,ast,bin,bin-runtime,clone-bin,devdoc,interface,opcodes,srcmap,srcmap-runtime,userdoc > ValidatorSetImpl.json
In the resulting compiled JSON file: ValidatorSetImpl.json copy the bin value:
{
"contracts": {
"ValidatorSetImpl.sol:ValidatorSet": {
…
"bin": "608060405...d8a16cf5f350029",
…
}
},
…
}
Into the chain configuration file, into the accounts section AND reference this contract address from the validators section as follows:
{
"name": "becke-ch--parity-chain--s0-v1",
"engine": {
"authorityRound": {
"params": {
"stepDuration": "5",
"validators": {
"safeContract": "0x0000000000000000000000000000000000000010"
}
}
}
},
…
"accounts": {
"0x0000000000000000000000000000000000000001": { "balance": "1", "builtin": { "name": "ecrecover", "pricing": { "linear": { "base": 3000, "word": 0 } } } },
…
"0x0000000000000000000000000000000000000010": { "balance": "1", "constructor": "0x6080...50029"},
"0x26D9E695Bd95fD6cd9e2C08Fc3450FCD6958fC1E": { "balance": "10000000000000000000000" },
…
}
}
And last but not least when starting parity these “Initial contract validators” should be listed in the output:
raoul-becke--s0-v1@hp-elitebook-850-g5--s0-v1:~$ docker run -ti --net docker--s0-0-v1-0 --ip 10.0.0.10 -v /data/becke-ch--parity-node--s0-v1/:/data/becke-ch--parity-node--s0-v1/ parity/parity:v1.11.8 --chain /data/becke-ch--parity-node--s0-v1/configuration/chain-config.json --config /data/becke-ch--parity-node--s0-v1/configuration/node-config.toml --base-path /data/becke-ch--parity-node--s0-v1/data/
Loading config file from /data/becke-ch--parity-node--s0-v1/configuration/node-config.toml
2018-09-11 05:02:45 UTC Starting Parity/v1.11.8-stable-c754a02-20180725/x86_64-linux-gnu/rustc1.27.2
2018-09-11 05:02:45 UTC Keys path /data/becke-ch--parity-node--s0-v1/data//keys/becke-ch--parity-chain--s0-v1
2018-09-11 05:02:45 UTC DB path /data/becke-ch--parity-node--s0-v1/data//chains/becke-ch--parity-chain--s0-v1/db/675318460daeba05
2018-09-11 05:02:45 UTC Path to dapps /data/becke-ch--parity-node--s0-v1/data//dapps
2018-09-11 05:02:45 UTC State DB configuration: fast
2018-09-11 05:02:45 UTC Operating mode: active
2018-09-11 05:02:45 UTC Configured for becke-ch--parity-chain--s0-v1 using AuthorityRound engine
2018-09-11 05:02:45 UTC Signal for switch to contract-based validator set.
2018-09-11 05:02:45 UTC Initial contract validators: [0xdfbad97d7ad160804762c36c255082a705d985e8, 0x1c8592bfb4f2a842fc2efbeb54463638739c2b93, 0x169b1feceb85044b36d6b7a3f2076af6b372843a]
2018-09-11 05:02:50 UTC Public node URL: enode://4326994a843cd64591998ac2c80b437215a18d793f925fe95972470728943610599ca3082c7103295923a2bc482d3003bdd627fcb9edfb761028a92b27f5fd7d@10.0.0.10:30303
2018-09-11 05:03:15 UTC 0/25 peers 8 KiB chain 9 KiB db 0 bytes queue 448 bytes sync RPC: 0 conn, 0 req/s, 0 µs
...
Sometimes one might want to automatically take action when one of the validators behaves badly. The definition of bad behaviour depends on a consensus engine and there are two types of bad behaviour:
benign misbehaviour
malicious misbehaviour
Benign misbehaviour in Aura may be simply not receiving a block from a designated primary, while malicious misbehaviour would be releasing two different blocks for the same step.
This type of contract can listen to misbehaviour reports from the consensus engine and decide what are the consequences for the validators.
The contract structure that needs to be implemented is superset to the safeContract with the following additional methods see differences highlighted below:
pragma solidity ^0.4.22;
contract ValidatorSet {
event InitiateChange(bytes32 indexed _parentHash, address[] _newSet);
function finalizeChange() external{
...
}
/// Reports benign misbehavior of validator of the current validator set
/// (e.g. validator offline).
function reportBenign(address validator, uint256 blockNumber) external{
...
}
/// Reports malicious misbehavior of validator of the current validator set
/// and provides proof of that misbehavor, which varies by engine
/// (e.g. double vote).
function reportMalicious(address validator, uint256 blockNumber, bytes proof) external{
...
}
function getValidators() external view returns (address[]){
...
}
}
Starting from Parity v1.10, Parity Ethereum client has been separated from the Parity User Interface (UI). The user interface previously accessible from the browser in versions <=1.9 is now released as a standalone app.
As already mentioned in chapter 1.1.2.2 and 3.3.4 the WebSocket communication is not secure respective the exposed APIs cannot be disabled as expected and therefore WebSocket should not be used! (Actually the ParityUI can access all APIs via the WebSocket using a signer token but the security issue here is that the first ParityUI does not need to request a signer token but instead gets it “for free”!) Most operations can be performed using the HTTP(S) protocol see [36]. In case you really want to quickly temporarily startup the WebSocket interface perform the following command:
docker run -ti --net docker--s0-0-v1-0 --ip 10.0.0.10 -v /data/becke-ch--parity-node--s0-v1/:/data/becke-ch--parity-node--s0-v1/ parity/parity:v1.11.8 --chain /data/becke-ch--parity-node--s0-v1/configuration/chain-config.json --config /data/becke-ch--parity-node--s0-v1/configuration/node-config.toml --base-path /data/becke-ch--parity-node--s0-v1/data/ --jsonrpc-interface 10.0.0.10 --ws-interface 10.0.0.10
Download latest version of “parity-ui-X.Y.Z.tar.xz” from https://github.com/Parity-JS/shell/releases into directory “/tool/” and extract file.
Launch “/tool/parity-ui-0.3.4/parity-ui --ws-interface=NODE_IP --ws-port=8546” replace “NODE_IP” with the IP address of your node e.g. 10.0.0.10
Optional:
To delete the configurations performed by the client remove the following directories:
$ rm -rf .config/parity-ui
$ rm -rf .local/share/io.parity.ethereum
Instead of running a parity node locally and connecting your dapp to this node via JSON RPC and this node to the rest of the network; you can alternatively connect to a remote infura full-node, which is already connected to the network, and connect your dapp to this remote node instead. But in order to do this some steps are necessary:
Sign-up: https://infura.io/signup: You first need to sign-up to Infura with: first-, last-name and email address and accept the terms of service:
Illustration 6:
Infura: Sign-Up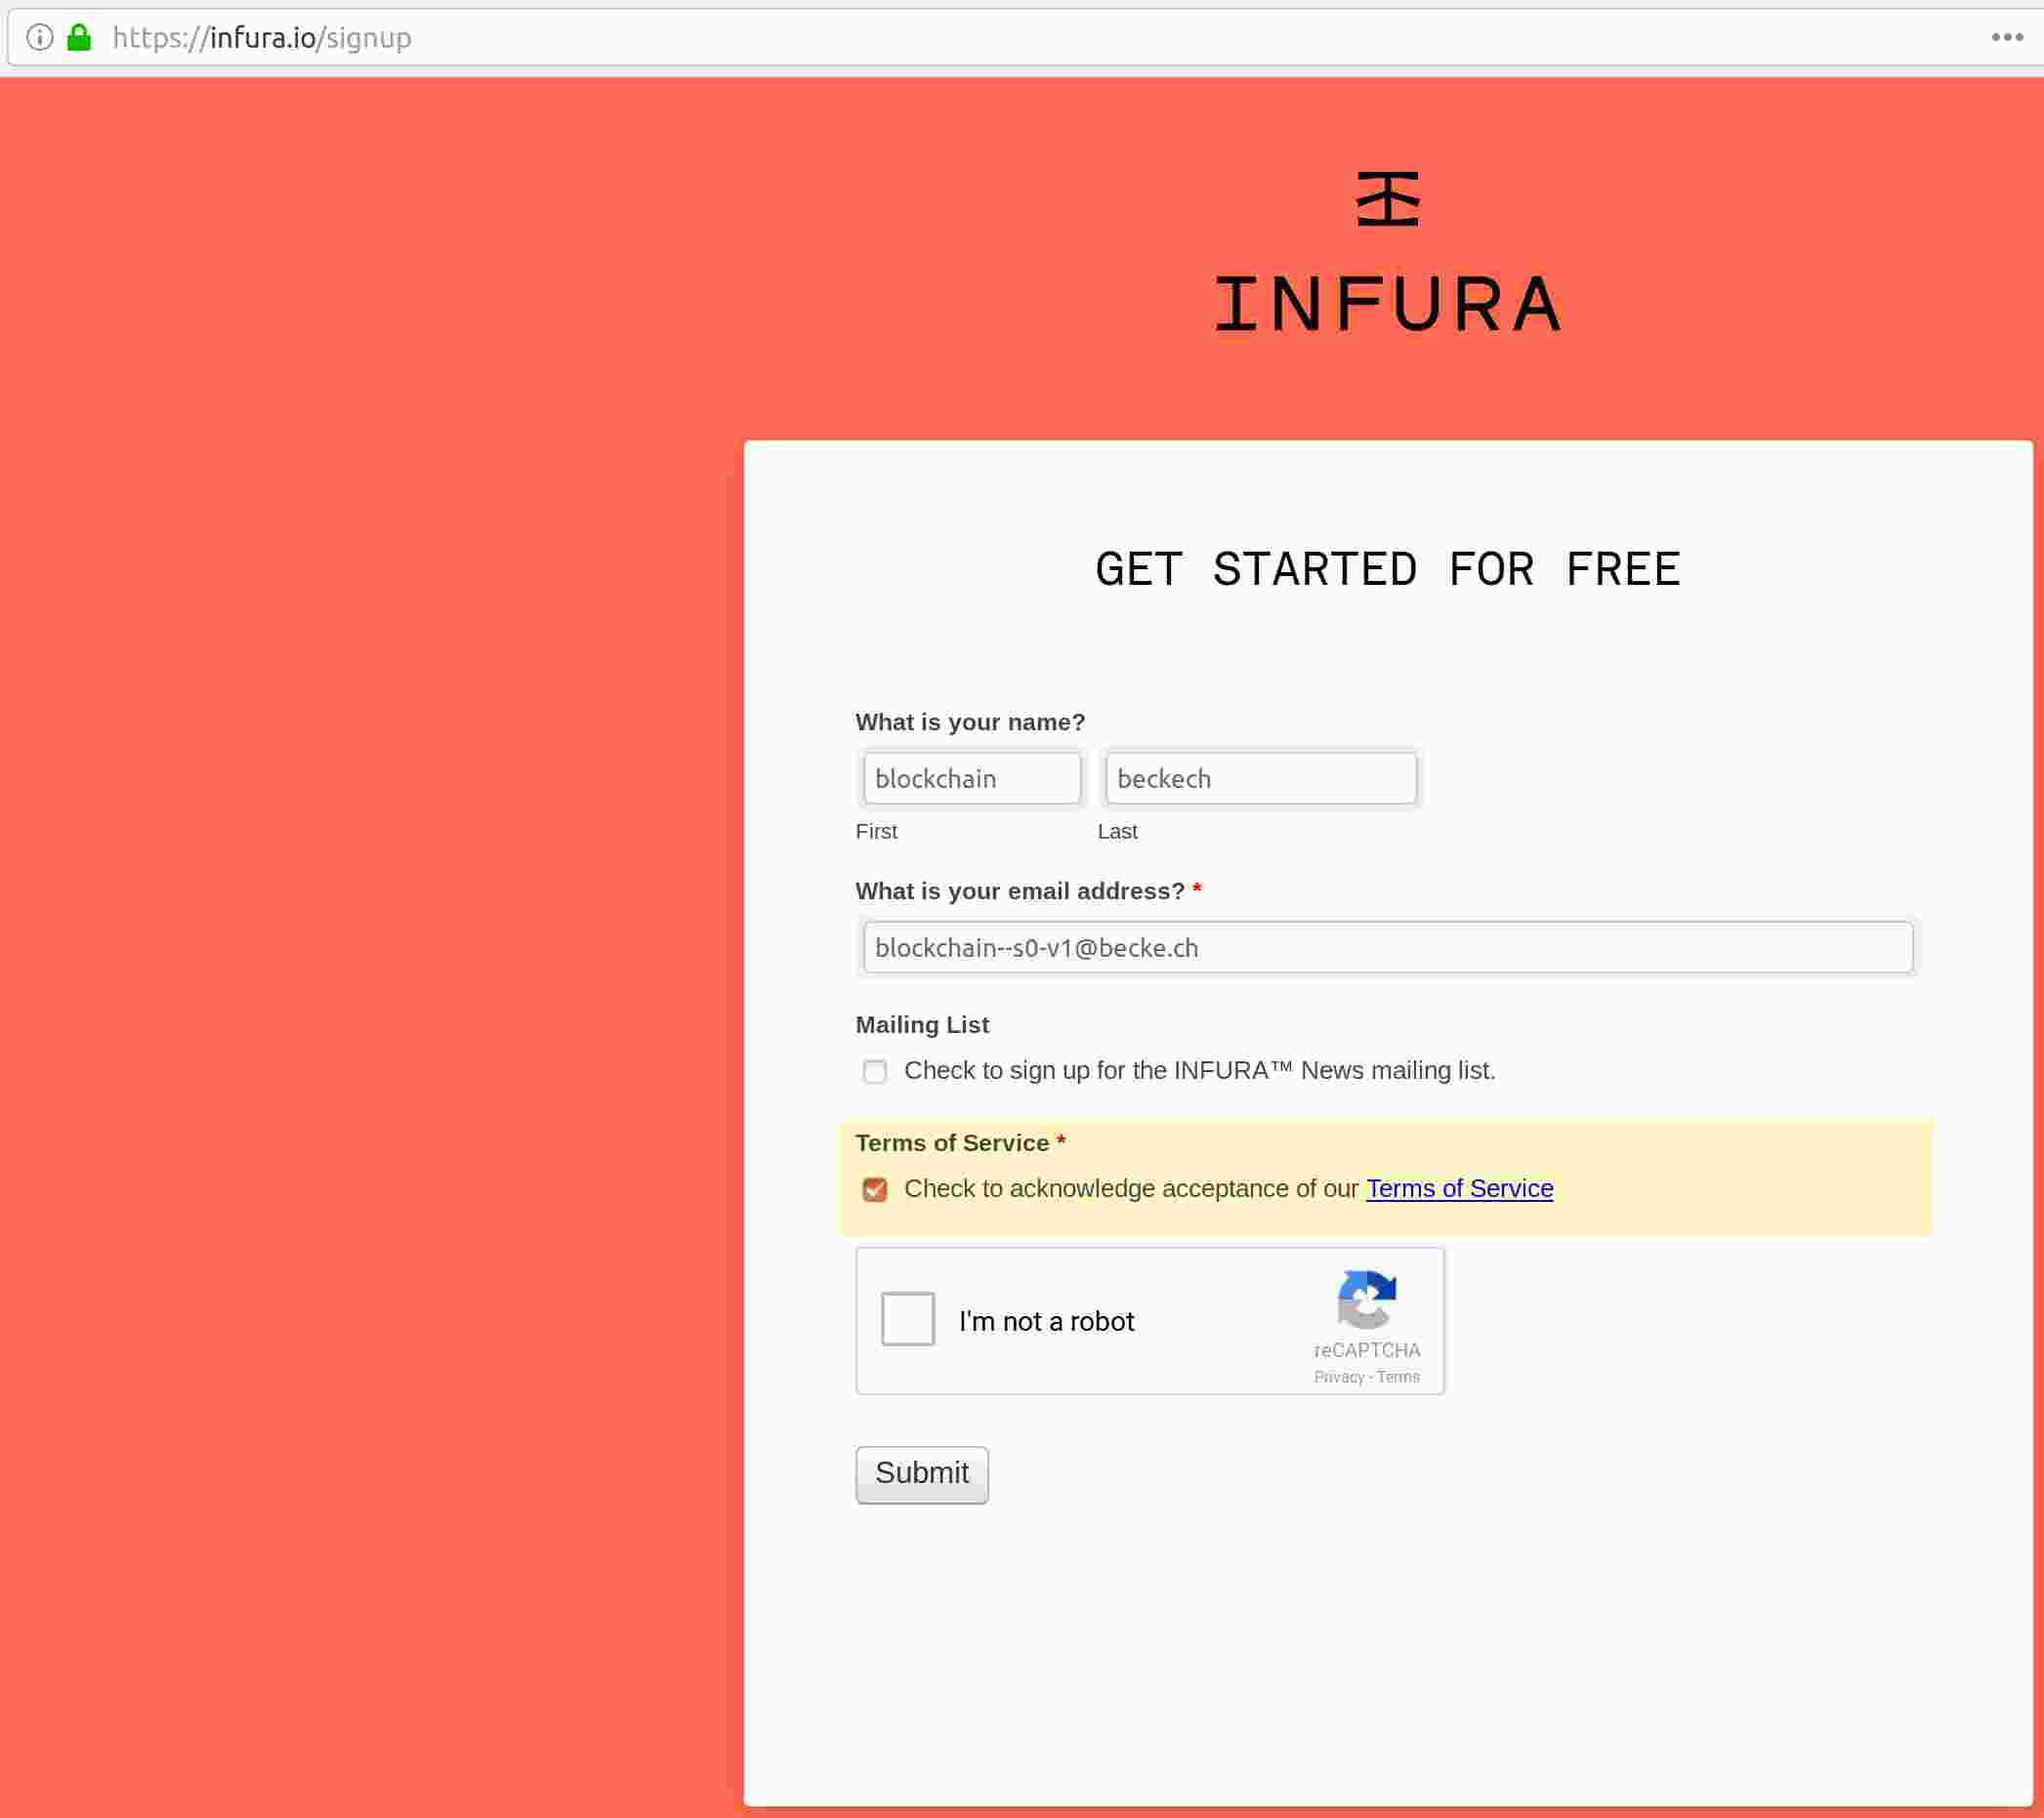
You will then get a list of nodes respective url-end-points in the different networks/chains you can connect to:
Main Ethereum Network
https://mainnet.infura.io/...
Test Ethereum Network (Ropsten)
https://ropsten.infura.io/...
Test Ethereum Network (Rinkeby)
https://rinkeby.infura.io/...
Test Ethereum Network (Kovan)
https://kovan.infura.io/...
IPFS Gateway
https://ipfs.infura.io
IPFS RPC
https://ipfs.infura.io:5001
Most content in this chapter is extracted from different MetaMask articles see [23].
MetaMask allows you to run Ethereum dApps right in your browser without running a full Ethereum node. MetaMask includes a secure identity vault, providing a user interface to manage your identities on different sites and sign blockchain transactions.
MetaMask is more than just an Ether wallet. It's an Ethereum Browser, like Mist! It allows you all the same functions, features and ease of access from regular Ethereum Wallets, and it allows you to interact with Dapps and Smart Contracts, and all without the need to download the blockchain or install any software, you can just install it as a Google Chrome Extension!
Under the hood, MetaMask stores your public & private keys securely (per network), connects to the infura full-nodes see chapter 3.3.8: “https://mainnet.infura.io/metamask”, “https://ropsten.infura.io/metamask”, “https://kovan.infura.io/metamask”, “https://rinkeby.infura.io/metamask” or to local nodes using the JSON RPC protocol and injects a web3 provider which intercepts the web3 via JSON RPC communication and facilitates the interaction with the MetaMask public/private key-store.
Basically what MetaMask plugin does is to inject a web3 provider; see chapter 3.7.2; and intercept web3 api calls to simplify and facilitate communication with nodes (see chapter 3.3) and contracts in the Ethereum network (see chapter 3.1)
Go to: https://metamask.io/
Click on “Get Chrome extension”
Click on “Add to Chrome” and click “Add Extension”
Illustration 7:
MetaMask: Add Chrome Extension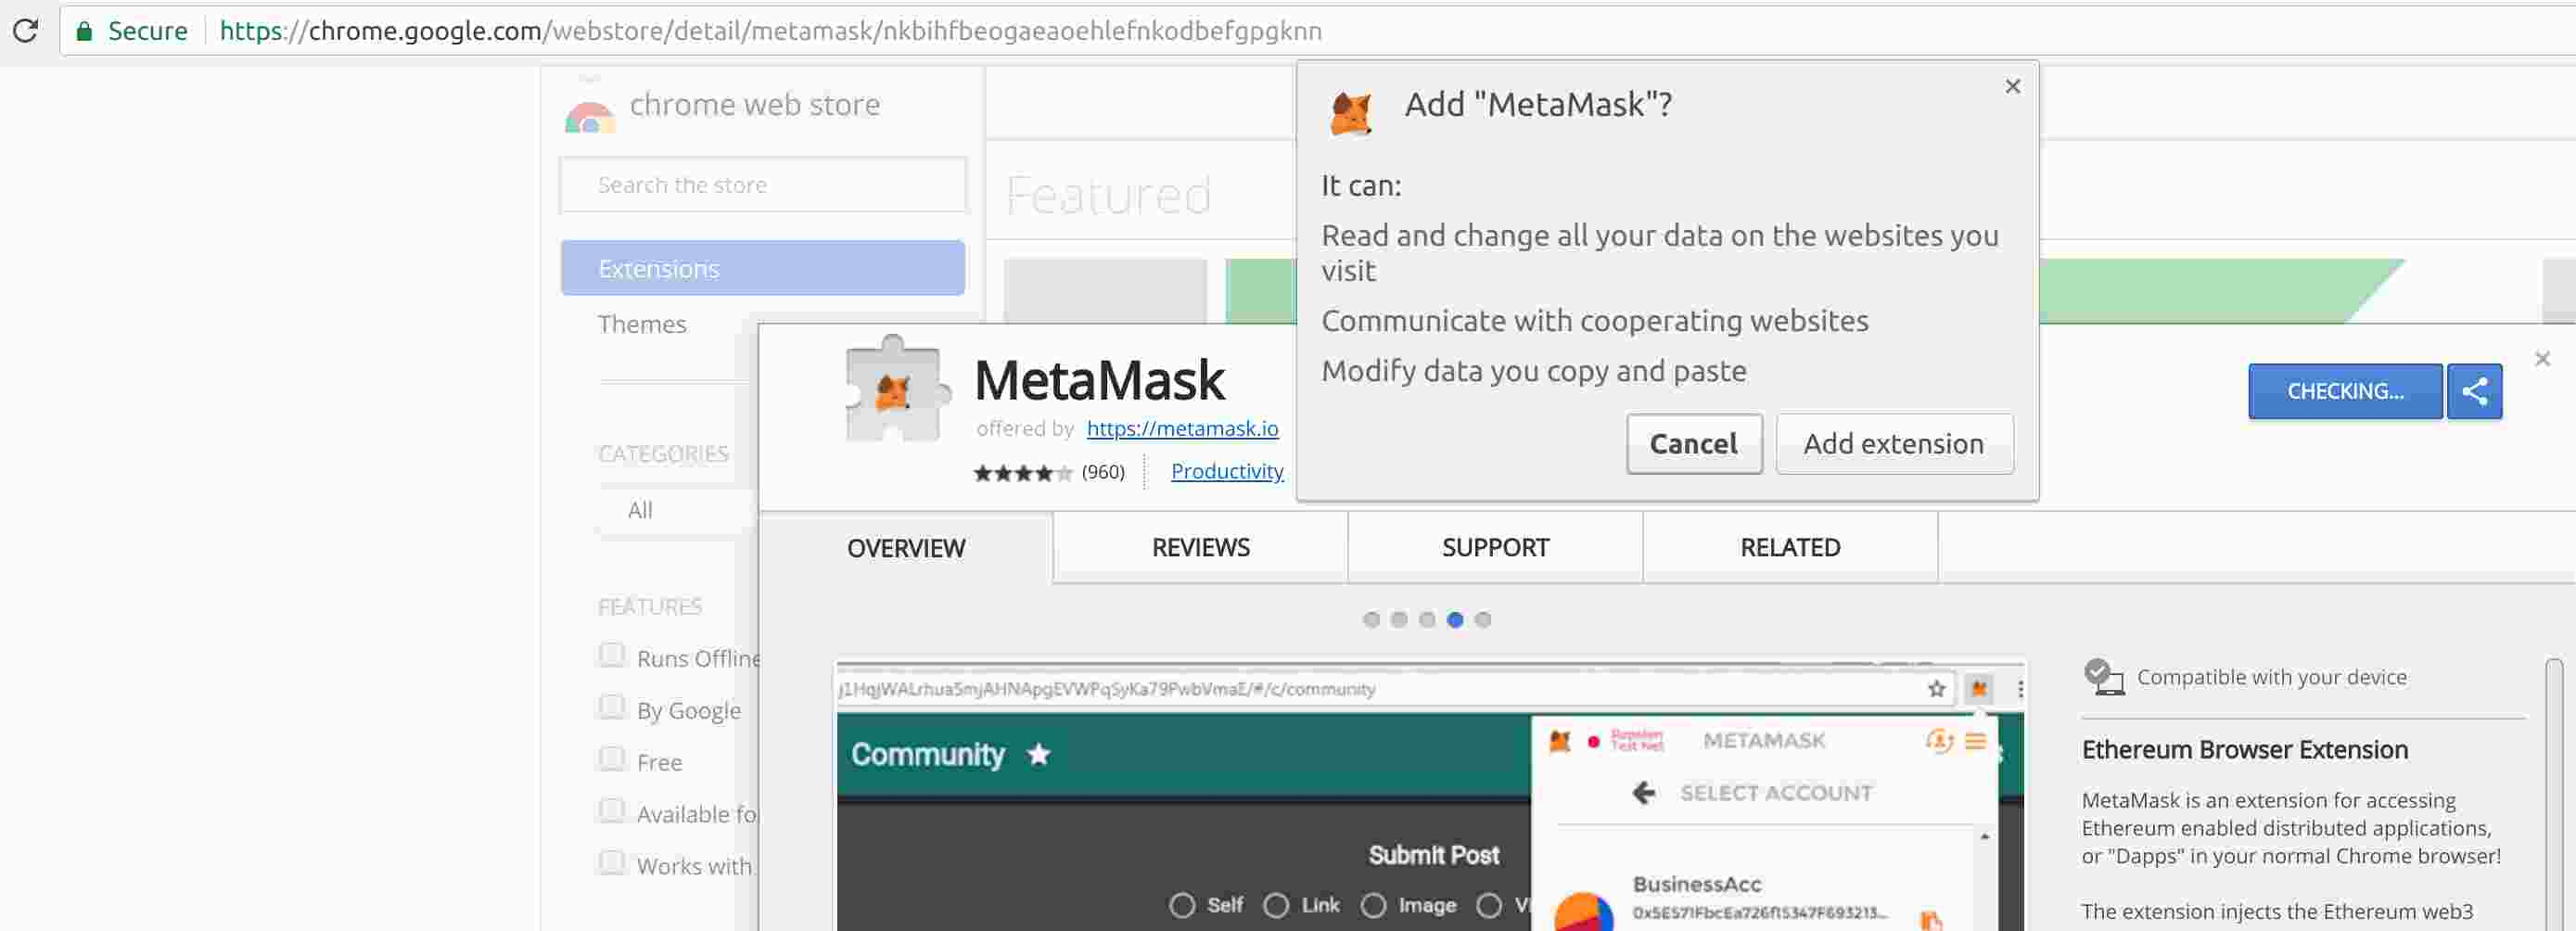
There should now be a MetaMask Icon in your browser.
Illustration 8:
MetaMask: Browser Icon
Once installed, you'll see the MetaMask fox icon next to your address bar. Click the icon and click on “Accept” to accept the Privacy Notice.
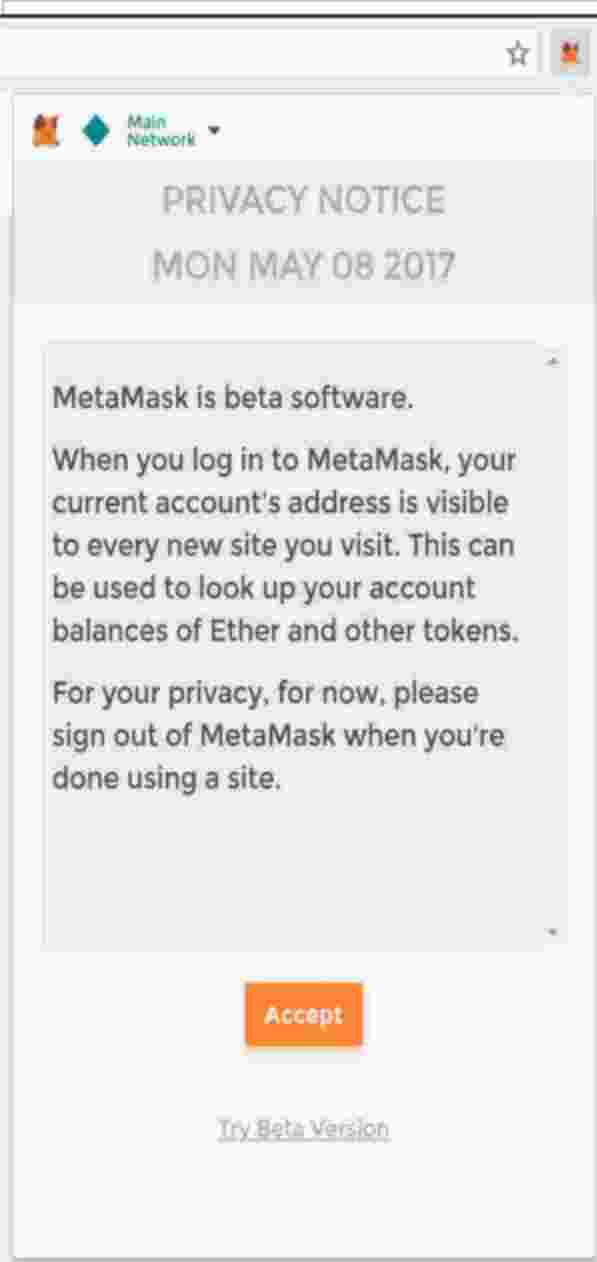 Illustration
9: MetaMask: Privacy Notice
Illustration
9: MetaMask: Privacy Notice
Then you'll see the Terms of Use. Read them, scrolling to the bottom, and then click Accept there too.
At this point you have different options i.e. you can either create a new DEN (password encrypted storage aka password encrypted wallet) this is what I suggest and this is what I follow in the next steps and that you use the mnemonic that is getting generated as well in Ganache see chapter A.2.6 or alternatively you can use the mnemonic that is used in Ganache and import it into MetaMask – this is what I describe in next chapter 3.4.1.1.
Enter the password “Eo...” twice and click on “Create” to create a new DEN:
 Illustration
10: MetaMask: Create DEN (HD Wallet)
Illustration
10: MetaMask: Create DEN (HD Wallet)
Save the 12 words called mnemonic that are displayed somewhere safe and do not loose them because they are required to restore the wallet! And then click on “I’VE COPIED IT SOMEWHERE SAFE” to close the dialog. (PS the screenshot below does not show the mnemonic that I use, this is just a sample!).
The wallet in MetaMask is based on the concept of deterministic wallets and mnemonics see chapter 2.2 to create the public addresses (keys) together with their private keys.
Further interesting related articles see [24].
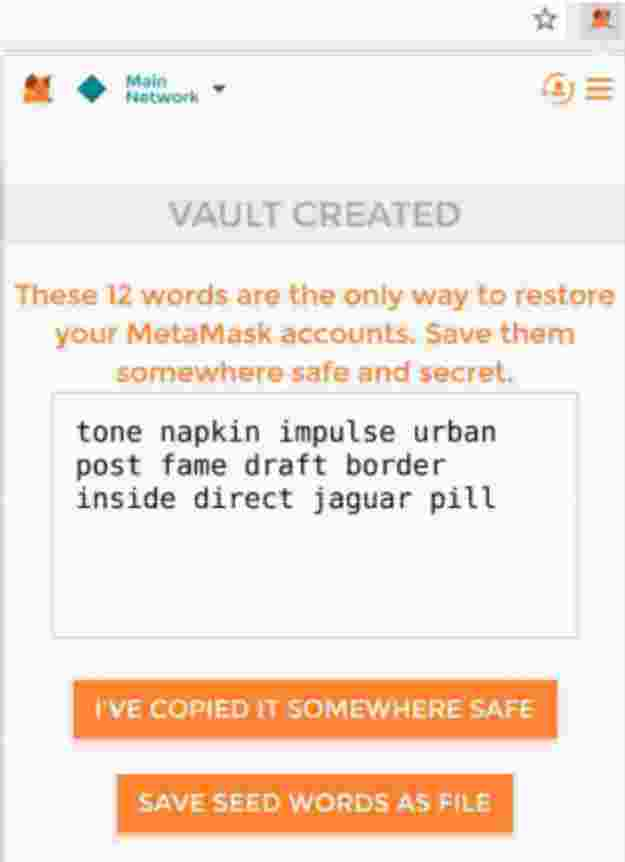 Illustration
11: MetaMask: Mnemonic
Illustration
11: MetaMask: Mnemonic
Instead of creating a new DEN you can, if you plan to develop with truffle, install Ganache see chapter A.2.6 and get the mnemonic from there (and continue after step 6. from previous chapter 3.4.1):
Now you'll see the initial MetaMask screen. Click Import Existing DEN.
In the box marked Wallet Seed, enter the
(default) mnemonic that is displayed in Ganache: “...”.
Enter
a password (“Eo…”) below that and click OK.
Now continue with the steps described in chapter A.2.20
The advantage with this approach is that your public & private keys are automatically in sync with ganache every time you restart ganache.
Summary: You can either import an account by entering the private key of the account or importing a JSON file that you previously exported from another wallet.
See as well [25].
Testnets simulate the Ethereum network and EVM. They allow developers to upload and interact with smart contracts without paying the cost of gas.
Smart contracts must pay gas for their computations on the Ethereum network. If you rent the Ethereum network to run a contract, you have to pay. However, testnets provide free or unlimited gas. That allows developers to test contracts without having to pay real money for their execution.
Because we’ve used MetaMask as our (HD) wallet we will as well use MetaMask to connect to Ropsten and create an account:
Click on the network drop-down and select “Ropsten Test Network”:
 Illustration
12: Testnetwork: Ropsten: Metamask: Create Account
Illustration
12: Testnetwork: Ropsten: Metamask: Create Account
MetaMask creates automatically an account for you (0x26D9E695Bd95fD6cd9e2C08Fc3450FCD6958fC1E):
Illustration 13:
Testnetwork: Ropsten: Metamask: Account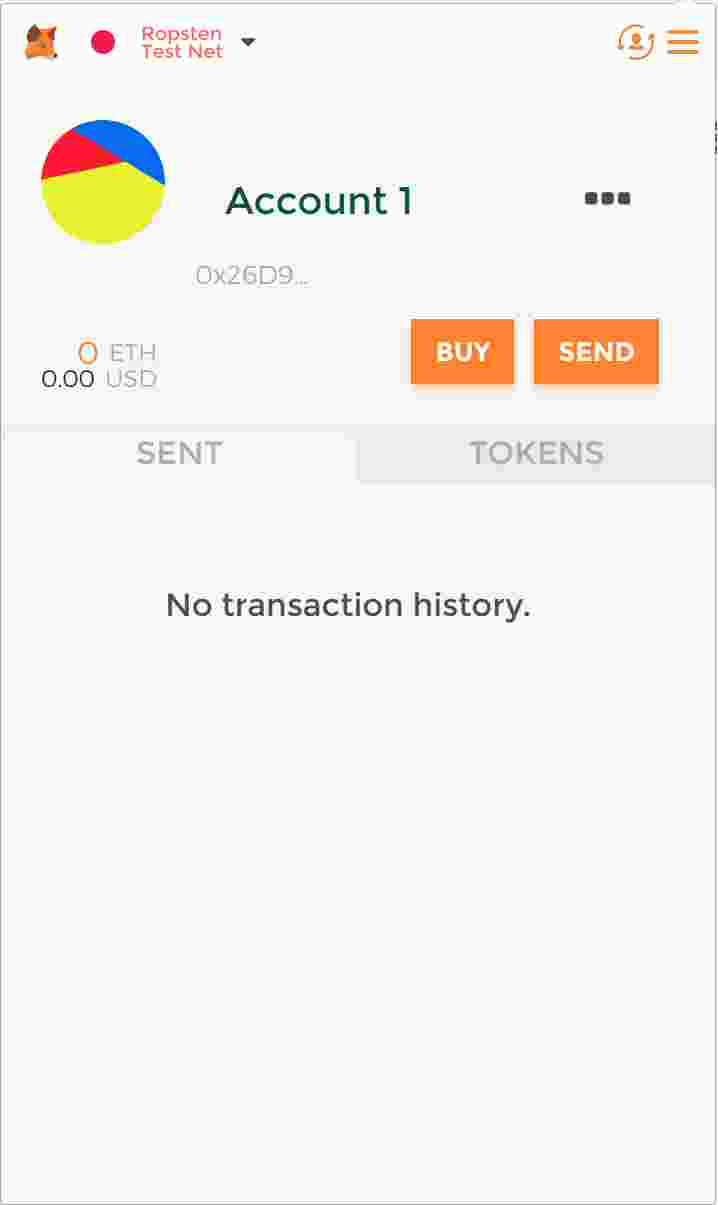
Now we will use a faucet e.g. http://faucet.ropsten.be:3001/ to send us test ethers:
Go to faucet e.g. http://faucet.ropsten.be:3001/
Click on “Send me 1 test ether”:
Alternatively and potentially easier is to use the following methods:
Command line: wget
http://faucet.ropsten.be:3001/donate/<your ethereum address>
wget
http://faucet.ropsten.be:3001/donate/0x26D9E695Bd95fD6cd9e2C08Fc3450FCD6958fC1E
REST API: http://faucet.ropsten.be:3001/donate/<your ethereum address>
Illustration 14:
Testnetwork: Ropsten: Faucet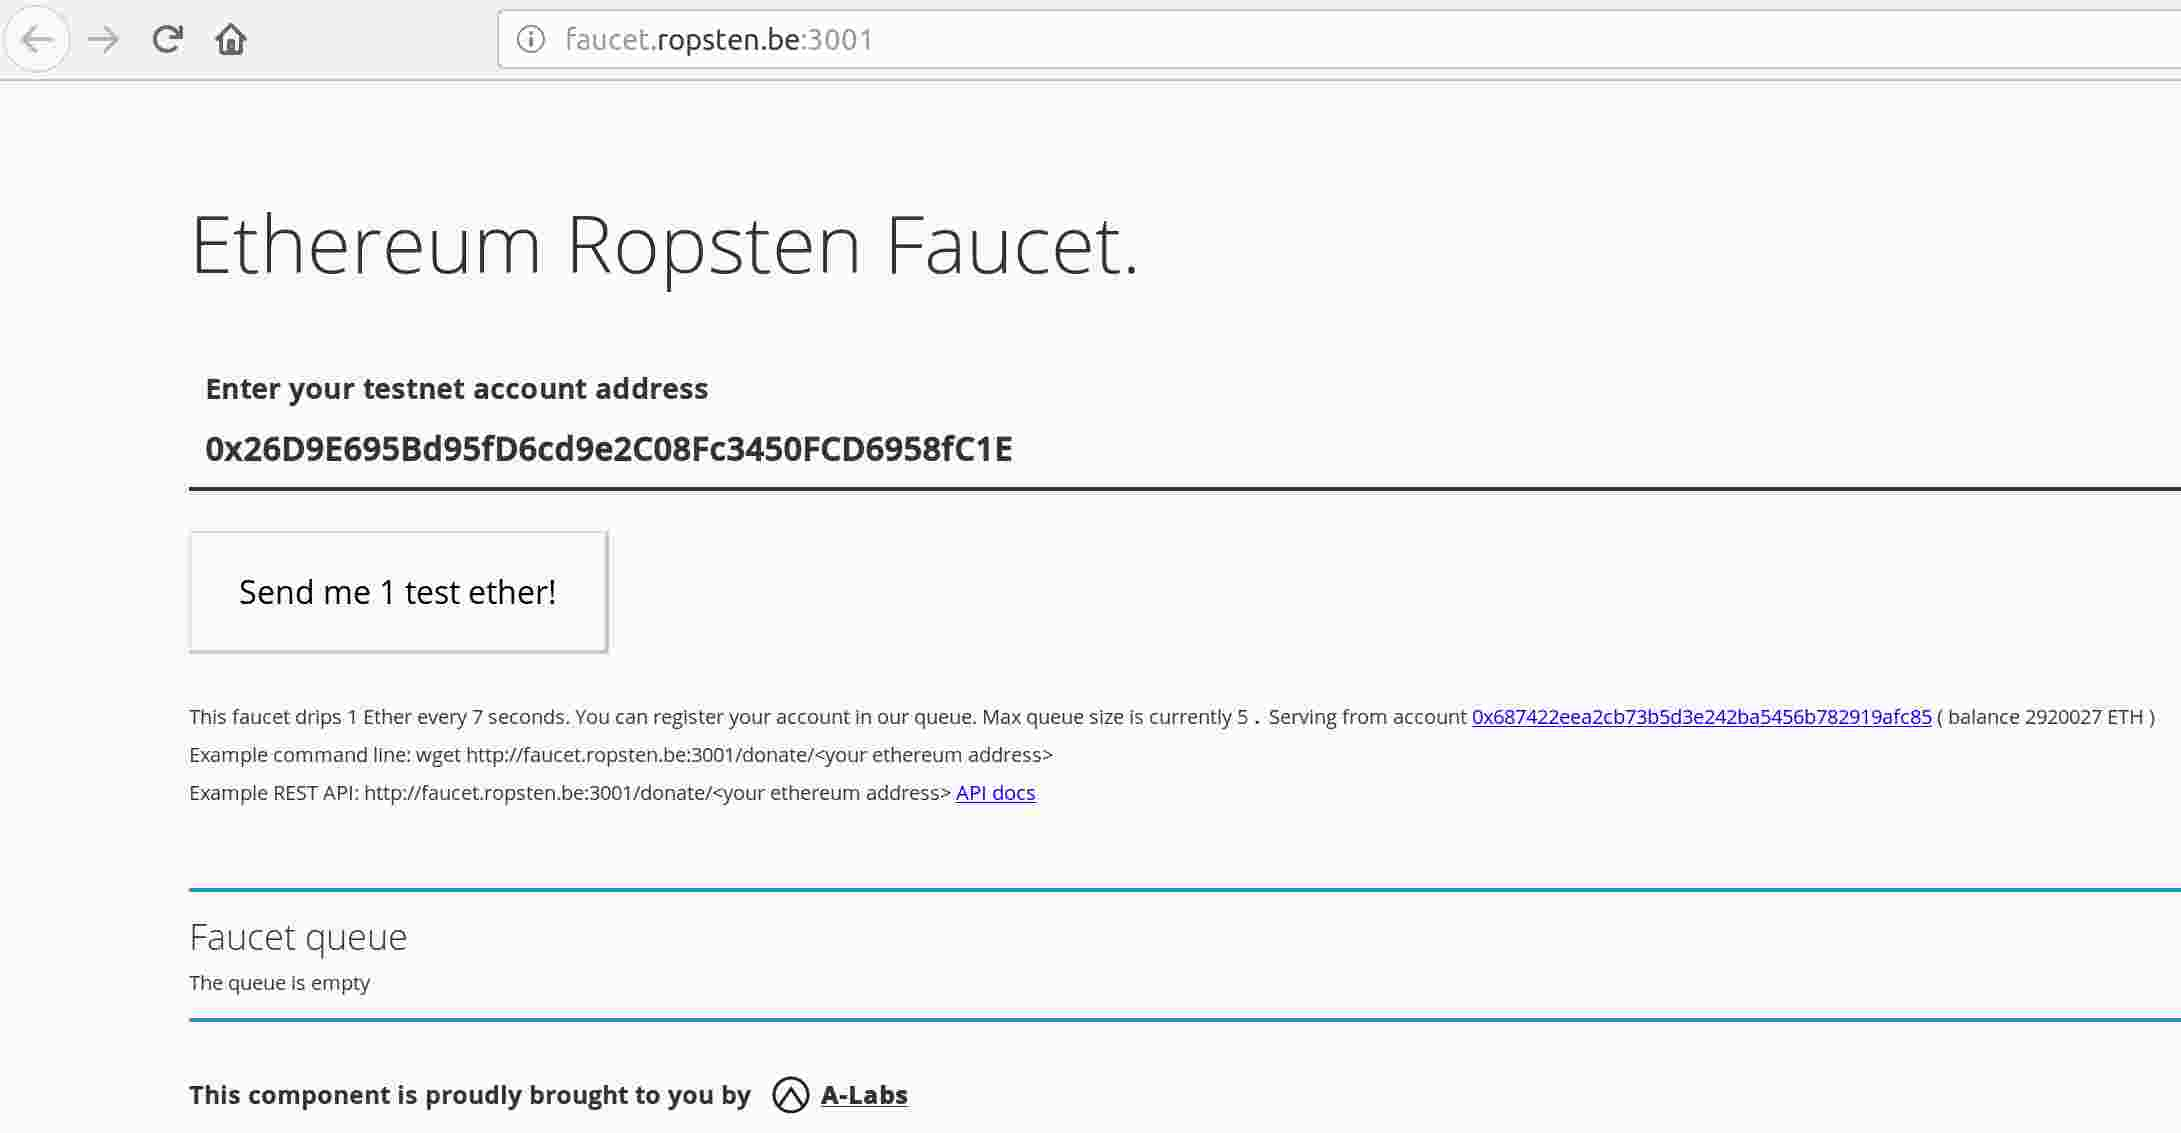
ACTUALLY THIS FAUCET IS NOT REALLY WORKING WELL – INSTEAD I SUGGEST TO TRY: https://faucet.metamask.io/ which requires that you have MetaMask installed see chapter 3.4 and connected to ropsten testnet see chapter 3.5.1.
See chapter 1 A smart-contract is a piece of code that runs in the blockchain network, has a public-key and can therefore participate in transactions and accordingly receive and spend coins. Furthermore a smart contract exposes an interface (ABI: Application Binary Interface) whose methods can be invoked in the context of a transaction.
Solidity is a contract-oriented programming language for writing smart contracts. It is used for implementing smart contracts on various blockchain platforms. It is one of four languages (the others being Serpent, LLL, Viper (experimental) and Mutan (deprecated)) designed to target the Ethereum Virtual Machine (EVM).
Most content in this chapter is extracted from the solidity documentation see [17].
Contract & Address: A contract in the sense of Solidity is a collection of code (its functions) and data (its state) that resides at a specific address on the Ethereum blockchain.
/ws/app/becke-ch--blockchain--s0-v1/becke-ch--blockchain--s0-v1--plain/becke-ch--blockchain--s0-v1--plain-simple-storage--bl--server/SimpleStorage.sol :
contract SimpleStorage {
uint storedData;
function set(uint x) public {
storedData = x;
}
function get() public constant returns (uint) {
return storedData;
}
}
pragma solidity ^0.4.0: tells that the source code is written for Solidity version 0.4.0 or anything newer that does not break functionality (<0.5.0)
uint storedData: declares a state variable (chapter 3.6.1.1.1) called storedData of type uint (chapter 3.6.1.2.1) that has internal (default) visibility (chapter 3.6.1.5.1). State variables are values which are permanently stored in contract storage.
ASCII: All identifiers (contract names, function names and variable names) are restricted to the ASCII character set. It is possible to store UTF-8 encoded data in string variables.
pragma solidity ^0.4.20; // should actually be 0.4.21
contract Coin {
// The keyword "public" makes those variables
// readable from outside.
address public minter;
mapping (address => uint) public balances;
// Events allow light clients to react on
// changes efficiently.
event Sent(address from, address to, uint amount);
// This is the constructor whose code is
// run only when the contract is created.
// function Coin() public – this notation is deprecated
constructor() public {
minter = msg.sender;
}
function mint(address receiver, uint amount) public {
if (msg.sender != minter) return;
balances[receiver] += amount;
}
function send(address receiver, uint amount) public {
if (balances[msg.sender] < amount) return;
balances[msg.sender] -= amount;
balances[receiver] += amount;
emit Sent(msg.sender, receiver, amount);
}
}
address public minter; declares a state variable of type address (chapter address) that is publicly (chapter 3.6.1.5.1) accessible. 160-bit value that does not allow any arithmetic operations. It is suitable for storing addresses of contracts or keypairs belonging to external persons. The keyword public automatically generates a function that allows you to access the current value of the state variable from outside of the contract. Without this keyword, other contracts have no way to access the variable.
mapping (address => uint) public balances; Is a public Hash-Map (chapter 3.6.1.2.3) called balances that takes as key an address and takes as value a uint (unsigned integer).
event Sent(address from, address to, uint amount); declares a so-called “event” which is emitted in the last line of the function send “emit Sent(msg.sender, receiver, amount);”. As soon as it is emitted, the listener will also receive the arguments from, to and amount, which makes it easy to track transactions as follows for example:
Coin.Sent().watch({}, '', function(error, result) {
if (!error) {
console.log("Coin transfer: " + result.args.amount +
" coins were sent from " + result.args.from +
" to " + result.args.to + ".");
console.log("Balances now:\n" +
"Sender: " + Coin.balances.call(result.args.from) +
"Receiver: " + Coin.balances.call(result.args.to));
}
})
Coin is the constructor which is run during creation of the contract and cannot be called afterwards. It permanently stores the address of the person creating the contract: “msg”.
msg (together with tx and block) is a magic global variable (chapter 3.6.1.3) that contains some properties which allow access to the blockchain. msg.sender is always the address where the current (external) function call came from.
pragma solidity ^0.4.22;
contract RandomWinner {
// Functions can be specified as being external, public, internal or private, where the default is public.
// For state variables, external is not possible and the default is internal.
uint pot;
uint public round = 1;
// Arrays can have a compile-time fixed size or they can be dynamic.
// An array of fixed size k and element type T is written as T[k], an array of dynamic size as T[].
address[] participant;
// This function is called for all messages sent to
// this contract (there is no other function).
// Important: The fallback function must have the `payable`
// modifier!
// Otherwise: Sending Ether to this contract will cause an exception!
function() public payable {
bool participating = false;
// Most of the control structures from JavaScript are available in Solidity except for switch and goto
for (uint i = 0; i < participant.length; i++) {
if (participant[i] == msg.sender) {
participating = true;
break;
}
}
// require can be used to easily check conditions on inputs
require(!participating, "This sender/user is already participating in this round!");
// Minimal Stake: 1 Kwei (babbage) == 1e3 wei
require(msg.value > 1000, "The minimal stake needs to be > 1 Kwei (babbage)(1000 wei)!");
participant.push(msg.sender);
pot += msg.value;
// ether == 1e18 wei
if (pot > 5000000000000000000) {
// Long discussion how to calculate random number:
// https://ethereum.stackexchange.com/questions/191/how-can-i-securely-generate-a-random-number-in-my-smart-contract
// For simplicity taking the following approach:
// block.timestamp (uint): current block timestamp as seconds since unix epoch
address winner = participant[block.timestamp % participant.length];
// .send(uint): Send is the low-level counterpart of transfer.
// transfer send Ether (in units of wei) to an address.
require(winner.send(pot), "Could not transfer the pot to the winner!");
// delete assigns the initial value for the type
delete (participant);
pot = 0;
round++;
}
}
}
address[] participant, participant.push(msg.sender): Chapter Arrays: Arrays can have a compile-time fixed size or they can be dynamic. An array of fixed size k and element type T is written as T[k], an array of dynamic size as T[].
function() public payable: fallback function: Chapter Fallback Function: This function is called for all messages sent to this contract if the functiona name/identifier is empty (respective does not match a function). Important: The fallback function must have the `payable` modifier! Otherwise: Sending Ether to this contract will cause an exception!
for (uint i = 0; i < participant.length; i++), if (participant[i] == msg.sender): control structures: Chapter 3.6.1.4: Most of the control structures from JavaScript are available in Solidity except for switch and goto.
require(!participating, "This sender/user is already participating in this round!"): Chapter 3.6.1.3.3: require can be used to easily check conditions on inputs.
winner.send(pot): Chapter address: .send(uint) is the low-level counterpart of transfer. transfer send Ether (in units of wei) to an address.
delete (participant): Chapter 3.6.1.3.3: delete assigns the initial value for the type. It can also be used on arrays, where it assigns a dynamic array of length zero.
Contracts in Solidity are similar to classes in object-oriented languages. Each contract can contain declarations of State Variables, Functions, Function Modifiers, Events, Struct Types and Enum Types. Furthermore, contracts can inherit from other contracts.
Samples see code snippets in the introduction chapter above 3.6.1.
State variables are values which are permanently stored in contract storage. Comparable to member variables in Java.
See the Types chapter 3.6.1.2 for valid state variable types and Visibility and Getters chapter 3.6.1.5.1for possible choices for visibility.
Solidity is a statically typed language, which means that the type of each variable (state and local) needs to be specified.
Samples see code snippets in the introduction chapter above 3.6.1.
Variables of these types will always be passed by value, i.e. they are always copied when they are used as function arguments or in assignments.
bool: The possible values are constants true and false. The operators are the same including behavior as in Java or JavaScript: “!”, “&&”, “||”, “==”, “!=”
int (same as int256) / uint (same as int256): Signed and unsigned integers of various sizes in steps of 8: int8, int16, …, int256 and uint8, uint16, …, uint256. The operators are the same including behavior as in Java or JavaScript:
Comparisons: “<=”, “<”, “==”, “!=”, “>=”, “>”
Bit operators: “&”, “|”, “^”, “~” (bitwise negation)
Arithmetic operators: “+”, “-”, “*”, “/”, “%”, “**” (exponentiation), “<<” (left shift), “>>” (right shift)
Fixed Point Numbers: Fixed point numbers are not fully supported by Solidity yet. They can be declared, but cannot be assigned to or from.
bytes1, bytes2, bytes3, …, bytes32. byte is an alias for bytes1.
Operators:
Comparisons: “<=”, “<”, “==”, “!=”, “>=”, “>”
Bit operators: “&”, “|”, “^”, “~”, “<<”, “>>”
Index access: If x is of type bytesI, then x[k] for 0 <= k < I returns the k th byte (read-only).
Members: .length yields the fixed length of the byte array.
address:
Holds a 20 byte value (size of an Ethereum address).
Address types also have members and serve as a base for all
contracts. Operators: “<=”,
“<”, “==”,
“!=”, “>=”,
“>”.
Members
of Addresses:
.balance and .transfer(uint): It is possible to query the balance of an address using the property balance and to send Ether (in units of wei) to an address using the transfer function.
x.transfer(uint): If x is a contract address, its code (Fallback Function, if present) will be executed together with the transfer call. If that execution runs out of gas or fails in any way, the Ether transfer will be reverted and the current contract will stop with an exception.
.send(uint): Send is the low-level counterpart of transfer. If the execution fails, the current contract will not stop with an exception, but send will return false. In order to make safe Ether transfers, always check the return value of send or use transfer.
.call, .callcode, .delegatecall and .staticcall
Enums: enum ActionChoices { GoLeft, GoRight, GoStraight, SitStill }: Enums are one way to create a user-defined type in Solidity. They are explicitly convertible to and from all integer types but implicit conversion is not allowed. Values starting from 0.
Complex types, i.e. types which do not always fit into 256 bits have to be handled more carefully than the value-types. Since copying them can be quite expensive, we have to think about whether we want them to be stored in memory (which is not persisting), storage (where the state variables are held) or calldata (non-modifiable, non-persistent area where function arguments are stored, and behaves mostly like memory) parameters (not return) of external functions are always calldata. state variables are always storage.
Arrays: address[]
participant: Arrays can have a compile-time fixed size or
they can be dynamic. For storage arrays, the element type can be
arbitrary. For memory arrays, it cannot be a mapping and has to be an
ABI type if it is an argument of a publicly-visible function.
An
array of fixed size k and element type T is written as T[k],
an array of dynamic size as T[].
As an example, an array of 5 dynamic arrays of uint
is uint[][5] (note that the
notation is reversed when compared to some other
languages).
Variables of type bytes
and string
are special arrays. A bytes
is similar to byte[],
but it is packed tightly in calldata.
string
is equal to bytes
but does not allow length
or index
access (for now). So bytes should
always be preferred over byte[] because it is cheaper.
Creating
arrays with variable length in memory can be done using the new
keyword. As opposed to storage arrays, it is
not possible to resize memory arrays!
It
is not yet possible to use arrays of arrays in external
functions.
Members:
.length: Arrays have a length member to hold their number of elements. Dynamic arrays can be resized in storage (not in memory) by changing the .length member.
.push(...): Dynamic storage arrays and bytes (not string) have a member function called push that can be used to append an element at the end of the array.
.pop(...): Dynamic storage arrays and bytes (not string) have a member function called pop that can be used to remove an element from the end of the array.
Structs: Solidity provides a way to define new types in the form of structs.
Mappings: mapping
(address => uint) public balances: Mapping types are
declared as mapping(_KeyType =>
_ValueType). Here _KeyType
can be almost any type except for a mapping, a dynamically sized
array, a contract, a function, an enum and a struct. _ValueType
can actually be any type, including mappings.
Mappings can be
seen as hash tables which are virtually initialized such that every
possible key exists and is mapped to a value whose
byte-representation is all zeros: a type’s default value.
delete a: assigns the initial value for the type to a. It can also be used on arrays, where it assigns a dynamic array of length zero or a static array of the same length with all elements reset. For structs, it assigns a struct with all members reset.
See introduction in chapter 3.
There are special variables and functions which always exist in the global namespace and are mainly used to provide information about the blockchain or are general-use utility functions.
msg.sender (address): sender of the message (current call)
tx.origin (address): sender of the transaction (full call chain)
block.timestamp (uint): current block timestamp as seconds since unix epoch
The values of all members of msg, including msg.sender and msg.value can change for every external function call. This includes calls to library functions.
Most of the control structures from JavaScript are available in Solidity except for switch and goto. So there is: if, else, while, do, for, break, continue, return, ? :, with the usual semantics known from Java or JavaScript.
Internal Function Calls: Functions of the current contract can be called directly (“internally”) without the keyword this.
External Function Calls: The expressions
this.g(8); and c.g(2);
(where c is a contract instance) are also valid function calls, but
this time, the function will be called “externally”, via a
message call and not directly via jumps.
Functions of other
contracts have to be called externally. For an
external call, all function arguments have to be copied to
memory.
When calling functions of other contracts, the
amount of Wei sent with the call and the gas can be specified with
special options .value() and
.gas(), respectively
Contracts in Solidity are similar to classes in object-oriented languages. They contain persistent data in state variables and functions that can modify these variables. Calling a function on a different contract (instance) will perform an EVM function call and thus switch the context such that state variables are inaccessible.
Visibility: Functions can be specified as being external, public, internal or private, where the default is public. For state variables, external is not possible and the default is internal.
external: External functions are part of the contract interface, which means they can be called from other contracts and via transactions. An external function f cannot be called internally (i.e. f() does not work, but this.f() works). External functions are sometimes more efficient when they receive large arrays of data.
public: Public functions are part of the contract interface and can be either called internally or via messages. For public state variables, an automatic getter function is generated.
internal: Those functions and state variables can only be accessed internally (i.e. from within the current contract or contracts deriving from it), without using this.
private: Private functions and state variables are only visible for the contract they are defined in and not in derived contracts.
A contract can have exactly one unnamed function. This function cannot have arguments, cannot return anything and has to have external visibility. It is executed on a call to the contract if none of the other functions match the given function identifier (or if no data was supplied at all).
Furthermore, this function is executed whenever the contract receives plain Ether (without data). Additionally, in order to receive Ether, the fallback function must be marked payable. If no such function exists, the contract cannot receive Ether through regular transactions.
There exist different compilers for Solidity:
Remix: Recommended for small contracts and for quickly learning Solidity:
Online: https://remix.ethereum.org/
Offline: https://github.com/ethereum/browser-solidity/tree/gh-pages
npm / Node.js: solcjs: Portable but has less features than the other compilers (besides Remix): https://github.com/ethereum/solc-js
Docker: “docker run ethereum/solc:stable solc --version” the docker image only contains the compiler executable, some additional work to be done to link in the source and output directories.
Binary packages: https://github.com/ethereum/solidity/releases
The easiest option is to work with the binary package: “solc-static-linux” (in the following steps I download and work on the current release “0.4.23” that you should replace accordingly to the latest stable version you’re using):
Create a new directory: “mkdir -p /tool/solidity/0.4.23”
Download “https://github.com/ethereum/solidity/releases/download/v0.4.23/solc-static-linux” into this directory.
Make the file executable: “chmod +x /tool/solidity/0.4.23/solc-static-linux”
Create a symbolic link (that you can update to a newer version as needed): “ln -s /tool/solidity/0.4.23/solc-static-linux /tool/solidity/solc“
Run the compiler as follows: “/tool/solidity/solc”
For example:
/tool/solidity/solc SimpleStorage.sol --combined-json abi,asm,ast,bin,bin-runtime,clone-bin,devdoc,interface,opcodes,srcmap,srcmap-runtime,userdoc > SimpleStorage.json
(the sample is copied from https://ethereum.stackexchange.com/questions/7255/deploy-contract-from-nodejs-using-web3 , personally I find the compiler options too complex but this seems to be the format that is required for deployment besides when running “solc” this seems one of the suggested compiler options:)
--combined-json abi,asm,ast,bin,bin-runtime,clone-bin,compact-format,devdoc,hashes,interface,metadata,opcodes,srcmap,srcmap-runtime,userdoc
Output a single json document containing the specified
information.
And this compiled contract is what we will use during deployment see chapter 3.8.
web3.js is a collection of libraries which allow you to interact with a local or remote ethereum node, using a HTTP or IPC connection.
To make your app work on Ethereum, you can use the web3 object provided by the web3.js library. Under the hood it communicates to a node through RPC calls. web3.js works with any Ethereum node, which exposes an RPC layer.
There exist currently two separate versions of web3.js:
0: Currently 0.20.5: This is the official version that is in sync with the current JSON RPC specification see chapter 1.1.2.2 but offers much less functionality than version 1. For more information on this API see [28].
1 beta: Currently 1.0.0-beta.34: This version is still beta but offers a lot of functionality but has a lot of disclaimers for certain functions: “… package has NOT been audited and might potentially be unsafe …”, “… Many of these functions send sensitive information, like password …”. For more information on this API see [29].
In the following we will use version 1 even it is still beta but it offers the functionality we need; mainly because the package “web3.eth.accounts” which we plan to use does not require an unlocked account. Unlocked accounts are required in version 0 to sign transactions. With unlocked accounts cybercriminal groups have stolen a total 38,642 Ether, worth more than $20,500,000 just only in Q2 2018 – see as well chapter 1.1.2.2! And even more when connecting to a remote node that is not under your control, I would not unlock an account over there and I would be careful to send secrets over the wire and to an organization I don’t control respective know! (Alternatively as described in chapter 1.1.2.2 you should host the node locally and the exposed APIs, ports and firewalls need to be well secured and configured properly!).
Most content in this chapter is extracted from the web3js documentation [29].
PRECONDITION: Install “build-essential”: sudo apt-get install build-essential
Otherwise “npm install web3” will fail!
Download: npm install web3
package.json
...
"dependencies": { "web3": "^1.0.0-beta.34" }
...
JavaScript:
...
var Web3 = require('web3');
...
Download (and extract) zip-file for offline usage: https://github.com/ethereum/web3.js/tree/1.0 (or v0 https://github.com/ethereum/web3.js )
OR download single file for offline usage or reference it directly from:
There is currently a “web3.js” file missing in the distribution of the version 1 beta (or v0 https://raw.githubusercontent.com/ethereum/web3.js/develop/dist/web3.js)
https://raw.githubusercontent.com/ethereum/web3.js/1.0/dist/web3.min.js (or v0 https://raw.githubusercontent.com/ethereum/web3.js/develop/dist/web3.min.js)
There
is currently no
“web3.min.js”
file for
the
version 1 beta available on the CDN (or
https://cdn.jsdelivr.net/gh/ethereum/web3.js/dist/web3.min.js
)
In case
you reference the web3 JS file within your HTML then:
Reference the minified (compact) web3.min.js variant!
Reference it from the content delivery network (CDN) which will resolve based on your IP to the closest content delivery server in your region!
HTML & JavaScript:
<head>
<meta charset="utf-8"/>
<script language="JavaScript" src="PATH_WHERE_WEB3JS_FILE_IS_LOCATED/web3.js" type="text/javascript"></script>
...
<script language="JavaScript">
<!--
Here comes first the web3 instantiation/setting of a provider, followed by your code;
...
//-->
</script>
</head>
<body>
...
</body>
</html>
In addition for simplification, to access the file system install: “fs”: npm install fs
Which results in the following package.json file: /ws/app/becke-ch--blockchain--s0-v1/becke-ch--blockchain--s0-v1--plain/becke-ch--blockchain--s0-v1--plain-simple-storage--bl--server/package.json:
{
"name": "becke-ch--blockchain--s0-v1--plain-simple-storage--pl--lib",
"version": "1.0.0",
"description": "simple storage contract",
"main": "index.js",
"scripts": {
"test": "echo \"Error: no test specified\" && exit 1",
"deploy": "node index.js"
},
"keywords": [
"smart",
"contract"
],
"author": "becke.ch <npm--s0-v1@becke.ch> (http://becke.ch)",
"license": "MIT",
"dependencies": {
"fs": "0.0.1-security",
"web3": "^1.0.0-beta.34"
}
}
There exist certain browsers e.g. “Mist” respective plugins like for example MetaMask see chapter 3.4 that inject a web3 provider and intercept web3 api calls to simplify and facilitate communication with nodes and contracts in the Ethereum network. Therefore during instantiation we first check whether such a provider has already been injected.
HTTP Basic Authentication: The web3 HTTP
Provider supports as well HTTP Basic Authentication:
web3
= new Web3(new Web3.providers.HttpProvider("http://localhost:8545",
0, BasicAuthUsername,
BasicAuthPassword));
JavaScript:
...
//There exist certain browser e.g. “Mist” respective plugins like for example MetaMask that inject a web3 provider and intercept web3 api calls to simplify and facilitate communication with nodes and contracts in the Ethereum network.
//Therefore during instantiation we first check whether such a provider has already been injected.
if (typeof web3 !== 'undefined') {
web3 = new Web3(web3.currentProvider);
} else {
// set the provider you want from Web3.providers
web3 = new Web3(new Web3.providers.HttpProvider("http://localhost:8545"));
// Note: HTTP Basic Authentication: HttpProvider takes 4 arguments (host, timeout, user, password)
// web3 = new Web3(new Web3.providers.HttpProvider("http://localhost:8545", 0, BasicAuthUsername, BasicAuthPassword));
}
…
In the context of signing transactions there exist a lot of proprietary providers see chapter 3.7.4.4.
The account creation is nothing else than just the creation of a public- and private-key pair and can be done offline i.e. does not need any connection to the block chain! There exist different wallets e.g. MetaMask see chapter 3.4 that can generate keys and store them securely but the same can as well be achieved in just a few lines of code and this is what we show in the next sub-chapters.
<html lang="en">
<head>
<meta charset="utf-8"/>
<!-- Download web3.js or web3.min.js for offline usage -->
<!-- script language="JavaScript" src="lib/web3/web3.min.js" type="text/javascript"></script-->
<!-- OR reference web3.min.js remotely -->
<script src="https://raw.githubusercontent.com/ethereum/web3.js/1.0/dist/web3.min.js"></script>
<script language="JavaScript">
<!--
var web3 = new Web3();
console.log("Create new account");
var newAccount = web3.eth.accounts.create();
console.log("New account: address: " + newAccount.address);
console.log("New account: privateKey: " + newAccount.privateKey);
//-->
</script>
</head>
<body></body>
</html>
To show a little bit more in depth the underlying mathematics I’ve pasted here the corresponding Java code:
java.security.KeyPairGenerator keyGen = java.security.KeyPairGenerator.getInstance("ECDSA","BC");
java.security.SecureRandom random = java.security.SecureRandom.getInstance("SHA1PRNG");
java.security.ECGenParameterSpec ecSpec = new java.security.ECGenParameterSpec("prime192v1");
// Initialize the key generator and generate a KeyPair
keyGen.initialize(ecSpec, random); //256 bytes provides an acceptable security level
java.security.KeyPair keyPair = keyGen.generateKeyPair();
// Set the public and private keys from the keyPair
privateKey = keyPair.getPrivate();
publicKey = keyPair.getPublic();
More about creating Your First Blockchain with Java – see [37].
There exist different approaches to sign transactions but most (all) of them are not satisfying:
web3.eth:
The web3-eth package allows you to interact with an Ethereum
blockchain and Ethereum smart
contracts.
web3.eth.signTransaction(transactionObject,
address [, callback]): Signs a transaction. This
account needs to be unlocked.
If
you have RPC on (ie, run geth/parity
with --rpc)
AND unlock the account
AND have no firewall at all AND have ----rpcaddr
set to "0.0.0.0"
then anyone can easily scan your
node, retrieve all accounts: web3.eth.getAccounts([callback])
(Returns a list of accounts the node controls) and transfer money
from all unlocked accounts using
web3.eth.signTransaction(transactionObject,
address [, callback]) and
web3.eth.sendSignedTransaction(signedTransactionData
[, callback]). In
this way cybercriminal groups
have managed in Q2 2018
to steal a total 38,642 Ether,
worth more than $20,500,000.
web3.eth.accounts:
The web3.eth.accounts contains functions to generate Ethereum
accounts and sign transactions and data.
This
package is safest for transaction handling because security
sensitive actions are performed
on client side i.e. no passwords are sent over the wire and no
unlocking of accounts is required! For
most functionality like: account creation and transaction handling
only the following non sensitive JSON-RPC methods are used:
“net_version”,
“eth_getTransactionCount”
and “eth_sendRawTransaction”
because handling of private keys and signing of transaction happens
all locally, no secrets are sent over the wire!
This
package has NOT been audited and might potentially be unsafe. Take
precautions to clear memory properly, store the private keys safely,
and test transaction receiving and sending functionality properly
before using in production
web3.eth.personal:
The web3-eth-personal package allows you to interact with the
Ethereum node’s accounts.
Many of
these functions send sensitive information, like password. Never
call these functions over a unsecured Websocket or HTTP provider, as
your password will be sent in plain text!
HD Wallet Provider: proprietary, MetaMask: tool specific, etc.
Based on these facts the safest decision is to use the package “web3.eth.accounts” for all transaction handling!
In the following chapters I will focus on web3.eth.accounts.signTransaction and web3.eth.accounts.wallet methods but will mention as well the other approaches of unlocking the account and last but least mention the proprietary and tool-specific approaches for completeness.
web3.eth.accounts.wallet: Contains an in memory wallet with multiple accounts. These accounts can be used when using web3.eth.sendTransaction() - in the background the transaction will then get signed web3.eth.accounts.signTransaction and and sent using web3.eth.sendSignedTransaction. So basically the wallet does same as web3.eth.accounts.signTransaction see chapter 3.7.4.2 but is simpler because a lot of handling is done behind the scenes!
web3.eth.accounts.wallet.add(account): Adds an account using a private key or account object to the wallet.
Parameters:
account - String|Object: A private key or account object created with web3.eth.accounts.create()
Returns:
Object: The added account.
For an example of how this method is being used see next chapter 3.7.4.1.1.
Before you can run this JavaScript you need to deploy the contract “SimpleStorage.sol” see chapter 3.8.1.1.
File: /ws/app/becke-ch--blockchain--s0-v1/becke-ch--blockchain--s0-v1--plain/becke-ch--blockchain--s0-v1--plain-simple-storage--bl--server/SimpleStorageTestHttpProviderWallet.js
// node SimpleStorageTestHttpProviderWallet.js
var fs = require("fs");
var Web3 = require('web3'); // https://www.npmjs.com/package/web3
var web3 = new Web3();
// Create a web3 connection to a local running geth node over JSON-RPC running at
// http://localhost:8545
//web3.setProvider(new web3.providers.HttpProvider('http://localhost:8545'));
// for Ganache at
// http://localhost:7545
//web3.setProvider(new web3.providers.HttpProvider('http://localhost:7545'));
// for Ropsten Testnet via Infura node (first you need to sign up to infura: https://infura.io/signup) at
// https://ropsten.infura.io/PUT-YOUR-INFURA-TOKEN-ID-HERE
web3.setProvider(new web3.providers.HttpProvider('https://ropsten.infura.io/PUT-YOUR-INFURA-TOKEN-ID-HERE'));
// The web3.eth.accounts contains functions to generate Ethereum accounts and sign transactions and data.
// https://web3js.readthedocs.io/en/1.0/web3-eth-accounts.html
var account = '0xPUT-YOUR-ACCOUNT-KEY-HERE';
// web3.eth.accounts.wallet: Contains an in memory wallet with multiple accounts.
// These accounts can be used when using web3.eth.sendTransaction():
// web3.eth.accounts.wallet.add(account): Adds an account using a private key or account object to the wallet.
var privateKey = '0xPUT-YOUR-ACCOUNT-PRIVATE-KEY-HERE';
web3.eth.accounts.wallet.add(privateKey);
// Read the compiled contract code which was compiled with:
// solc SimpleStorage.sol --combined-json abi,asm,ast,bin,bin-runtime,clone-bin,devdoc,interface,opcodes,srcmap,srcmap-runtime,userdoc > SimpleStorage.json
var source = fs.readFileSync("SimpleStorage.json");
var contractKey = 'SimpleStorage.sol:SimpleStorage';
var contractAddressFile = "SimpleStorageAddress.txt";
var contracts = JSON.parse(source)["contracts"];
// ABI description as JSON structure
var abi = JSON.parse(contracts[contractKey].abi);
// Read the contract address that was written previously when deploying the contract
var contractAddress = '' + fs.readFileSync(contractAddressFile);
console.log("Contract address: " + contractAddress);
// Create Contract class
// see: https://web3js.readthedocs.io/en/1.0/web3-eth-contract.html
var contract = new web3.eth.Contract(abi, contractAddress);
try {
console.log("Invoke contract methods");
// Will call a “constant” method and execute its smart contract method in the EVM without sending any transaction.
// Note calling can not alter the smart contract state.
// using the callback
// see: https://web3js.readthedocs.io/en/1.0/web3-eth-contract.html#id12
contract.methods.get().call({from: account}, function (error, result) {
console.log("get called: " + result);
// Will send a transaction to the smart contract and execute its method. Note this can alter the smart contract state.
contract.methods.set(Number(result) + 50).send({
from: account, // default from address
gas: 150000,
gasPrice: '20000000000' // default gas price in wei, 20 gwei in this case
}).on('transactionHash', function (hash) {
console.log("set called: transaction hash: " + hash);
}).on('receipt', function (receipt) {
console.log("set called and receipe is available: receipt: " + receipt);
contract.methods.get().call({from: account}, function (error, result) {
console.log("get called: " + result);
});
});
});
} catch (e) {
console.log(e);
return;
}
web3.eth.accounts.signTransaction(tx, privateKey [, callback]): Signs an Ethereum transaction with a given private key:
Parameters:
tx - Object: The transaction object as follows:
nonce - String: (optional) The nonce to use when signing this transaction. Default will use web3.eth.getTransactionCount().
chainId - String: (optional) The chain id to use when signing this transaction. Default will use web3.eth.net.getId().
to - String: (optional) The recevier of the transaction, can be empty when deploying a contract.
data - String: (optional) The call data of the transaction, can be empty for simple value transfers.
value - String: (optional) The value of the transaction in wei.
gasPrice - String: (optional) The gas price set by this transaction, if empty, it will use web3.eth.gasPrice()
gas - String: The gas provided by the transaction.
privateKey - String: The private key to sign with.
callback - Function: (optional) Optional callback, returns an error object as first parameter and the result as second.
Returns: Promise returning Object: The signed data RLP encoded transaction, or if returnSignature is true the signature values as follows:
messageHash - String: The hash of the given message.
r - String: First 32 bytes of the signature
s - String: Next 32 bytes of the signature
v - String: Recovery value + 27
rawTransaction - String: The RLP encoded transaction, ready to be send using web3.eth.sendSignedTransaction.
Before you can run this JavaScript you need to deploy the contract “SimpleStorage.sol” see chapter 3.8.1.1.
File: /ws/app/becke-ch--blockchain--s0-v1/becke-ch--blockchain--s0-v1--plain/becke-ch--blockchain--s0-v1--plain-simple-storage--bl--server/SimpleStorageTestHttpProviderSignTransaction.js
The JavaScript “SimpleStorageTestHttpProviderSignTransaction .js” is almost identical to “SimpleStorageTestHttpProviderWallet.js” see previous chapter 3.7.4.1 and therefore we list here only the differences:
Replace:
var
privateKey = '0xPUT-YOUR-ACCOUNT-PRIVATE-KEY-HERE';
web3.eth.accounts.wallet.add(privateKey);
With:
var privateKey = '0xPUT-YOUR-ACCOUNT-PRIVATE-KEY-HERE';
Replace:
contract.methods.set(Number(result)
+ 50).send({
from: account, //
default from address
gas: 150000,
gasPrice:
'20000000000' // default gas price in wei, 20 gwei in this case
}).on('transactionHash',
function (hash) {
console.log("set
called: transaction hash: " + hash);
}).on('receipt',
function (receipt) {
console.log("set
called and receipe is available: receipt: " + receipt);
contract.methods.get().call({from:
account}, function (error, result) {
console.log("get
called: " + result);
});
});
With:
// Encodes the ABI for this method.
// This can be used to send a transaction, call a method, or pass it into another smart contracts method as arguments.
var encodedABI = contract.methods.set(Number(result) + 50).encodeABI();
// Signs an Ethereum transaction with a given private key.
web3.eth.accounts.signTransaction({
from: account,
gas: 150000,
gasPrice: '20000000000',
data: encodedABI,
to: contractAddress
},
privateKey,
function (error, signedTx) {
if (error) {
console.log("Error: " + error);
} else {
web3.eth.sendSignedTransaction(signedTx.rawTransaction)
.on('transactionHash', function (hash) {
console.log("set called: transaction hash: " + hash);
}).on('receipt', function (receipt) {
console.log("set called and receipe is available: receipt: " + receipt);
contract.methods.get().call({from: account}, function (error, result) {
console.log("get called: " + result);
});
});
}
});
});
Attention: According to the API documentation: Many of these functions send sensitive information, like password. Never call these functions over a unsecured Websocket or HTTP provider, as your password will be sent in plain text!
TODO: getAccounts, unlockAccount, lockAccount, sendTransaction THESE METHODS HAVE NOT YET BEEN IMPLEMENTED!
There exist dozens of proprietary respective tool specific approaches to sign transactions out of which I will highlight some in this chapter.
truffle-hdwallet-provider: HD Wallet-enabled Web3 provider. Use it to sign transactions for addresses derived from a 12-word mnemonic.
Installation: npm install truffle-hdwallet-provider
Link: https://github.com/trufflesuite/truffle-hdwallet-provider
Further information how to use the truffle-hdwallet-provider with an Infura node see http://truffleframework.com/tutorials/using-infura-custom-provider (further information on Infura see chapter 3.3.8).
You can use this provider wherever a Web3 provider is needed, not just in Truffle. This provider basically replaces the HTTP-Provider see chapter 3.7.2 and 3.7.2.1.
var HDWalletProvider = require("truffle-hdwallet-provider");
var mnemonic = "opinion destroy betray ..."; // 12 word mnemonic
var provider = new HDWalletProvider(mnemonic, "http://localhost:8545");
// Or, alternatively pass in a zero-based address index.
var provider = new HDWalletProvider(mnemonic, "http://localhost:8545", 5);
MetaMask: See chapter 3.4: MetaMask is more than just an Ether wallet. It's an Ethereum Browser, like Mist and follows the same idea as the truffle-hdwallet-provider i.e. it replaces the HTTP-Provider respective whenever MetaMask is installed as a plugin it injects a web3-provider and this is why the following check needs to be done to test whether a web3 provider has been injected:
...
if (typeof web3 !== 'undefined') {
web3 = new Web3(web3.currentProvider);
} else {
web3 = new Web3(new Web3.providers.HttpProvider("http://localhost:8545"));
}
...
Further proprietary and tool specific approaches to sign transactions:
ethereumjs-tx: A simple module for creating, manipulating and signing ethereum transactions.
Installation: npm install ethereumjs-tx
Remix: In addition to compilation see chapter 3.6.2 remix offers as well the possibility to deploy the compiled contract. For more details see: https://medium.com/swlh/deploy-smart-contracts-on-ropsten-testnet-through-ethereum-remix-233cd1494b4b
truffle-wallet-provider:
Wallet-enabled Web3 provider. Use it to sign transactions for web3
wallet. See https://github.com/crypedit/truffle-wallet-provider
SEEMS TO BE OUTDATED!
As this API is designed to work with a RPC node, all its functions use synchronous HTTP requests by default.
If you want to make an asynchronous request, you can pass an optional callback as the last parameter to most functions. All callbacks are using an error first callback style:
For example: web3.eth.getBlock: web3.eth.getBlock(blockHashOrBlockNumber [, returnTransactionObjects] [, callback])
...
web3.eth.getBlock(48, function(error, result){
if(!error)
console.log(JSON.stringify(result));
else
console.error(error);
})
…
You will always get a BigNumber object for number values as JavaScript is not able to handle big numbers correctly.
web3.js depends on the BigNumber Library and adds it automatically.
var balance = new BigNumber('131242344353464564564574574567456');
// or var balance = web3.eth.getBalance(someAddress);
balance.plus(21).toString(10); // toString(10) converts it to a number string
// "131242344353464564564574574567477"
It is recommended to always keep your balance in wei and only transform it to other units when presenting to the user!
The new API 1.0 offers the following packages and functions (for a mapping to parity json-rpc calls see 3.3.3):
The old API can be found here: https://github.com/ethereum/wiki/wiki/JavaScript-API
Once the smart contract is written in solidity see chapter 3.6.1 and has been compiled see chapter 3.6.2 the next step is to deploy this contract. Analogue as we have different possibilities to compile a contract we have as well different possibilities to deploy a contract. In the following we will focus on the programmatic deployment using web3.
Most content in this chapter is extracted from the web3js documentation see [29] and deployment articles see [30].
The deployment of a contract is straightforward in web3 but there exist different possibilities to sign this transaction which were already discussed in chapter 3.7.4. In the following chapters these different possibilities will be listed.
The deployment JavaScript: /ws/app/becke-ch--blockchain--s0-v1/becke-ch--blockchain--s0-v1--plain/becke-ch--blockchain--s0-v1--plain-simple-storage--bl--server/deploy-http-provider-wallet.js is based on the concepts in chapter 3.7.4.1 and most of the code is copied from chapter 3.7.4.1.1:
// node deploy-http-provider-wallet.js
var fs = require("fs");
var Web3 = require('web3'); // https://www.npmjs.com/package/web3
var web3 = new Web3();
// Create a web3 connection to a local running geth node over JSON-RPC running at
// http://localhost:8545
//web3.setProvider(new web3.providers.HttpProvider('http://localhost:8545'));
// for Ganache at
// http://localhost:7545
//web3.setProvider(new web3.providers.HttpProvider('http://localhost:7545'));
// for Ropsten Testnet via Infura node (first you need to sign up to infura: https://infura.io/signup) at
// https://ropsten.infura.io/PUT-YOUR-INFURA-TOKEN-ID-HERE
web3.setProvider(new web3.providers.HttpProvider('https://ropsten.infura.io/PUT-YOUR-INFURA-TOKEN-ID-HERE'));
// The web3.eth.accounts contains functions to generate Ethereum accounts and sign transactions and data.
// https://web3js.readthedocs.io/en/1.0/web3-eth-accounts.html
var account = '0xPUT-YOUR-ACCOUNT-KEY-HERE';
// web3.eth.accounts.wallet: Contains an in memory wallet with multiple accounts.
// These accounts can be used when using web3.eth.sendTransaction():
// web3.eth.accounts.wallet.add(account): Adds an account using a private key or account object to the wallet.
var privateKey = '0xPUT-YOUR-ACCOUNT-PRIVATE-KEY-HERE';
web3.eth.accounts.wallet.add(privateKey);
// Read the compiled contract code which was compiled with:
// solc SimpleStorage.sol --combined-json abi,asm,ast,bin,bin-runtime,clone-bin,devdoc,interface,opcodes,srcmap,srcmap-runtime,userdoc > SimpleStorage.json
var source = fs.readFileSync("SimpleStorage.json");
var contractKey = 'SimpleStorage.sol:SimpleStorage';
var contractAddressFile = "SimpleStorageAddress.txt";
var contracts = JSON.parse(source)["contracts"];
// ABI description as JSON structure
var abi = JSON.parse(contracts[contractKey].abi);
// Smart contract EVM bytecode as hex
var code = '0x' + contracts[contractKey].bin;
// Create Contract class
// see: https://web3js.readthedocs.io/en/1.0/web3-eth-contract.html
var contract = new web3.eth.Contract(abi);
try {
console.log("Deploying the contract");
// see: https://web3js.readthedocs.io/en/1.0/web3-eth-contract.html#deploy
contract.deploy({data: code})
.send({
from: account,
gas: 150000,
gasPrice: '300000000000'
})
.then(function (newContractInstance) {
console.log("Contract address: " + newContractInstance.options.address); // instance with the new contract address
fs.writeFileSync(contractAddressFile, newContractInstance.options.address);
});
} catch (e) {
console.log(e);
return;
}
The deployment using signedTransaction is based on the concepts in chapter 3.7.4.2 and most of the code can be copied from chapter 3.7.4.2.1 combined with the deployment commands used in previous chapter 3.8.1.1 and therefore not further elaborated here.
Install: https://code.visualstudio.com/download
Download: .zip or .tar.gz (code-stable-code_1.20.1-1518535978_amd64.tar.gz)
Move to c:\tool or /tool
Extract here - creates directory: /tool/VSCode-linux-x64
Run:
cd /tool/VSCode-linux-x64
./code
Click: Ctrl+Shift+X
Or click on the left side on the Extension Icon and enter “Solidity” in the search dialog:
Illustration 15:
Solidity Extension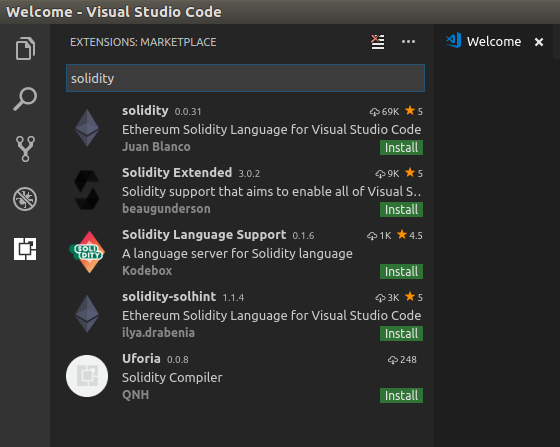
Select the first entry and click on “install”.
Open the folder: /ws/app/becke-ch--blockchain--s0-v1/truffle/pet-shop-tutorial
in VSCode.
Formatting: Ctrl+Shift+I: Unfortunately there is no formatter available with the extension :-(.
For me a formatter is absolutely essential therefore I just gave up using VSCode and instead use IntelliJ (see below)!
Select: “File → New Project → From Existing Sources …”
Select the directory to import: /ws/app/becke-ch--blockchain--s0-v1/truffle/pet-shop-tutorial
Illustration 16:
IntelliJ: New project from existing sources
Click “OK”
Select “Create project from existing sources” and click “Next”
 Illustration
17: IntelliJ: Create project from existing resource
Illustration
17: IntelliJ: Create project from existing resource
Keep default settings – and click “Next”:
Project name: pet-shop-tutorial
Project location: /ws/app/becke-ch--blockchain--s0-v1/truffle/pet-shop-tutorial
Project format: .idea (directory based)
Illustration 18:
IntelliJ: Project setting
Select directories that should be added to the project root – leave default setting: “/ws/app/becke-ch--blockchain--s0-v1/truffle/pet-shop-tutorial” - and click “Next”:
Illustration 19:
IntelliJ: Import Source Files
You get the information that no frameworks were detected and can click on “Finish”:
Illustration 20:
IntelliJ: No Frameworks Detected
Download and install the “Intellij-Solidity” Plug-In from the repository:
Illustration 21:
Intellij-Solidity Plug-In
Formatting: Ctrl+Alt+I: After installing the Plug-In everything works fine!
Follow the documentation in [31]:
Chapter: 3. NPM (Package Manager for Java-Script)
Chapter: 3.1. Node.js
Optional: The following is recommended but optional reading:
Chapter: 3.3. Setup
Chapter: 3.4. npm install
Table 1: References
|
Terms / Abbreviations / Acronyms |
Description |
|---|---|
|
|
|
Table 2: Glossary
A. Appendix - Truffle (Ethereum Development Framework)
Truffle is the most popular development framework for Ethereum with a mission to make your life a whole lot easier.
Built-in smart contract compilation, linking, deployment and binary management
Truffle takes care of managing your contract artifacts so you don’t have to. Includes support for custom deployments, library linking and complex Ethereum applications.
Automated contract testing for rapid development
Bring your dapp development to the 21st century. Write automated tests for your contracts in both JavaScript and Solidity, and get your contracts developed quickly.
Scriptable deployment & migrations framework
Write simple, manageable deployment scripts that acknowledge your application will change over time. Foster your dapp’s evolution and ensure you can maintain your contracts far into the future.
Network management for deploying to both public & private networks
Don’t manage network artifacts ever again. Let Truffle do it for you, and put your focus on dapp development where it belongs.
Access to hundreds of external packages
Pull in hundreds of smart contract dependencies from NPM and EthPM to have your code stand on the shoulders of giants.
Interactive console for direct contract communication
Use Truffle to save time and talk to your contracts via an interactive console, which includes access to all your built contracts and all available Truffle commands.
External script runner that executes scripts within a Truffle environment
Use Truffle to bootstrap your contracts and run a network-aware script, without hassle.
Built for speed
Whether you’re compiling contracts or running unit tests, Truffle includes clever optimizations to ensure you only compile what you have to and your tests run as quickly as possible. When used along with Ganache, you can develop your dapps quickly and get real code deployed, fast.
Development: IntelliJ: For development I suggest to use IntelliJ (see chapter 4.2) and not VSCode (see chapter 4.1) because the Solidity Plugin in IntelliJ is more developed than the Solidity-Extension in VSCode. For example code formatting works in IntelliJ but not VSCode!!
NPM: Node Package Manager: In the documentation: “”
A.2. Development (Ethereum Pet Shop)
http://truffleframework.com/tutorials/pet-shop
npm install -g truffle
Highlighted in red are the truffle specific parts which need to be considered when deploying the contract and web gui because this results in a vendor lock-in.
raoul-becke--s0-v1@hp-elitebook-840-g1--s0-v3:~$ truffle version
Truffle v4.1.7 (core: 4.1.7)
Solidity v0.4.23 (solc-js)
A.2.2. Create directory structure:
raoul-becke--s0-v1@hp-elitebook-840-g1--s0-v3:~$ mkdir /ws/app/becke-ch--blockchain--s0-v1
raoul-becke--s0-v1@hp-elitebook-840-g1--s0-v3:~$ mkdir /ws/app/becke-ch--blockchain--s0-v1/truffle
raoul-becke--s0-v1@hp-elitebook-840-g1--s0-v3:~$ mkdir /ws/app/becke-ch--blockchain--s0-v1/truffle/pet-shop-tutorial
raoul-becke--s0-v1@hp-elitebook-840-g1--s0-v3:~$ cd /ws/app/becke-ch--blockchain--s0-v1/truffle/pet-shop-tutorial
raoul-becke--s0-v1@hp-elitebook-840-g1--s0-v3:/ws/app/becke-ch--blockchain--s0-v1/truffle/pet-shop-tutorial
The following sub-directories are created after downloading and installing the pet-shop see next chapter:
contracts/: Contains the Solidity source files for our smart contracts. There is an important contract in here called Migrations.sol, which we'll talk about later.
migrations/: Truffle uses a migration system to handle smart contract deployments. A migration is an additional special smart contract that keeps track of changes.
test/: Contains both JavaScript and Solidity tests for our smart contracts
truffle.js: Truffle configuration file
raoul-becke--s0-v1@hp-elitebook-840-g1--s0-v3:/ws/app/becke-ch--blockchain--s0-v1/truffle/pet-shop-tutorial$ truffle unbox pet-shop
Downloading...
Unpacking...
Setting up...
Unbox successful. Sweet!
Commands:
Compile: truffle compile
Migrate: truffle migrate
Test contracts: truffle test
Run dev server: npm run dev
Alternatively to create a directory from scratch
run the command: truffle
init
raoul-becke--s0-v1@hp-elitebook-840-g1--s0-v3:~$ cd /ws/app/becke-ch--blockchain--s0-v1/truffle/pet-shop-tutorial
raoul-becke--s0-v1@hp-elitebook-840-g1--s0-v3:/ws/app/becke-ch--blockchain--s0-v1/truffle/pet-shop-tutorial$ truffle init
A.2.4. Writing the smart contract
We'll start our dapp by writing the smart contract that acts as the back-end logic and storage.
Create a new file named Adoption.sol in the contracts/ directory.
Add the following content to the file:
contract Adoption {
address[16] public adopters;
// Adopting a pet
function adopt(uint petId) public returns (uint) {
require(petId >= 0 && petId <= 15);
adopters[petId] = msg.sender;
return petId;
}
// Retrieving the adopters
function getAdopters() public view returns (address[16]) {
return adopters;
}
}
http://truffleframework.com/docs/getting_started/compile
All of your contracts are located in your project's contracts/ directory. As contracts are written in Solidity, all files containing contracts will have a file extension of .sol. Associated Solidity libraries will also have a .sol extension.
To compile a Truffle project, change to the root of the directory where the project is located and then type the following into a terminal:
truffle compile
Upon first run, all contracts will be compiled. Upon subsequent runs, Truffle will compile only the contracts that have been changed since the last compile.
cd /ws/app/becke-ch--blockchain--s0-v1/truffle/pet-shop-tutorial
truffle compile
raoul-becke--s0-v1@hp-elitebook-840-g1--s0-v3:/ws/app/becke-ch--blockchain--s0-v1/truffle/pet-shop-tutorial$ truffle compile
Compiling ./contracts/Migrations.sol...
Compilation warnings encountered:
/ws/app/becke-ch--blockchain--s0-v1/truffle/pet-shop-tutorial/contracts/Migrations.sol:11:3: Warning: Defining constructors as functions with the same name as the contract is deprecated. Use "constructor(...) { ... }" instead.
function Migrations() public {
^ (Relevant source part starts here and spans across multiple lines).
Writing artifacts to ./build/contracts
Artifacts of your compilation (Adoption.json, Migrations.json) will be placed in the build/contracts/ directory, relative to your project root.
/ws/app/becke-ch--blockchain--s0-v1/truffle/pet-shop-tutorial/build/contracts/Adoption.json
{
"contractName": "Adoption",
"abi": [
{
"constant": true,
"inputs": [
{
"name": "",
"type": "uint256"
}
],
"name": "adopters",
"outputs": [
{
"name": "",
"type": "address"
}
],
"payable": false,
"stateMutability": "view",
"type": "function"
},
{
"constant": false,
"inputs": [
{
"name": "petId",
"type": "uint256"
}
],
"name": "adopt",
"outputs": [
{
"name": "",
"type": "uint256"
}
],
"payable": false,
"stateMutability": "nonpayable",
"type": "function"
},
...
WARNING: Warning: No visibility specified. Defaulting to "public".
Wrong: function Migrations() {
Correct: function Migrations() public {
Wrong: function setCompleted(uint completed) restricted {
Correct: function setCompleted(uint completed) public restricted {
WARNING: Warning: Defining constructors as functions with the same name as the contract is deprecated. Use "constructor(...) { ... }" instead.
...
//function Migrations() public { -- is deprecated and gives warning
//"https://ethereum.stackexchange.com/questions/45972/ive-got-an-error-while-compiling-use-constructor-instead"
//instead use:
constructor() public {
owner = msg.sender;
}
...
A.2.6. Migration (Deployment & Versioning) & Installation of Ganache (Ethereum Node)
A migration is a deployment script meant to alter the state of your application's contracts, moving it from one state to the next. For the first migration, you might just be deploying new code, but over time, other migrations might move data around or replace a contract with a new one.
You'll see one JavaScript file already in the migrations/ directory: 1_initial_migration.js. This handles deploying the Migrations.sol contract to observe subsequent smart contract migrations, and ensures we don't double-migrate unchanged contracts in the future.
/ws/app/becke-ch--blockchain--s0-v1/truffle/pet-shop-tutorial/migrations/1_initial_migration.js
var Migrations = artifacts.require("./Migrations.sol");
module.exports = function(deployer) {
deployer.deploy(Migrations);
};
Now we are ready to create our own migration script.
Create a new file named 2_deploy_contracts.js in the migrations/ directory.
Add the following content to: /ws/app/becke-ch--blockchain--s0-v1/truffle/pet-shop-tutorial/migrations/2_deploy_contracts.js
var Adoption = artifacts.require("Adoption");
module.exports = function (deployer) {
deployer.deploy(Adoption);
};
Note that the filename is prefixed with a number and is suffixed by a description. The numbered prefix is required in order to record whether the migration ran successfully. The suffix is purely for human readability and comprehension.
Further details on migration scripts see next sub-chapter: A.2.6
Before we can migrate our contract to the blockchain, we need to have a blockchain running. For this tutorial, we're going to use Ganache (), a personal blockchain for Ethereum development you can use to deploy contracts, develop applications, and run tests. If you haven't already, download Ganache (http://truffleframework.com/ganache ) and double click the icon to launch the application. This will generate a blockchain running locally on port 7545.
raoul-becke--s0-v1@hp-elitebook-840-g1--s0-v3:/app/ganache$ chmod +x ganache-1.1.0-x86_64.AppImage
raoul-becke--s0-v1@hp-elitebook-840-g1--s0-v3:/app/ganache$ ./ganache-1.1.0-x86_64.AppImage
A dialog opens asking whether you want to integrate ganache with your system (menu and icons):
Click “Yes”.
On the installation screen either select “Analytics enabled” or deselect:
Click “Continue”:
And Ganache opens in a new screen:
mnemonic: Like a deterministic wallet (see 2.2.1) Ganache uses a mnemonic to generate initial addresses (public keys) together with their private keys!
-m or --mnemonic: Using the ganache-cli (see https://github.com/trufflesuite/ganache-cli ) the user can provide himself a mnemonic: “Use a specific HD wallet mnemonic to generate initial addresses”
The default mnemonic of Ganache is: scatter normal exact perfect item perfect whisper design jump library remove noise
Instead of using the default mnemonic I strongly suggest to use the one that was generated in MetaMask see chapter 3.4 and modify Ganache mnemonic accordingly (IN ANY CASE I DO NOT TO USE THE DEFAULT MNEMONIC IN GANACHE!): Go to “Settings → Accounts & Keys” and enter the mnemonic used in MetaMask:
Back in our terminal, migrate the contract to the blockchain.
truffle migrate
raoul-becke--s0-v1@hp-elitebook-850-g5--s0-v1:/ws/app/becke-ch--blockchain--s0-v1/truffle/pet-shop-tutorial$ truffle migrate
Compiling ./contracts/Migrations.sol...
Writing artifacts to ./build/contracts
Using network 'development'.
Running migration: 1_initial_migration.js
Deploying Migrations...
... 0xf2b011ef798493660a94f67b2cfa6dd565a9a74b9cf034a9e785f7b0c5bacc7d
Migrations: 0x413bd6fb51e7f0504fb9b535ba7872899f989c80
Saving successful migration to network...
... 0xcbd24683053b4acaf48bce59213bd6dd89623998441531799ad97f9077337f4b
Saving artifacts...
Running migration: 2_deploy_contracts.js
Deploying Adoption...
... 0x51314e1f2237993ccb42c9f609fb9247b2e94ea01db89230f83175ecf30645b5
Adoption: 0x639170ef9b580e9336fd910073f9d4540cc42f6d
Saving successful migration to network...
... 0xfe34da3778ea9823e962f395c872cce914d8f2c35ac7f2b74a1d846a28e037d3
Saving artifacts...
You can see the migrations being executed in order, followed by the blockchain address of each deployed contract. (Your addresses will differ.)
In Ganache, note that the state of the blockchain has changed. The blockchain now shows that the current block, previously 0, is now 4. In addition, while the first account originally had 100 ether, it is now lower, due to the transaction costs of migration. We'll talk more about transaction costs later.
Running migrations (Versioning)
http://truffleframework.com/docs/getting_started/migrations
Migrations are JavaScript files that help you deploy contracts to the Ethereum network. These files are responsible for staging your deployment tasks, and they're written under the assumption that your deployment needs will change over time. As your project evolves, you'll create new migration scripts to further this evolution on the blockchain. A history of previously run migrations is recorded on-chain through a special Migrations contract, detailed below.
/ws/app/becke-ch--blockchain--s0-v1/truffle/pet-shop-tutorial/migrations/2_deploy_contracts.js
var Adoption = artifacts.require("Adoption");
module.exports = function (deployer) {
deployer.deploy(Adoption);
};
To run your migrations, run the following:
$ truffle migrate
This will run all migrations located within your project's migrations directory. At their simplest, migrations are simply a set of managed deployment scripts. If your migrations were previously run successfully, truffle migrate will start execution from the last migration that was ran, running only newly created migrations. If no new migrations exists, truffle migrate won't perform any action at all. You can use the --reset option to run all your migrations from the beginning. For local testing make sure to have a test blockchain such as Ganache installed and running before executing migrate.
At the beginning of the migration, we tell Truffle which contracts we'd like to interact with via the artifacts.require() method. This method is similar to Node's require, but in our case it specifically returns a contract abstraction that we can use within the rest of our deployment script. The name specified should match the name of the contract definition within that source file. Do not pass the name of the source file, as files can contain more than one contract.
All migrations must export a function via the module.exports syntax. The function exported by each migration should accept a deployer object as its first parameter. This object aides in deployment by both providing a clear syntax for deploying smart contracts as well as performing some of deployment's more mundane duties, such as saving deployed artifacts for later use. The deployer object is your main interface for staging deployment tasks, and its API is described as follows:
deployer.deploy(contract,
args…, options): Deploy a specific contract,
specified by the contract object, with optional constructor
arguments. This is useful for singleton contracts, such that only
one instance of this contract exists for your dapp. This will set
the address of the contract after deployment (i.e., Contract.address
will equal the newly deployed address), and it will override any
previous address stored.
Note that you will need to deploy and
link any libraries your contracts depend on first before calling
deploy. See the link function below for more details.
deployer.link(library, destinations): Link an already-deployed library to a contract or multiple contracts. destinations can be a single contract or an array of multiple contracts. If any contract within the destination doesn't rely on the library being linked, the contract will be ignored.
deployer.then(function() {…}): Just like a promise, run an arbitrary deployment step. Use this to call specific contract functions during your migration to add, edit and reorganize contract data.
Truffle requires you to have a Migrations contract in order to use the Migrations feature. This contract must contain a specific interface, but you're free to edit this contract at will. For most projects, this contract will be deployed initially as the first migration and won't be updated again. You will also receive this contract by default when creating a new project with truffle init.
pragma solidity ^0.4.2;
contract Migrations {
address public owner;
uint public last_completed_migration;
modifier restricted() {
if (msg.sender == owner) _;
}
function Migrations() {
owner = msg.sender;
}
function setCompleted(uint completed) restricted {
last_completed_migration = completed;
}
function upgrade(address new_address) restricted {
Migrations upgraded = Migrations(new_address);
upgraded.setCompleted(last_completed_migration);
}
}
Warnings, Errors and Solutions
ERROR: Error: Attempting to run transaction which calls a contract function, but recipient address 0x413bd6fb51e7f0504fb9b535ba7872899f989c80 is not a contract address:
raoul-becke--s0-v1@hp-elitebook-850-g5--s0-v1:/ws/app/becke-ch--blockchain--s0-v1/truffle/pet-shop-tutorial$ truffle migrate
Using network 'development'.
Error: Attempting to run transaction which calls a contract function, but recipient address 0x413bd6fb51e7f0504fb9b535ba7872899f989c80 is not a contract address
at Object.InvalidResponse (/tool/node-v8.11.1-linux-x64/lib/node_modules/truffle/build/webpack:/~/web3/lib/web3/errors.js:38:1)
at /tool/node-v8.11.1-linux-x64/lib/node_modules/truffle/build/webpack:/~/web3/lib/web3/requestmanager.js:86:1
at /tool/node-v8.11.1-linux-x64/lib/node_modules/truffle/build/webpack:/~/truffle-provider/wrapper.js:134:1
at XMLHttpRequest.request.onreadystatechange (/tool/node-v8.11.1-linux-x64/lib/node_modules/truffle/build/webpack:/~/web3/lib/web3/httpprovider.js:128:1)
at XMLHttpRequestEventTarget.dispatchEvent (/tool/node-v8.11.1-linux-x64/lib/node_modules/truffle/build/webpack:/~/xhr2/lib/xhr2.js:64:1)
at XMLHttpRequest._setReadyState (/tool/node-v8.11.1-linux-x64/lib/node_modules/truffle/build/webpack:/~/xhr2/lib/xhr2.js:354:1)
at XMLHttpRequest._onHttpResponseEnd (/tool/node-v8.11.1-linux-x64/lib/node_modules/truffle/build/webpack:/~/xhr2/lib/xhr2.js:509:1)
at IncomingMessage.<anonymous> (/tool/node-v8.11.1-linux-x64/lib/node_modules/truffle/build/webpack:/~/xhr2/lib/xhr2.js:469:1)
at emitNone (events.js:111:20)
at IncomingMessage.emit (events.js:208:7)
at endReadableNT (_stream_readable.js:1064:12)
at _combinedTickCallback (internal/process/next_tick.js:138:11)
at process._tickCallback (internal/process/next_tick.js:180:9)
When searching for the address “0x413bd6fb51e7f0504fb9b535ba7872899f989c80” in all files then we find this value in:
/ws/app/becke-ch--blockchain--s0-v1/truffle/pet-shop-tutorial/build/contracts/Migrations.json
…
"networks": {
"5777": {
"events": {},
"links": {},
"address": "0x413bd6fb51e7f0504fb9b535ba7872899f989c80",
"transactionHash": "0xf2b011ef798493660a94f67b2cfa6dd565a9a74b9cf034a9e785f7b0c5bacc7d"
}
},
...
SOLUTION: The solution is to remove this build artifacts in “/ws/app/becke-ch--blockchain--s0-v1/truffle/pet-shop-tutorial/build/contracts/*”
And to re-compile again the contracts “truffle compile”:
raoul-becke--s0-v1@hp-elitebook-850-g5--s0-v1:/ws/app/becke-ch--blockchain--s0-v1/truffle/pet-shop-tutorial$ truffle compile
Compiling ./contracts/Adoption.sol...
Compiling ./contracts/Migrations.sol...
Writing artifacts to ./build/contracts
And now when checking again in: /ws/app/becke-ch--blockchain--s0-v1/truffle/pet-shop-tutorial/build/contracts/Migrations.json
…
"networks": {},
...
The “networks” section has been emptied! AND this is actually the only difference from “truffle compile” to “truffle migrate” (deployment) is that the “networks” section is filled in! Or in other words, alternatively we could just have emptied the “networks” section instead of deleting the whole .json file and only running “truffle migrate”. But to be on the safe side it is better to delete the file and running “truffle compile” and “truffle migrate”!
raoul-becke--s0-v1@hp-elitebook-850-g5--s0-v1:/ws/app/becke-ch--blockchain--s0-v1/truffle/pet-shop-tutorial$ truffle migrate
Using network 'development'.
s
Running migration: 1_initial_migration.js
Deploying Migrations...
... 0xf2b011ef798493660a94f67b2cfa6dd565a9a74b9cf034a9e785f7b0c5bacc7d
Migrations: 0x413bd6fb51e7f0504fb9b535ba7872899f989c80
Saving successful migration to network...
... 0xcbd24683053b4acaf48bce59213bd6dd89623998441531799ad97f9077337f4b
Saving artifacts...
Running migration: 2_deploy_contracts.js
Deploying Adoption...
... 0x51314e1f2237993ccb42c9f609fb9247b2e94ea01db89230f83175ecf30645b5
Adoption: 0x639170ef9b580e9336fd910073f9d4540cc42f6d
Saving successful migration to network...
... 0xfe34da3778ea9823e962f395c872cce914d8f2c35ac7f2b74a1d846a28e037d3
Saving artifacts...
A.2.7. Testing the smart contract
Truffle is very flexible when it comes to smart contract testing, in that tests can be written either in JavaScript or Solidity. In this tutorial, we'll be writing our tests in Solidity.
/ws/app/becke-ch--blockchain--s0-v1/truffle/pet-shop-tutorial/test/TestAdoption.sol
import "truffle/Assert.sol";
import "truffle/DeployedAddresses.sol";
import "../contracts/Adoption.sol";
contract TestAdoption {
Adoption adoption = Adoption(DeployedAddresses.Adoption());
}
Assert.sol: Gives us various assertions to use in our tests. In testing, an assertion checks for things like equality, inequality or emptiness to return a pass/fail from our test. Here's a full list of the assertions included with Truffle.
DeployedAddresses.sol: When running tests, Truffle will deploy a fresh instance of the contract being tested to the blockchain. This smart contract gets the address of the deployed contract.
Adoption.sol: The smart contract we want to test.
Note: The first two imports are referring to global Truffle files, not a truffle directory. You should not see a truffle directory inside your test/ directory.
Then we define a contract-wide variable containing the smart contract to be tested, calling the DeployedAddresses smart contract to get its address.
/ws/app/becke-ch--blockchain--s0-v1/truffle/pet-shop-tutorial/test/TestAdoption.sol
pragma solidity ^0.4.17;
import "truffle/Assert.sol";
import "truffle/DeployedAddresses.sol";
import "../contracts/Adoption.sol";
contract TestAdoption {
Adoption adoption = Adoption(DeployedAddresses.Adoption());
// Testing the adopt() function
function testUserCanAdoptPet() public {
uint returnedId = adoption.adopt(8);
uint expected = 8;
Assert.equal(returnedId, expected, "Adoption of pet ID 8 should be recorded.");
}
}
Testing retrieval of a single pet's owner
/ws/app/becke-ch--blockchain--s0-v1/truffle/pet-shop-tutorial/test/TestAdoption.sol
pragma solidity ^0.4.17;
import "truffle/Assert.sol";
import "truffle/DeployedAddresses.sol";
import "../contracts/Adoption.sol";
contract TestAdoption {
Adoption adoption = Adoption(DeployedAddresses.Adoption());
// Testing the adopt() function
// Testing retrieval of a single pet's owner
function testGetAdopterAddressByPetId() public {
// Expected owner is this contract
address expected = this;
address adopter = adoption.adopters(8);
Assert.equal(adopter, expected, "Owner of pet ID 8 should be recorded.");
}
}
Since the TestAdoption contract will be sending the transaction, we set the expected value to this, a contract-wide variable that gets the current contract's address.
Testing retrieval of all pet owners
/ws/app/becke-ch--blockchain--s0-v1/truffle/pet-shop-tutorial/test/TestAdoption.sol
pragma solidity ^0.4.17;
import "truffle/Assert.sol";
import "truffle/DeployedAddresses.sol";
import "../contracts/Adoption.sol";
contract TestAdoption {
Adoption adoption = Adoption(DeployedAddresses.Adoption());
// Testing the adopt() function
// Testing retrieval of a single pet's owner
// Testing retrieval of all pet owners
function testGetAdopterAddressByPetIdInArray() public {
// Expected owner is this contract
address expected = this;
// Store adopters in memory rather than contract's storage
address[16] memory adopters = adoption.getAdopters();
Assert.equal(adopters[8], expected, "Owner of pet ID 8 should be recorded.");
}
}
address[16] memory adopters = adoption.getAdopters(); The memory attribute tells Solidity to temporarily store the value in memory, rather than saving it to the contract's storage.
truffle test
raoul-becke--s0-v1@hp-elitebook-840-g1--s0-v3:/ws/app/becke-ch--blockchain--s0-v1/truffle/pet-shop-tutorial$ truffle test
Using network 'development'.
Compiling ./contracts/Adoption.sol...
Compiling ./test/TestAdoption.sol...
Compiling truffle/Assert.sol...
Compiling truffle/DeployedAddresses.sol...
TestAdoption
✓ testUserCanAdoptPet (139ms)
✓ testGetAdopterAddressByPetId (65ms)
✓ testGetAdopterAddressByPetIdInArray (92ms)
3 passing (813ms)
A.2.9. Writing Tests in JavaScript
http://truffleframework.com/docs/getting_started/javascript-tests
var Adoption = artifacts.require("Adoption");
contract('Adoption Contract', function (accounts) {
it("Testing the adopt() function", function () {
return Adoption.deployed().then(function (adoptionInstance) {
return adoptionInstance.adopt.call(8);
}).then(function (returnedId) {
assert.equal(returnedId, 8, "Adoption of pet ID 8 should be recorded.");
});
});
Truffle uses the Mocha testing framework and Chai for assertions to provide you with a solid framework from which to write your JavaScript tests.
Use contract() instead of describe()
Your tests should exist in the ./test directory, they should end with a .js extension, and they should contain code that Mocha will recognize as an automated test. What makes Truffle tests different from that of Mocha is the contract() function: This function works exactly like describe() except it enables Truffle's clean-room features. It works like this:
Before each contract() function is run, your contracts are redeployed to the running Ethereum client so the tests within it run with a clean contract state.
The contract() function provides a list of accounts made available by your Ethereum client which you can use to write tests.
Use contract abstractions within your tests
Because Truffle has no way of detecting which contracts you'll need to interact with within your tests, you'll need to ask for those contracts explicitly. You do this by using the artifacts.require() method, a method provided by Truffle that allows you to request a usable contract abstraction for a specific Solidity contract.
See as well “artifacts.require()” in chapter “Migration Script”.
https://github.com/trufflesuite/truffle-contract
.deployed(): Creates an instance of the contract abstraction representing the contract at its deployed address. The deployed address is a special value given to truffle-contract that, when set, saves the address internally so that the deployed address can be inferred from the given Ethereum network being used. This allows you to write code referring to a specific deployed contract without having to manage those addresses yourself. Like at(), deployed() is thenable, and will resolve to a contract abstraction instance representing the deployed contract after ensuring that code exists at that location and that that address exists on the network being used.
Warnings, Errors and Solutions
ERROR: AssertionError: Adoption of pet ID 8 should be recorded.: expected { Object (tx, receipt, ...) } to equal 8
SOURCE:
var Adoption = artifacts.require("Adoption");
contract('Adoption Contract', function (accounts) {
it("Testing the adopt() function", function () {
return Adoption.deployed().then(function (adoptionInstance) {
return adoptionInstance.adopt(8);
}).then(function (returnedId) {
assert.equal(returnedId, 8, "Adoption of pet ID 8 should be recorded.");
});
});
});
SOLUTION:
Instead of: Transaction:
“adoptionInstance.adopt(8)”
Use: Call: “adoptionInstance.adopt.call(8)”
A.2.10. Interacting with your contracts
http://truffleframework.com/docs/getting_started/contracts
In this chapter we use the “MetaCoin” contract sample and not the “Adoption” contract we used in the other chapters so far (potential improvement here to go with the “Adoption” contract sample!).
pragma solidity ^0.4.2;
import "./ConvertLib.sol";
// This is just a simple example of a coin-like contract.
// It is not standards compatible and cannot be expected to talk to other
// coin/token contracts. If you want to create a standards-compliant
// token, see: https://github.com/ConsenSys/Tokens. Cheers!
contract MetaCoin {
mapping (address => uint) balances; //Hash-map – key: address, value: uint
event Transfer(address indexed _from, address indexed _to, uint256 _value);
function MetaCoin() {
balances[tx.origin] = 10000;
}
function sendCoin(address receiver, uint amount) returns(bool sufficient) {
//msg.sender is optional third parameter that can be passed invocation:
//sendCoin(account_two, 10, {from: account_one});
if (balances[msg.sender] < amount) return false;
balances[msg.sender] -= amount;
balances[receiver] += amount;
Transfer(msg.sender, receiver, amount); //fire an event
return true;
}
function getBalanceInEth(address addr) returns(uint){
return ConvertLib.convert(getBalance(addr),2);
}
function getBalance(address addr) returns(uint) {
return balances[addr];
}
}
The Ethereum network makes a distinction between writing data to the network and reading data from it, and this distinction plays a significant part in how you write your application. In general, writing data is called a transaction whereas reading data is called a call. Transactions and calls are treated very differently, and have the following characteristics.
Transactions fundamentally change the state of the network. A transaction can be as simple as sending Ether to another account, or as complicated as executing a contract function or adding a new contract to the network. The defining characteristic of a transaction is that it writes (or changes) data.
Cost gas (Ether)
Change the state of the network
Aren't processed immediately
Won't expose a return value (only a transaction id).
The following is a code fragment written in JavaScript:
var MetaCoin = artifacts.require("MetaCoin");
var account_one = "0x1234..."; // an address
var account_two = "0xabcd..."; // another address
var meta;
MetaCoin.deployed().then(function(instance) {
meta = instance;
return meta.sendCoin(account_two, 10, {from: account_one});
}).then(function(result) {
// If this callback is called, the transaction was successfully processed.
alert("Transaction successful!")
}).catch(function(e) {
// There was an error! Handle it.
})
We called the abstraction's sendCoin function directly. This will result in a transaction by default (i.e, writing data) instead of call.
When the transaction is successful, the callback function isn't fired until the transaction is processed.
We passed an object as the third parameter to sendCoin. Note that the sendCoin function in our Solidity contract doesn't have a third parameter. What you see above is a special object that can always be passed as the last parameter to a function that lets you edit specific details about the transaction. Here, we set the from address ensuring this transaction came from account_one.
Calls, on the other hand, are very different. Calls can be used to execute code on the network, though no data will be permanently changed. Calls are free to run, and their defining characteristic is that they read data.
Are free (do not cost gas)
Do not change the state of the network
Are processed immediately
Will expose a return value (hooray!)
var account_one = "0x1234..."; // an address
var meta;
MetaCoin.deployed().then(function(instance) {
meta = instance;
return meta.getBalance.call(account_one, {from: account_one});
}).then(function(balance) {
// If this callback is called, the call was successfully executed.
// Note that this returns immediately without any waiting.
// Let's print the return value.
console.log(balance.toNumber());
}).catch(function(e) {
// There was an error! Handle it.
})
We had to execute the .call() function explicitly to let the Ethereum network know we're not intending to persist any changes.
Your contracts can fire events that you can catch to gain more insight into what your contracts are doing. The easiest way to handle events is by processing the result object of the transaction that triggered the event:
var account_one = "0x1234..."; // an address
var account_two = "0xabcd..."; // another address
var meta;
MetaCoin.deployed().then(function(instance) {
meta = instance;
return meta.sendCoin(account_two, 10, {from: account_one});
}).then(function(result) {
// result is an object with the following values:
//
// result.tx => transaction hash, string
// result.logs => array of decoded events that were triggered within this transaction
// result.receipt => transaction receipt object, which includes gas used
// We can loop through result.logs to see if we triggered the Transfer event.
for (var i = 0; i < result.logs.length; i++) {
var log = result.logs[i];
if (log.event == "Transfer") {
// We found the event!
break;
}
}
}).catch(function(err) {
// There was an error! Handle it.
});
Add a new contract to the network
We can deploy our own version to the network using the .new() function:
MetaCoin.new().then(function(instance) {
// Print the new address
console.log(instance.address);
}).catch(function(err) {
// There was an error! Handle it.
});
https://github.com/trufflesuite/truffle-contract
.new([arg1, arg2, ...], [tx params]): This function take whatever contructor parameters your contract requires and deploys a new instance of the contract to the network. There's an optional last argument which you can use to pass transaction parameters including the transaction from address, gas limit and gas price. This function returns a Promise that resolves into a new instance of the contract abstraction at the newly deployed address.
Use a contract at a specific address
If you already have an address for a contract, you can create a new abstraction to represent the contract at that address.
var instance = MetaCoin.at("0x1234...");
https://github.com/trufflesuite/truffle-contract
.at(address): This function creates a new instance of the contract abstraction representing the contract at the passed in address. Returns a "thenable" object (not yet an actual Promise for backward compatibility). Resolves to a contract abstraction instance after ensuring code exists at the specified address.
Option 1: Send a transaction directly to a contract via instance.sendTransaction(). This is promisified like all available contract instance functions, and has the same API as web3.eth.sendTransaction but without the callback. The to value will be automatically filled in for you if not specified.
instance.sendTransaction({...}).then(function(result) {
// Same transaction result object as above.
});
Option 2: There's also shorthand for just sending Ether directly:
instance.send(web3.toWei(1, "ether")).then(function(result) {
// Same result object as above.
});
A.2.11. Package management via EthPM
http://truffleframework.com/docs/getting_started/packages-ethpm
A.2.12. Package management via NPM
http://truffleframework.com/docs/getting_started/packages-npm
A.2.13. Debugging your contracts
http://truffleframework.com/docs/getting_started/debugging
A.2.14. Using Truffle Develop and the console
http://truffleframework.com/docs/getting_started/console
A.2.15. Writing external scripts
http://truffleframework.com/docs/getting_started/scripts
A.2.16. Using the build pipeline
http://truffleframework.com/docs/getting_started/build
http://truffleframework.com/docs/advanced/configuration
Your configuration file is called truffle.js and is located at the root of your project directory. This file is a Javascript file and can execute any code necessary to create your configuration.
module.exports = {
networks: {
development: {
host: "127.0.0.1",
port: 7545,
network_id: "*" // Match any network id
}
}
};
networks: The different options available are:
gas: Gas limit used for deploys. Default is 4712388.
gasPrice: Gas price used for deploys. Default is 100000000000 (100 Shannon).
from: From address used during migrations. Defaults to the first available account provided by your Ethereum client.
host / port versus provider: Default web3 provider using host and port options: new Web3.providers.HttpProvider("http://<host>:<port>"). For each network, you can specify either host / port or provider, but not both. If you need an HTTP provider, we recommend using host and port, while if you need a custom provider such as HDWalletProvider, you must use provider. In other words:
development: {
host: "127.0.0.1",
port: 7545,
network_id: "*" // Match any network id
}
Is the same as:
development: {
provider: new Web3.providers.HttpProvider("http://127.0.0.1:7545"),
network_id: "*" // Match any network id
}
Each network version gets a name (id). Here is an overview.
Olympic (0) is also
regularly referred to as Ethereum 0.9; it launched early 2015
and was the first public Testnet. Deprecated in mid 2015 and
replaced by Morden.
Frontier (1) the
official 1.0 release was launched as public main network
in the summer of 2015. Forked to Homestead in early 2016.
Morden (2) was the
Frontier-equivalent testnet; it launched with Frontier and
basically replaced Olympic. Deprecated in late 2016 and
replaced by Ropsten.
Homestead (1) was the first major upgrade (1.1) of the Frontier network in March 2016. It did not replace Frontier but upgraded it.
Ropsten (3) is a new Homestead-equivalent testnet launched in late 2016 due to multiple issues in the old testnet; it finally replaced Morden. Ropsten was attacked in February 2016 and declared dead. But with great effort it has been revived on March 2017.
Kovan (42) is the first proof-of-authority (PoA) testnet issued by Ethcore, Melonport, and Digix after the Ropsten attacks.
Rinkeby, another PoA testnet is currently being drafted.
The current protocol version is Homestead. The Ropsten testnet is broken and there is no public Homestead equivalent testnet available.
Despite the differences in name, Olympic, Morden and Ropsten have the network ids 0, 2 and 3. Frontier, Homestead are the main network with id 1. You can run your own chain by specifying a network id other than 0, 1, 2, or 3.
A.2.18. Networks and app deployment
http://truffleframework.com/docs/advanced/networks
A.2.19. Creating a user interface to interact with the smart contract
The front-end doesn't use a build system (webpack, grunt, etc.) to be as easy as possible to get started. The structure of the app is already there; we'll be filling in the functions which are unique to Ethereum. This way, you can take this knowledge and apply it to your own front-end development.
Open /src/js/app.js in a text editor.
Examine the file. Note that there is a global App object to manage our application, load in the pet data in init() and then call the function initWeb3(). The web3 JavaScript library interacts with the Ethereum blockchain. It can retrieve user accounts, send transactions, interact with smart contracts, and more.
Remove the multi-line comment from within initWeb3 and replace it with the following:
/ws/app/becke-ch--blockchain--s0-v1/truffle/pet-shop-tutorial/src/js/app.js
App = {
web3Provider: null,
contracts: {},
// Is there an injected web3 instance?
if (typeof web3 !== 'undefined') {
App.web3Provider = web3.currentProvider;
} else {
// If no injected web3 instance is detected, fall back to Ganache
App.web3Provider = new Web3.providers.HttpProvider('http://localhost:7545');
}
web3 = new Web3(App.web3Provider);
return App.initContract();
},
…
};
$(function () {
$(window).load(function () {
App.init();
});
});
App.web3Provider: The web3 API can be found here: https://github.com/ethereum/wiki/wiki/JavaScript-API
First, we check if there's a web3 instance already active. (Ethereum browsers like Mist or Chrome with the MetaMask extension will inject their own web3 instances.) If an injected web3 instance is present, we get its provider and use it to create our web3 object.
If no injected web3 instance is present, we create our web3 object based on our local provider. (This fallback is fine for development environments, but insecure and not suitable for production.)
Server Side: Private/Consortium Blockchain: On the other hand this is a good way to avoid using MetaMask in Private or Consortium Blockchains where not the end-user financial transaction is in focus but rather the smart-contract to implement a certain business process.
Example using HTTP Basic Authentication:
var Web3 = require('web3');
var web3 = new Web3(new Web3.providers.HttpProvider("http://localhost:8545", 0, BasicAuthUsername, BasicAuthPassword));
//Note: HttpProvider takes 4 arguments (host, timeout, user, password)
/ws/app/becke-ch--blockchain--s0-v1/truffle/pet-shop-tutorial/src/js/app.js
initContract: function () {
$.getJSON('Adoption.json', function (data) {
// Get the necessary contract artifact file and instantiate it with truffle-contract
var AdoptionArtifact = data;
App.contracts.Adoption = TruffleContract(AdoptionArtifact);
// Set the provider for our contract
App.contracts.Adoption.setProvider(App.web3Provider);
// Use our contract to retrieve and mark the adopted pets
return App.markAdopted();
});
return App.bindEvents();
},
$.getJSON('Adoption.json',
function (data):
We first retrieve the artifact file for our smart contract.
Artifacts are information about our contract such as its deployed
address and Application Binary Interface (ABI). The ABI is a
JavaScript object defining how to interact with the contract
including its variables, functions and their parameters.
$:
https://stackoverflow.com/questions/1150381/what-is-the-meaning-of-sign-in-javascript
: There's nothing mysterious about the use of $ in JavaScript. $
is simply a valid JavaScript identifier. In fact, $ is
just a shortcut for jQuery.
jQuery.getJSON(
url [, data ] [, success ] ):
http://api.jquery.com/jquery.getjson/
: Load JSON-encoded data from the server using a GET HTTP request.
Once we have
the artifacts in our callback, we pass them to TruffleContract().
This creates an instance of the contract we can interact
with.
IMPORTANT: TruffleContract(…)
is proprietary to Truffle and might give portability issues
later.
https://github.com/trufflesuite/truffle-contract
MyContract.new([arg1, arg2, ...], [tx params])
MyContract.at(address)
MyContract.deployed()
MyContract.link(instance)
...
With our contract instantiated, we set its web3 provider using the App.web3Provider value we stored earlier when setting up web3.
We then call the app's markAdopted() function in case any pets are already adopted from a previous visit. We've encapsulated this in a separate function since we'll need to update the UI any time we make a change to the smart contract's data.
Getting The Adopted Pets and Updating The UI
/ws/app/becke-ch--blockchain--s0-v1/truffle/pet-shop-tutorial/src/js/app.js
markAdopted: function (adopters, account) {
App.contracts.Adoption.deployed().then(function (instance) {
adoptionInstance = instance;
return adoptionInstance.getAdopters.call();
}).then(function (adopters) {
for (i = 0; i < adopters.length; i++) {
if (adopters[i] !== '0x0000000000000000000000000000000000000000') {
$('.panel-pet').eq(i).find('button').text('Success').attr('disabled', true);
}
}
}).catch(function (err) {
console.log(err.message);
});
},
We access the deployed Adoption contract, then call getAdopters() on that instance.
We first declare the variable adoptionInstance outside of the smart contract calls so we can access the instance after initially retrieving it.
Using call() allows us to read data from the blockchain without having to send a full transaction, meaning we won't have to spend any ether.
After calling getAdopters(), we then loop through all of them, checking to see if an address is stored for each pet. Since the array contains address types, Ethereum initializes the array with 16 empty addresses. This is why we check for an empty address string rather than null or other falsey value.
Once a petId with a corresponding address is found, we disable its adopt button and change the button text to "Success", so the user gets some feedback.
Any errors are logged to the console.
/ws/app/becke-ch--blockchain--s0-v1/truffle/pet-shop-tutorial/src/js/app.js
handleAdopt: function (event) {
event.preventDefault();
var petId = parseInt($(event.target).data('id'));
var adoptionInstance;
web3.eth.getAccounts(function (error, accounts) {
if (error) {
console.log(error);
}
var account = accounts[0];
App.contracts.Adoption.deployed().then(function (instance) {
adoptionInstance = instance;
// Execute adopt as a transaction by sending account
return adoptionInstance.adopt(petId, {from: account});
}).then(function (result) {
return App.markAdopted();
}).catch(function (err) {
console.log(err.message);
});
});
}
We use web3 to get the user's accounts. In the callback after an error check, we then select the first account.
From there, we get the deployed contract as we did above and store the instance in adoptionInstance. This time though, we're going to send a transaction instead of a call. Transactions require a "from" address and have an associated cost. This cost, paid in ether, is called gas. The gas cost is the fee for performing computation and/or storing data in a smart contract. We send the transaction by executing the adopt() function with both the pet's ID and an object containing the account address, which we stored earlier in account.
The result of sending a transaction is the transaction object. If there are no errors, we proceed to call our markAdopted() function to sync the UI with our newly stored data.
A.2.20. Interacting with the dapp in a browser
Installing and configuring MetaMask
Follow instructions in chapter 3.4 and then come back here and continue with step 2.
Now we need to connect MetaMask to the blockchain created by Ganache. Click the menu that shows "Main Network" and select Custom RPC.
In the box titled "New RPC URL" enter http://127.0.0.1:7545 and click Save.
Click the left-pointing arrow next to
"Settings" to close out of the page and return to the
Accounts page.
Each account created by Ganache is given 100
ether. You'll notice it's slightly less on the first account because
some gas was used when the contract itself was deployed and when the
tests were run.
A.2.21. Installing and configuring lite-server
IMPORTANT: Before starting the web-server and launching transactions, make sure that “Ganache” is runnig and the contract has been deployed/migrated (truffle migrate) – see chapter A.2.6.
We can now start a local web server and use the dapp. We're using the lite-server library to serve our static files. This shipped with the pet-shop Truffle Box, but let's take a look at how it works.
Open: /ws/app/becke-ch--blockchain--s0-v1/truffle/pet-shop-tutorial/bs-config.json
{
"server": {
"baseDir": ["./src", "./build/contracts"]
}
}
"baseDir": ["./src", "./build/contracts"]: This tells lite-server which files to include in our base directory. We add the ./src directory for our website files and ./build/contracts directory for the contract artifacts.
Open: /ws/app/becke-ch--blockchain--s0-v1/truffle/pet-shop-tutorial/package.json
…
"scripts": {
"dev": "lite-server",
"test": "echo \"Error: no test specified\" && exit 1"
},
...
"dev": "lite-server" : The scripts object allows us to alias console commands to a single npm command like this “npm run dev”.
raoul-becke--s0-v1@hp-elitebook-850-g5--s0-v1:/ws/app/becke-ch--blockchain--s0-v1/truffle/pet-shop-tutorial$ npm run dev
> pet-shop@1.0.0 dev /ws/app/becke-ch--blockchain--s0-v1/truffle/pet-shop-tutorial
> lite-server
** browser-sync config **
{ injectChanges: false,
files: [ './**/*.{html,htm,css,js}' ],
watchOptions: { ignored: 'node_modules' },
server:
{ baseDir: [ './src', './build/contracts' ],
middleware: [ [Function], [Function] ] } }
[Browsersync] Access URLs:
--------------------------------------
Local: http://localhost:3000
External: http://192.168.1.102:3000
--------------------------------------
UI: http://localhost:3001
UI External: http://192.168.1.102:3001
--------------------------------------
[Browsersync] Serving files from: ./src
[Browsersync] Serving files from: ./build/contracts
[Browsersync] Watching files...
18.04.28 09:57:41 200 GET /index.html
18.04.28 09:57:41 200 GET /js/bootstrap.min.js
18.04.28 09:57:41 200 GET /css/bootstrap.min.css
18.04.28 09:57:41 200 GET /js/web3.min.js
18.04.28 09:57:41 200 GET /js/app.js
18.04.28 09:57:41 200 GET /js/truffle-contract.js
18.04.28 09:57:42 200 GET /pets.json
18.04.28 09:57:42 200 GET /Adoption.json
18.04.28 09:57:42 200 GET /images/scottish-terrier.jpeg
18.04.28 09:57:42 200 GET /images/boxer.jpeg
18.04.28 09:57:42 200 GET /images/french-bulldog.jpeg
18.04.28 09:57:42 200 GET /images/golden-retriever.jpeg
18.04.28 09:57:42 404 GET /favicon.ico
18.04.28 09:57:42 404 GET /favicon.ico
The dapp is running now on: http://localhost:3000/
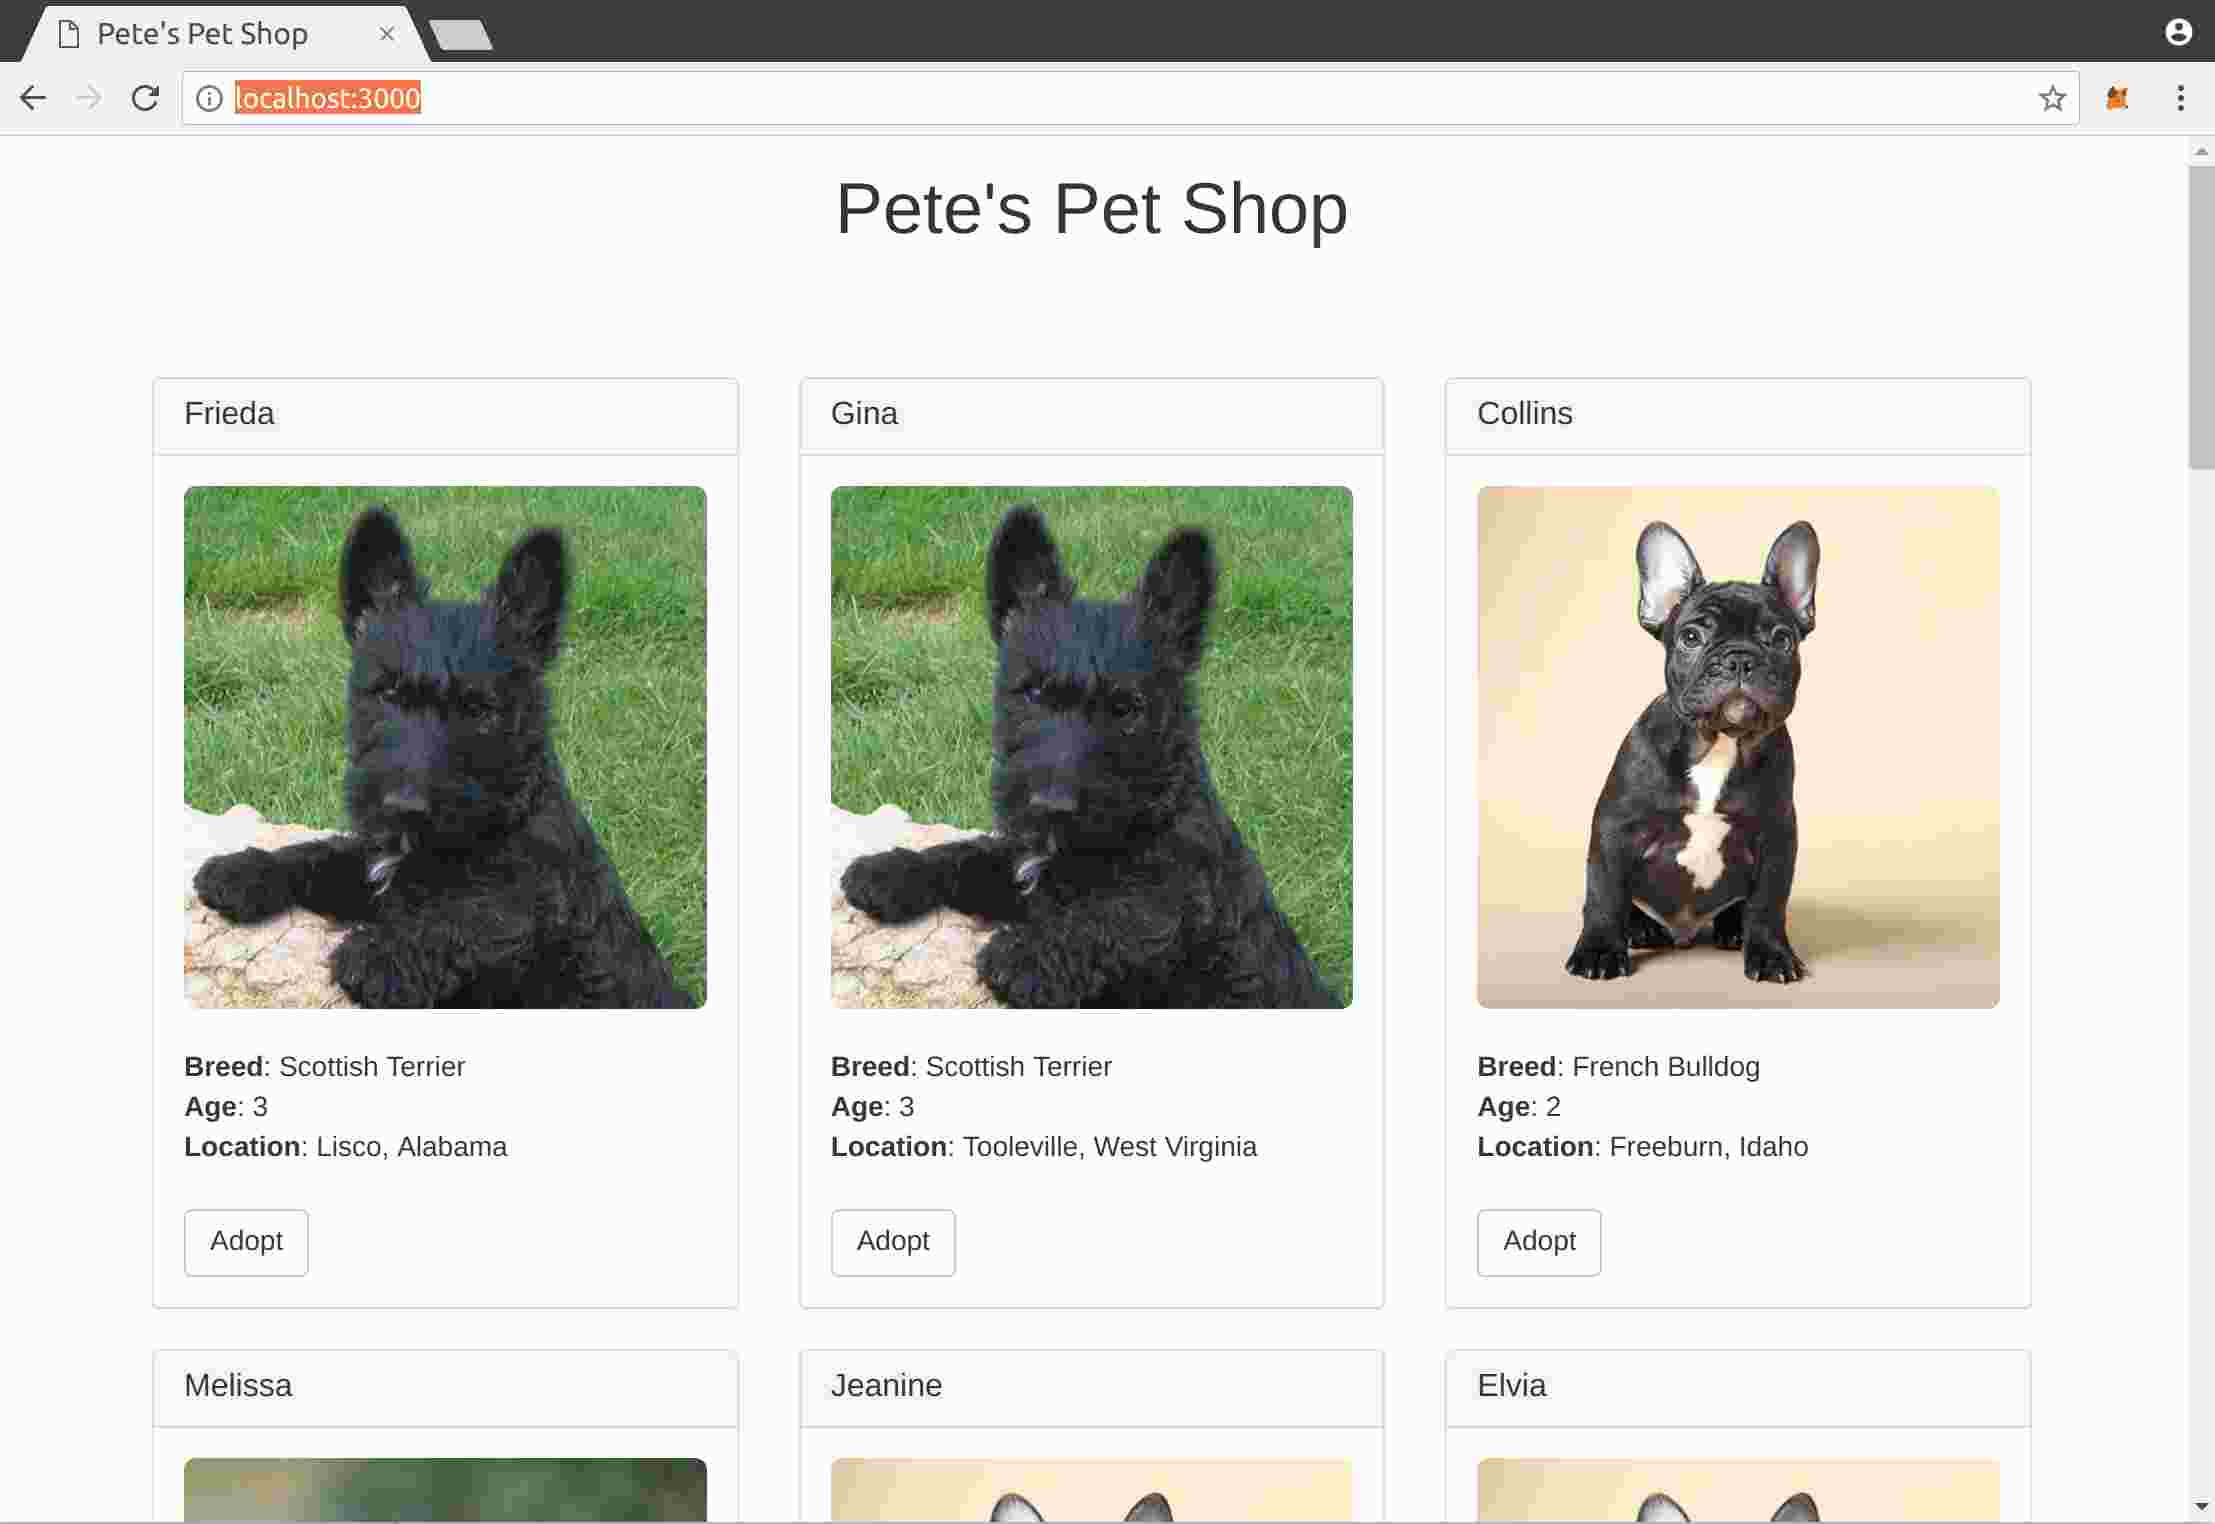
Click on “Adopt” and the following MetaMask dialog appears:
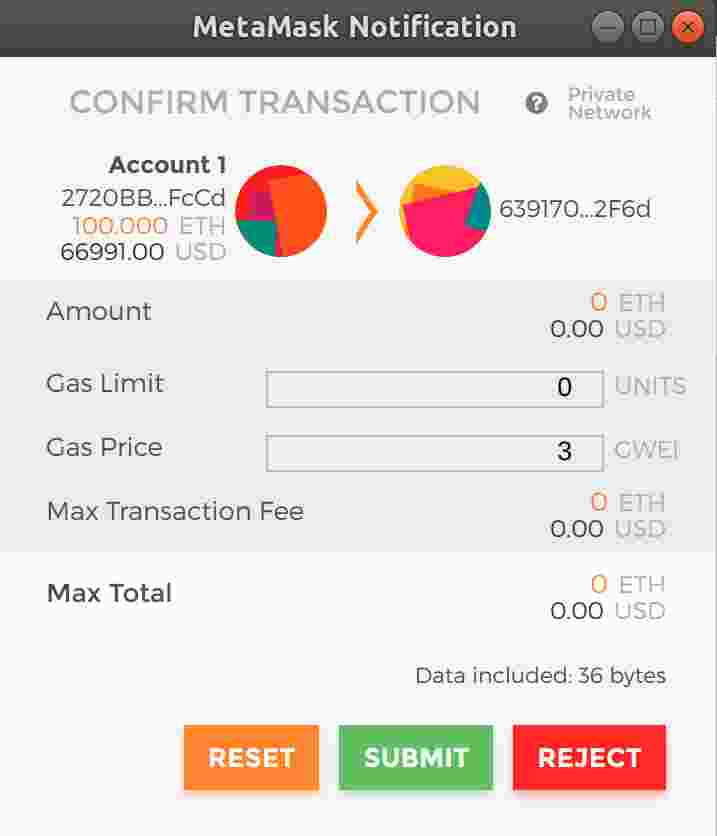
Click on “Submit” and an error is shown: “Gas Limit Must Be Greater Than Or Equal To 21000 UNITS And Less Than Or Equal To 6654755 UNITS.”
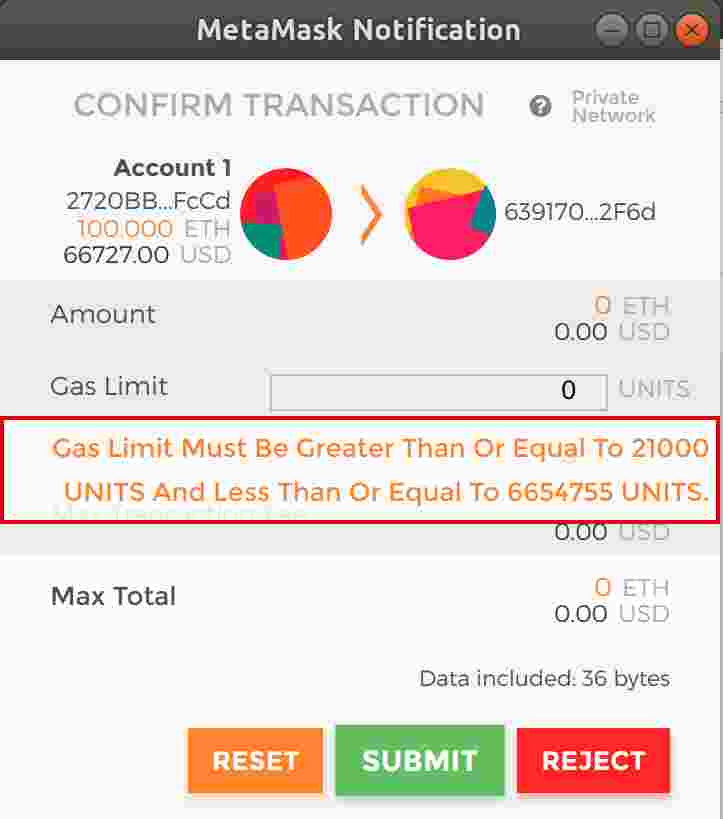
Increate the “Gas Limit” to: 21000 and click again “Submit”.
Unfortunately the transaction is not finishing and when clicking refresh in the MetaMask dialog we get:
It seems that the transaction took place but no ether was sent.
And when checking in the Ganache log file everything seems fine and we see:
...
[12:52:02 PM] eth_getBlockByNumber
[12:52:03 PM] net_version
[12:52:03 PM] eth_call
[12:52:10 PM] eth_getBlockByNumber
[12:52:18 PM] eth_getBlockByNumber
[12:52:21 PM] net_version
[12:52:21 PM] eth_call
[12:52:27 PM] eth_getBlockByNumber
[12:52:30 PM] eth_accounts
[12:52:30 PM] eth_sendTransaction
[12:52:30 PM] eth_getBlockByNumber
[12:52:30 PM] Transaction: 0x625d5d5eb42715f3bc304643698a7747a739b43fa70c396ba742663996e72c41
[12:52:30 PM] Gas usage: 42074
[12:52:30 PM] Block Number: 5
[12:52:30 PM] Block Time: Sat Apr 28 2018 12:52:30 GMT+0200 (CEST)
[12:52:30 PM] eth_getTransactionReceipt
[12:52:30 PM] eth_call
[12:52:31 PM] eth_getCode
[12:52:31 PM] eth_estimateGas
[12:52:35 PM] eth_getBlockByNumber
...
And last but not least it seems that the transaction was successful and the pet was adopted with “Success”:

Nevertheless according to: https://github.com/MetaMask/metamask-extension/issues/1662
I assume my “Transaction gas is too low” - actually I should get prompted this message somewhere but this is not the case. And somewhere I could find it out in the transaction console but I could not see where.
Increasing now the gas to 50000! And clicking “Submit”:
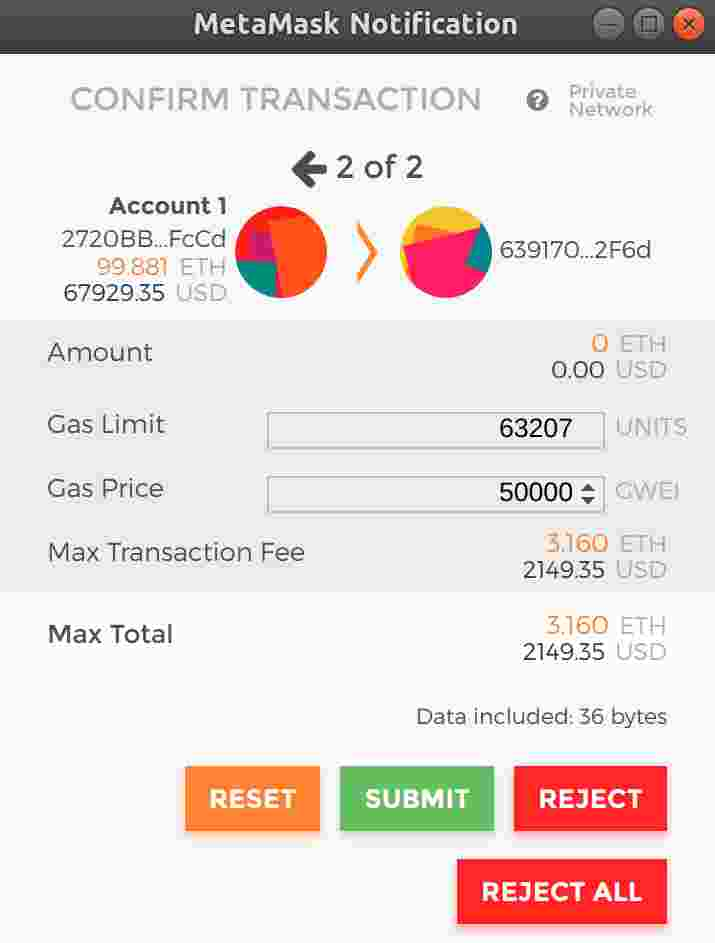
BUT ACTUALLY IN THE END IT SEEMS THAT THERE WAS A BROWSER ISSUE BETWEEN FIREFOX AND CHROME AND METAMASK. AND THEREFORE I CLOSED ALL BROWSERS, RESTARTED LITE-SERVER, REINSTALLED METAMASK.
Warnings, Errors and Solutions
ERROR: app.js:73: Invalid JSON RPC response: {"id":2,"jsonrpc":"2.0","error":{"code":-32603}}
B. Appendix – Azure Blockchain Workbench
https://docs.microsoft.com/en-us/azure/blockchain-workbench/
Log in to azure portal
Blockchain Workbench API app registration
Switch to the
desired Azure AD tenant. The tenant should be the subscription
admin's tenant of the subscription where Workbench is deployed and
you have sufficient permissions to register applications.
This is not required because working in the AAD of the subscription
where I’m administrator.
In the left-hand navigation pane, select the Azure Active Directory service. Select App registrations > New application registration.
Provide a Name: becke-ch--blockchain--s0-v1--api and Sign-on URL: https://becke-ch--blockchain--s0-v1--api for the application. You can use placeholder values since the values are changed during the deployment.
Select Create to register the Azure AD application.
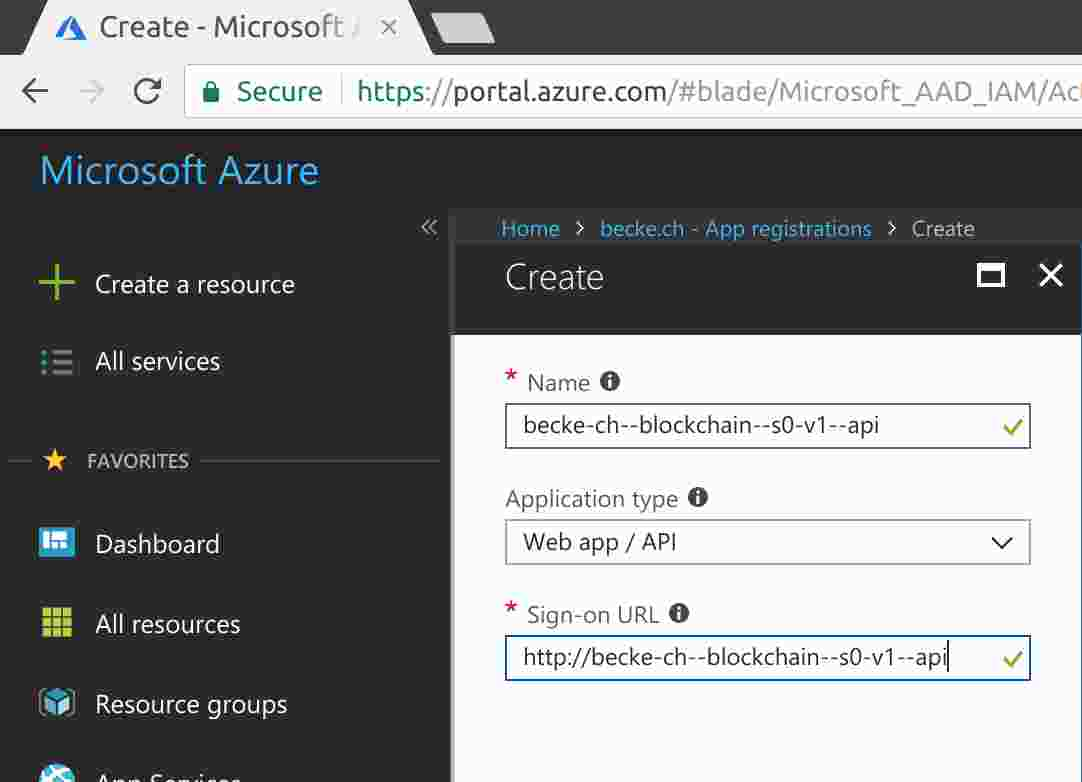
Modify application manifest
For the application you registered, select Manifest in the registered application details pane.
Generate a GUID. You can use the PowerShell command [guid]::NewGuid() or online tool https://www.guidgenerator.com/online-guid-generator.aspx to generate a GUID.
You are going to update the appRoles section of the manifest. In the Edit manifest pane, select Edit and replace "appRoles": [] with the provided JSON. Be sure to replace the value for the id field with the GUID you generated.
"appRoles": [
{
"allowedMemberTypes": [
"User",
"Application"
],
"displayName": "Administrator",
"id": "7ba95fbe-….",
"isEnabled": true,
"description": "Blockchain Workbench administrator role allows creation of applications, user to role assignments, etc.",
"value": "Administrator"
}
],
Click Save to save the application manifest changes.
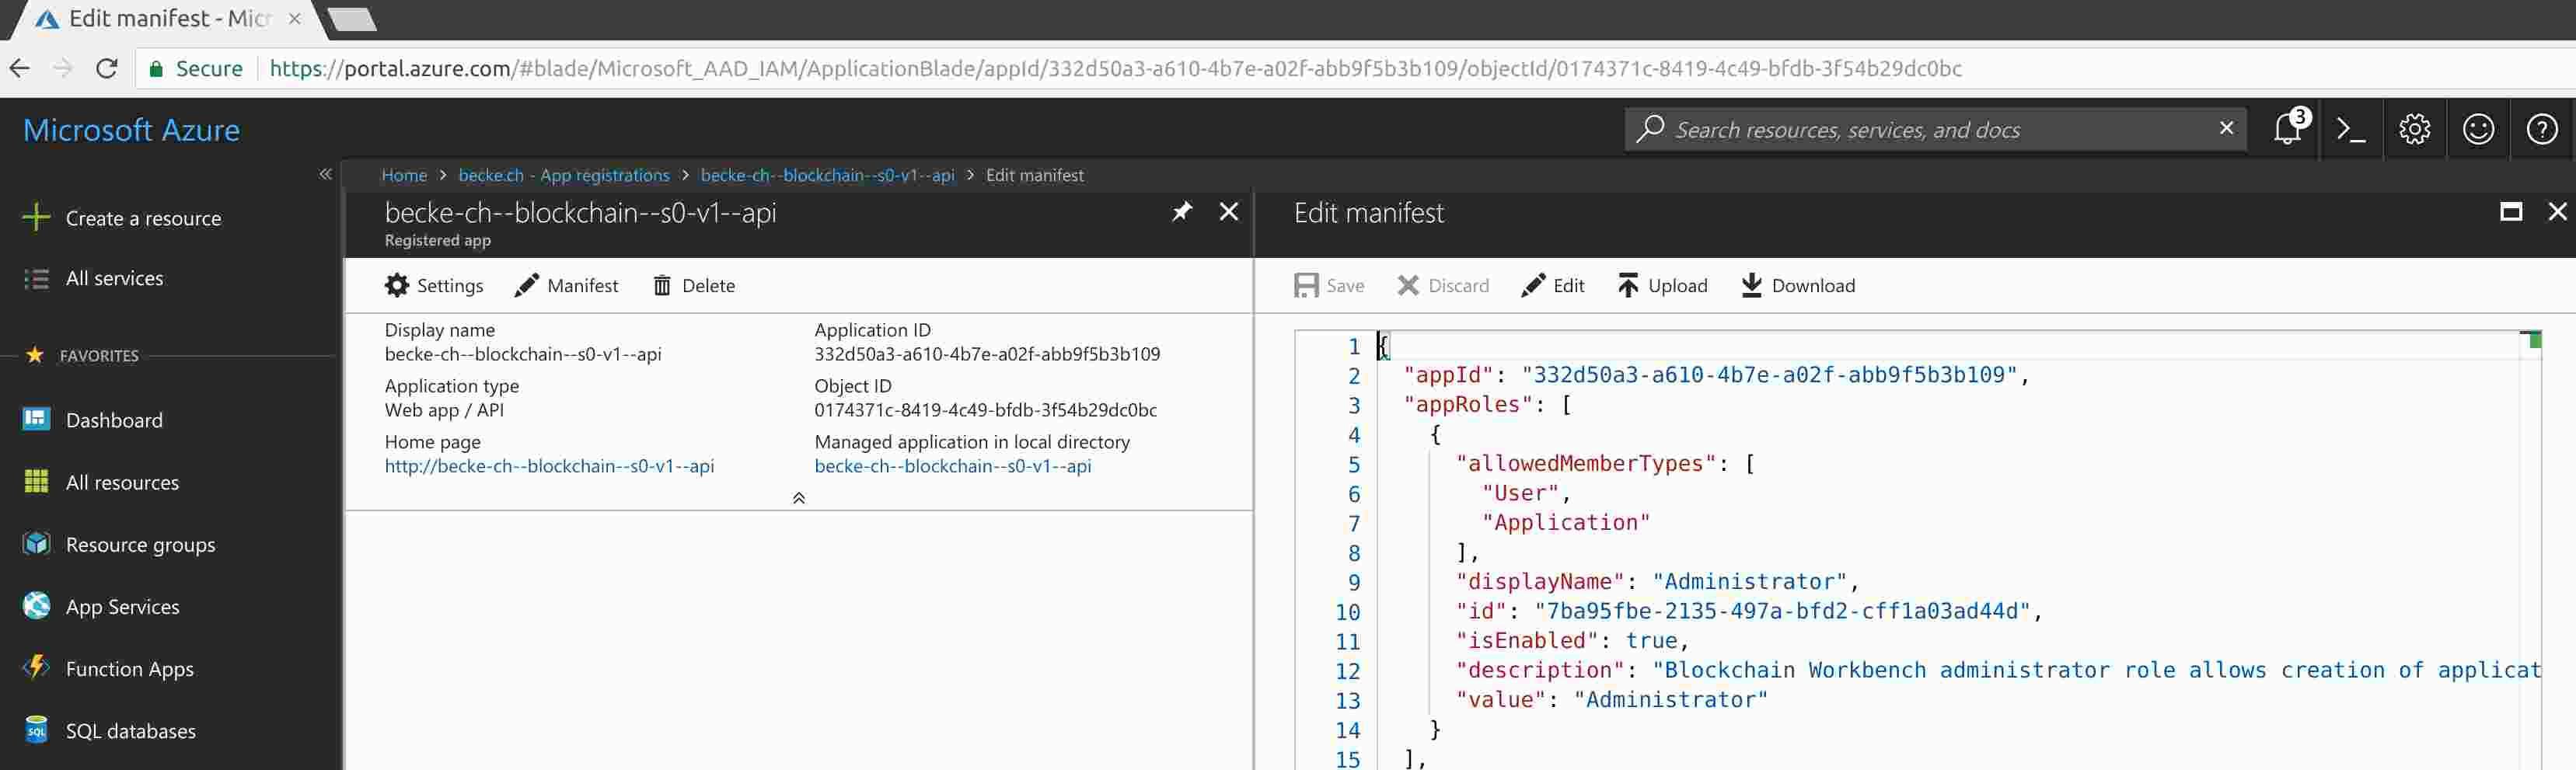
Add Graph API key to application
For the application you registered, select Settings in the registered application details pane.
Select Keys.
Add a new key by specifying a key description e.g. “Service” and choosing expires duration value e.g. “1 Year”.
Select “Save”
Copy the value of the key and store it for later. You need it for deployment. cTX78d5xhbxSh+w+pOa3Cb4kYX0Q6lhXQd5gslGB0R0=
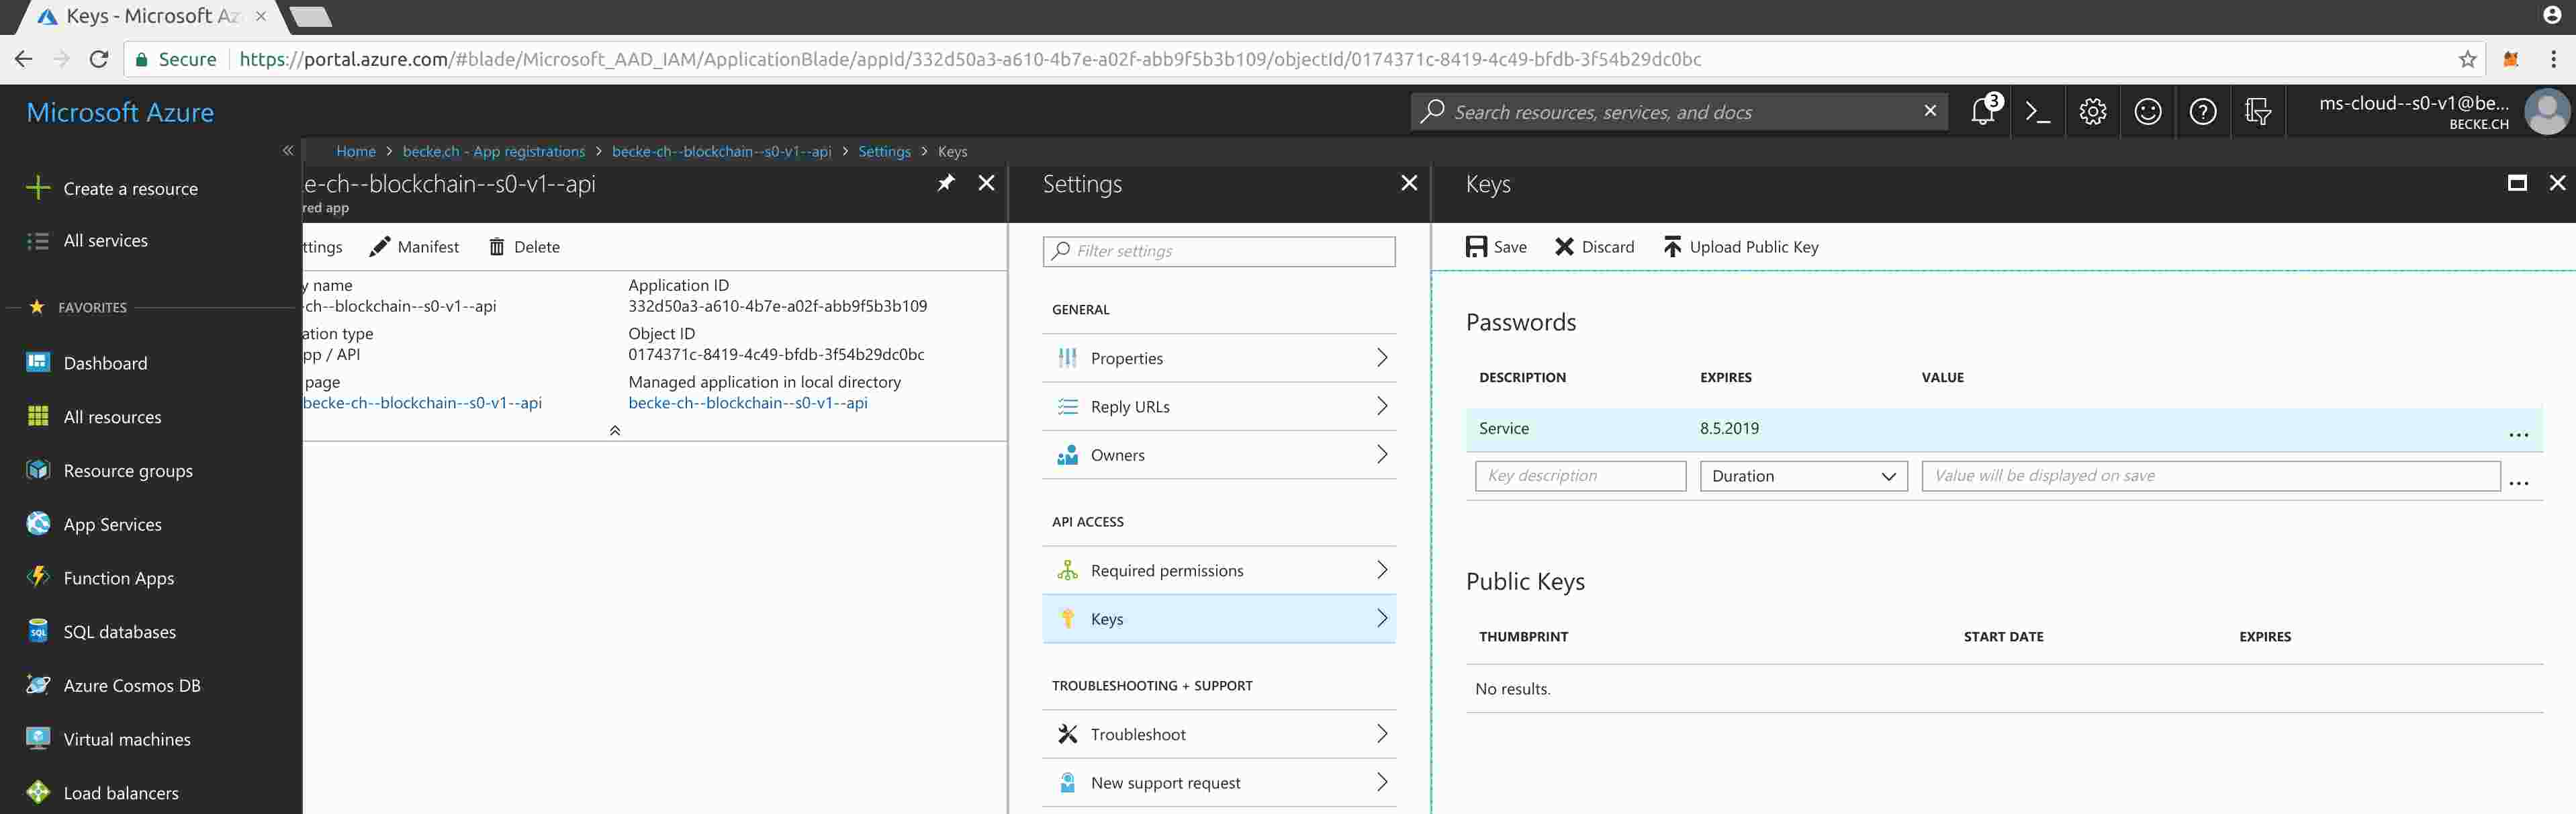
Add Graph API required permissions
In the Blockchain API app registration, select Settings > Required permissions: Click “Add”
Select an API: Click “Microsoft Graph”.
In Enable Access under Application permissions, choose Read all users' full profiles.
Click Select then click Done.
In Required permissions, select Grant Permissions then select Yes for the verification prompt.
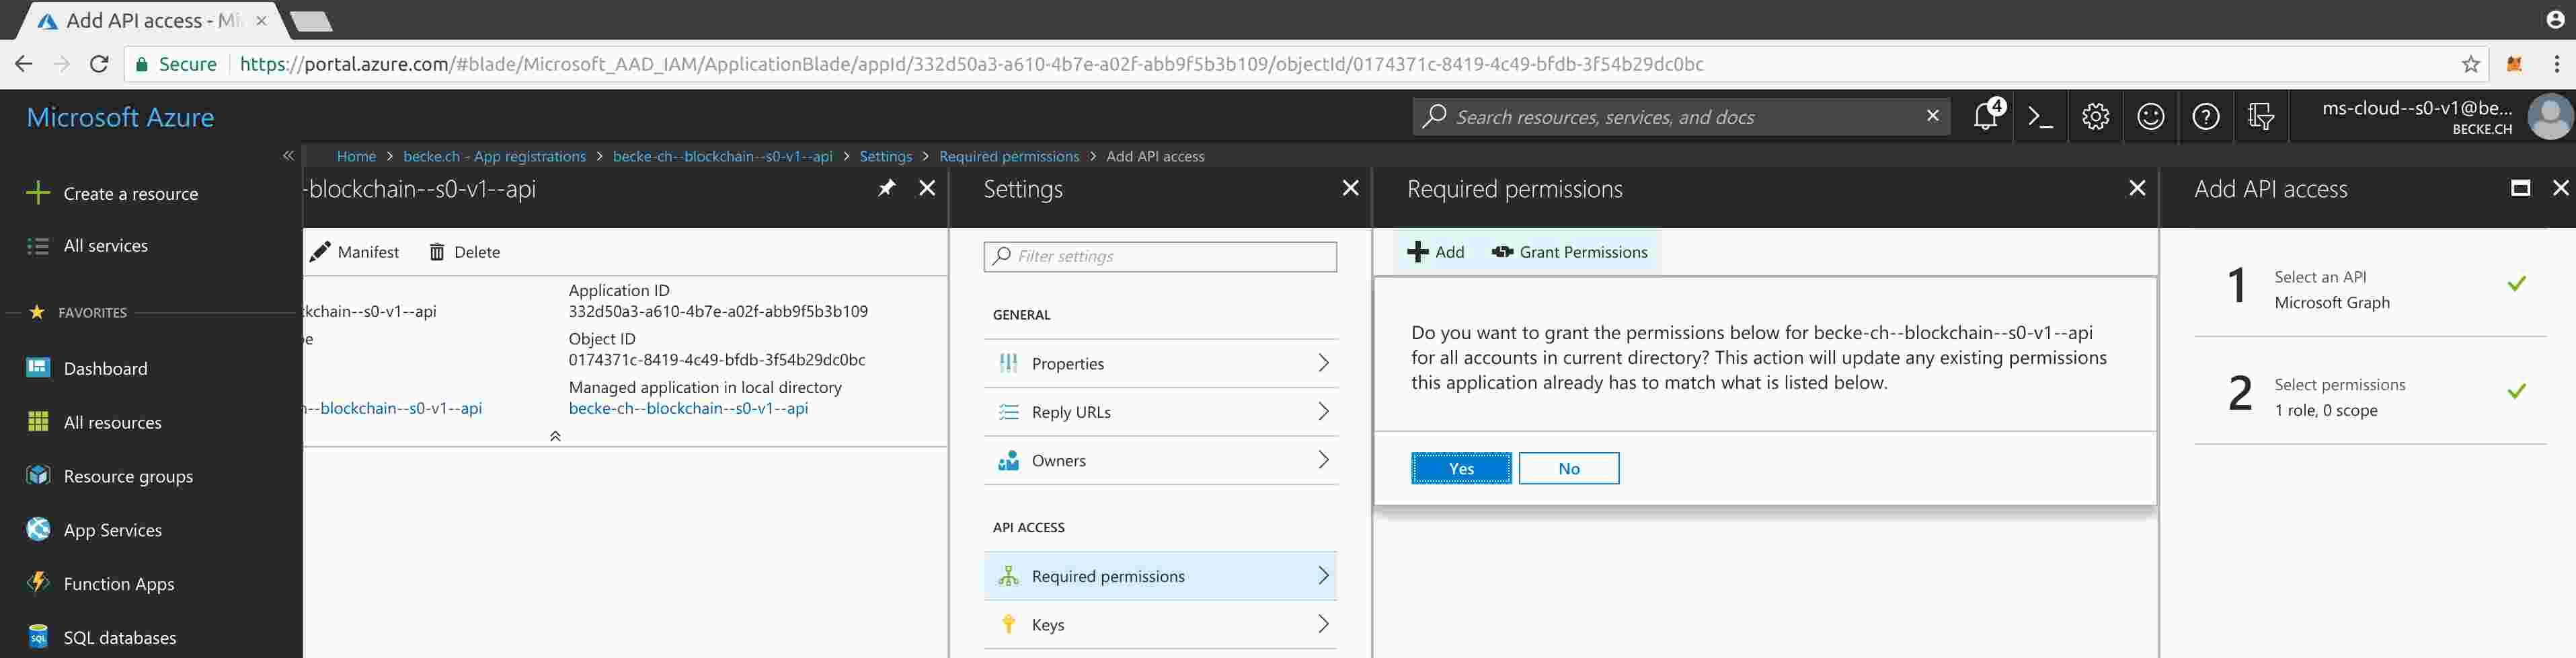
Get application ID
For the application you registered, select Settings > Properties.
In the Properties pane, copy and store the following values for later use during deployment.
Application ID: 332d50a3-a610-4b7e-a02f-abb9f5b3b109
Get tenant domain name
In the left-hand navigation pane, select the Azure Active Directory service. Select Custom domain names. Copy and store the domain name: beckech.onmicrosoft.com
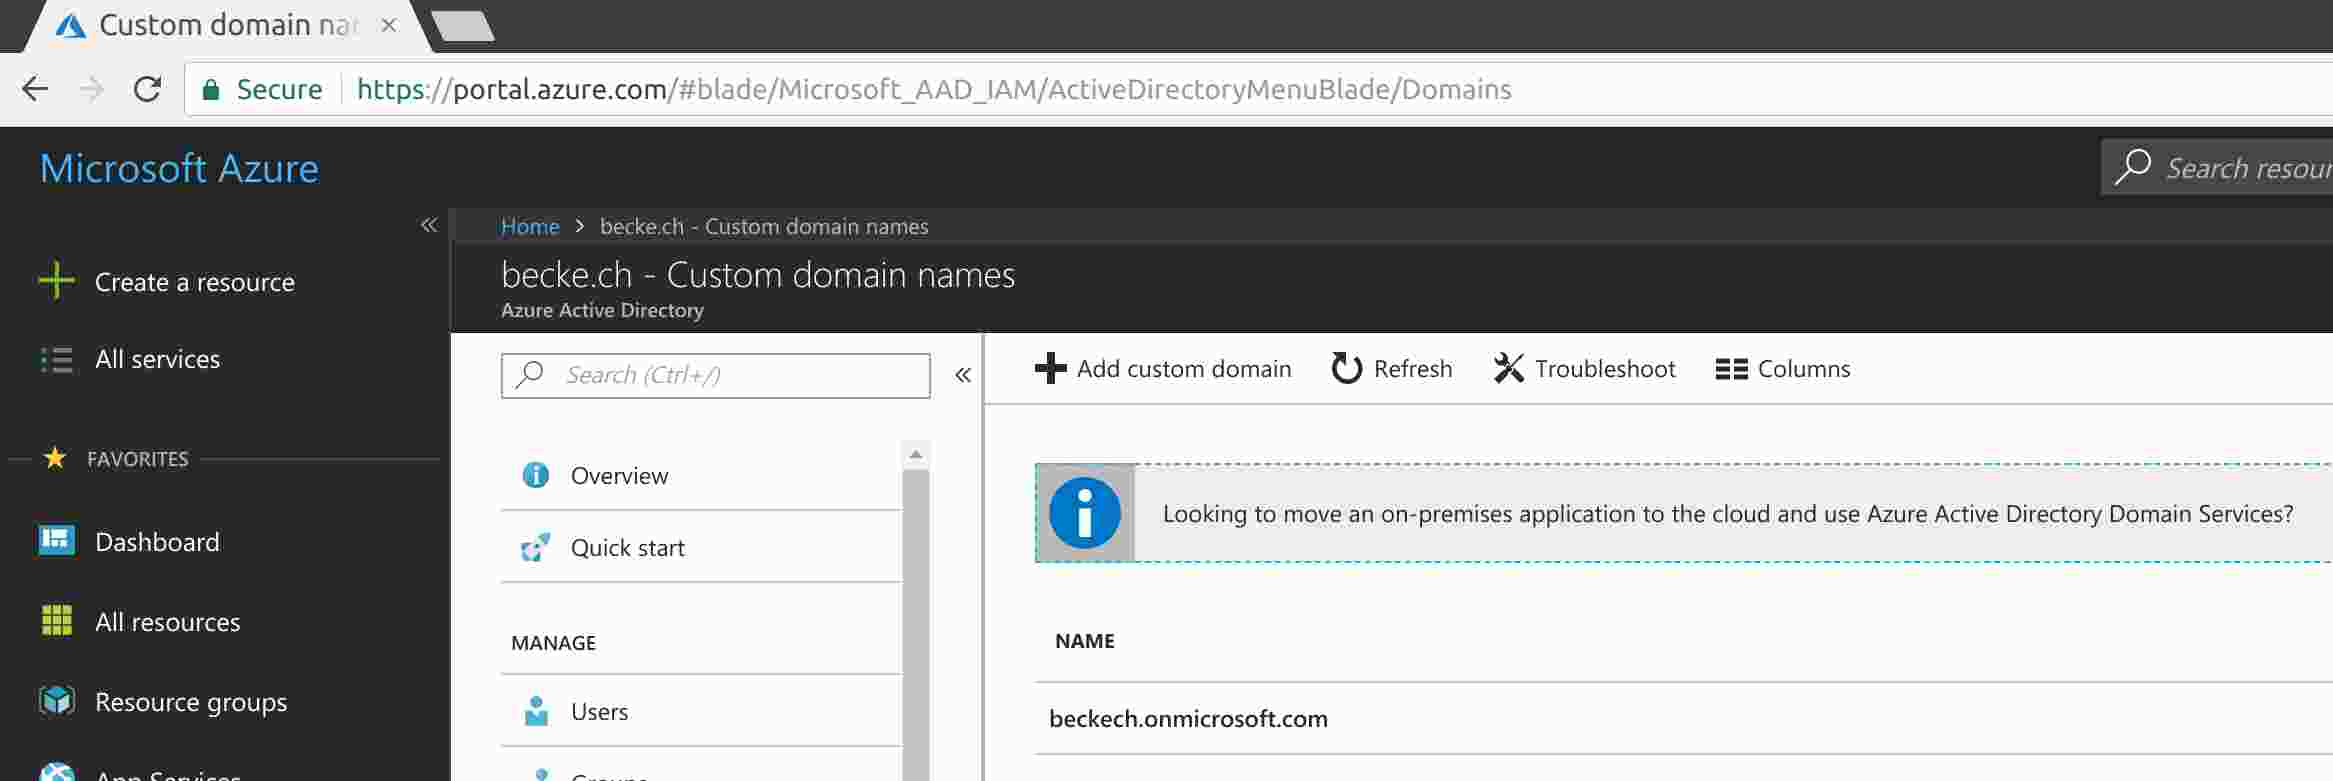
Deploy Blockchain Workbench
Click on “create a resource” and search for “Azure Blockchain Workbench”: https://portal.azure.com/#create/hub
The Azure Blockchain Workbench is the fastest way to get started with blockchain on Azure. This tool allows developers to deploy a blockchain ledger along with a set of relevant Azure services most often used to build a blockchain-based application. Rather than spending hours configuring the required infrastructure and cloud services, we have automated the time-consuming scaffolding to simplify development and allow users to focus on application logic and workflows.
With a handful of user inputs in a click-through deployment experience in the Azure portal, users can easily deploy the Workbench environment, which comes equipped with sample cross-organizational workflows and smart contracts as well as an out of the box UI and admin experience.
Deploying Workbench will result in the following Azure services being provisioned in your Azure subscription.
2 App Service resource groups (Standard)
1 Application Insights
1 Event Grid Topic
2 Azure Key Vaults
1 Service Bus Namespace
2 SQL Databases (Standard S0)
2 Azure Storage accounts (Standard LRS)
2 Virtual Machine scale sets (ledger nodes and workbench microservices)
2 Virtual Network resource groups (each with Load Balancer, Network Security Group, Public IP Address, Virtual Network)
Optional: Azure Monitor
Note: The cost of Blockchain Workbench is an aggregate of the cost of the underlying Azure services. Pricing information for these services can be found here. Usage amounts and billing details for your subscription can be found in the Azure Portal.
Click “Create”
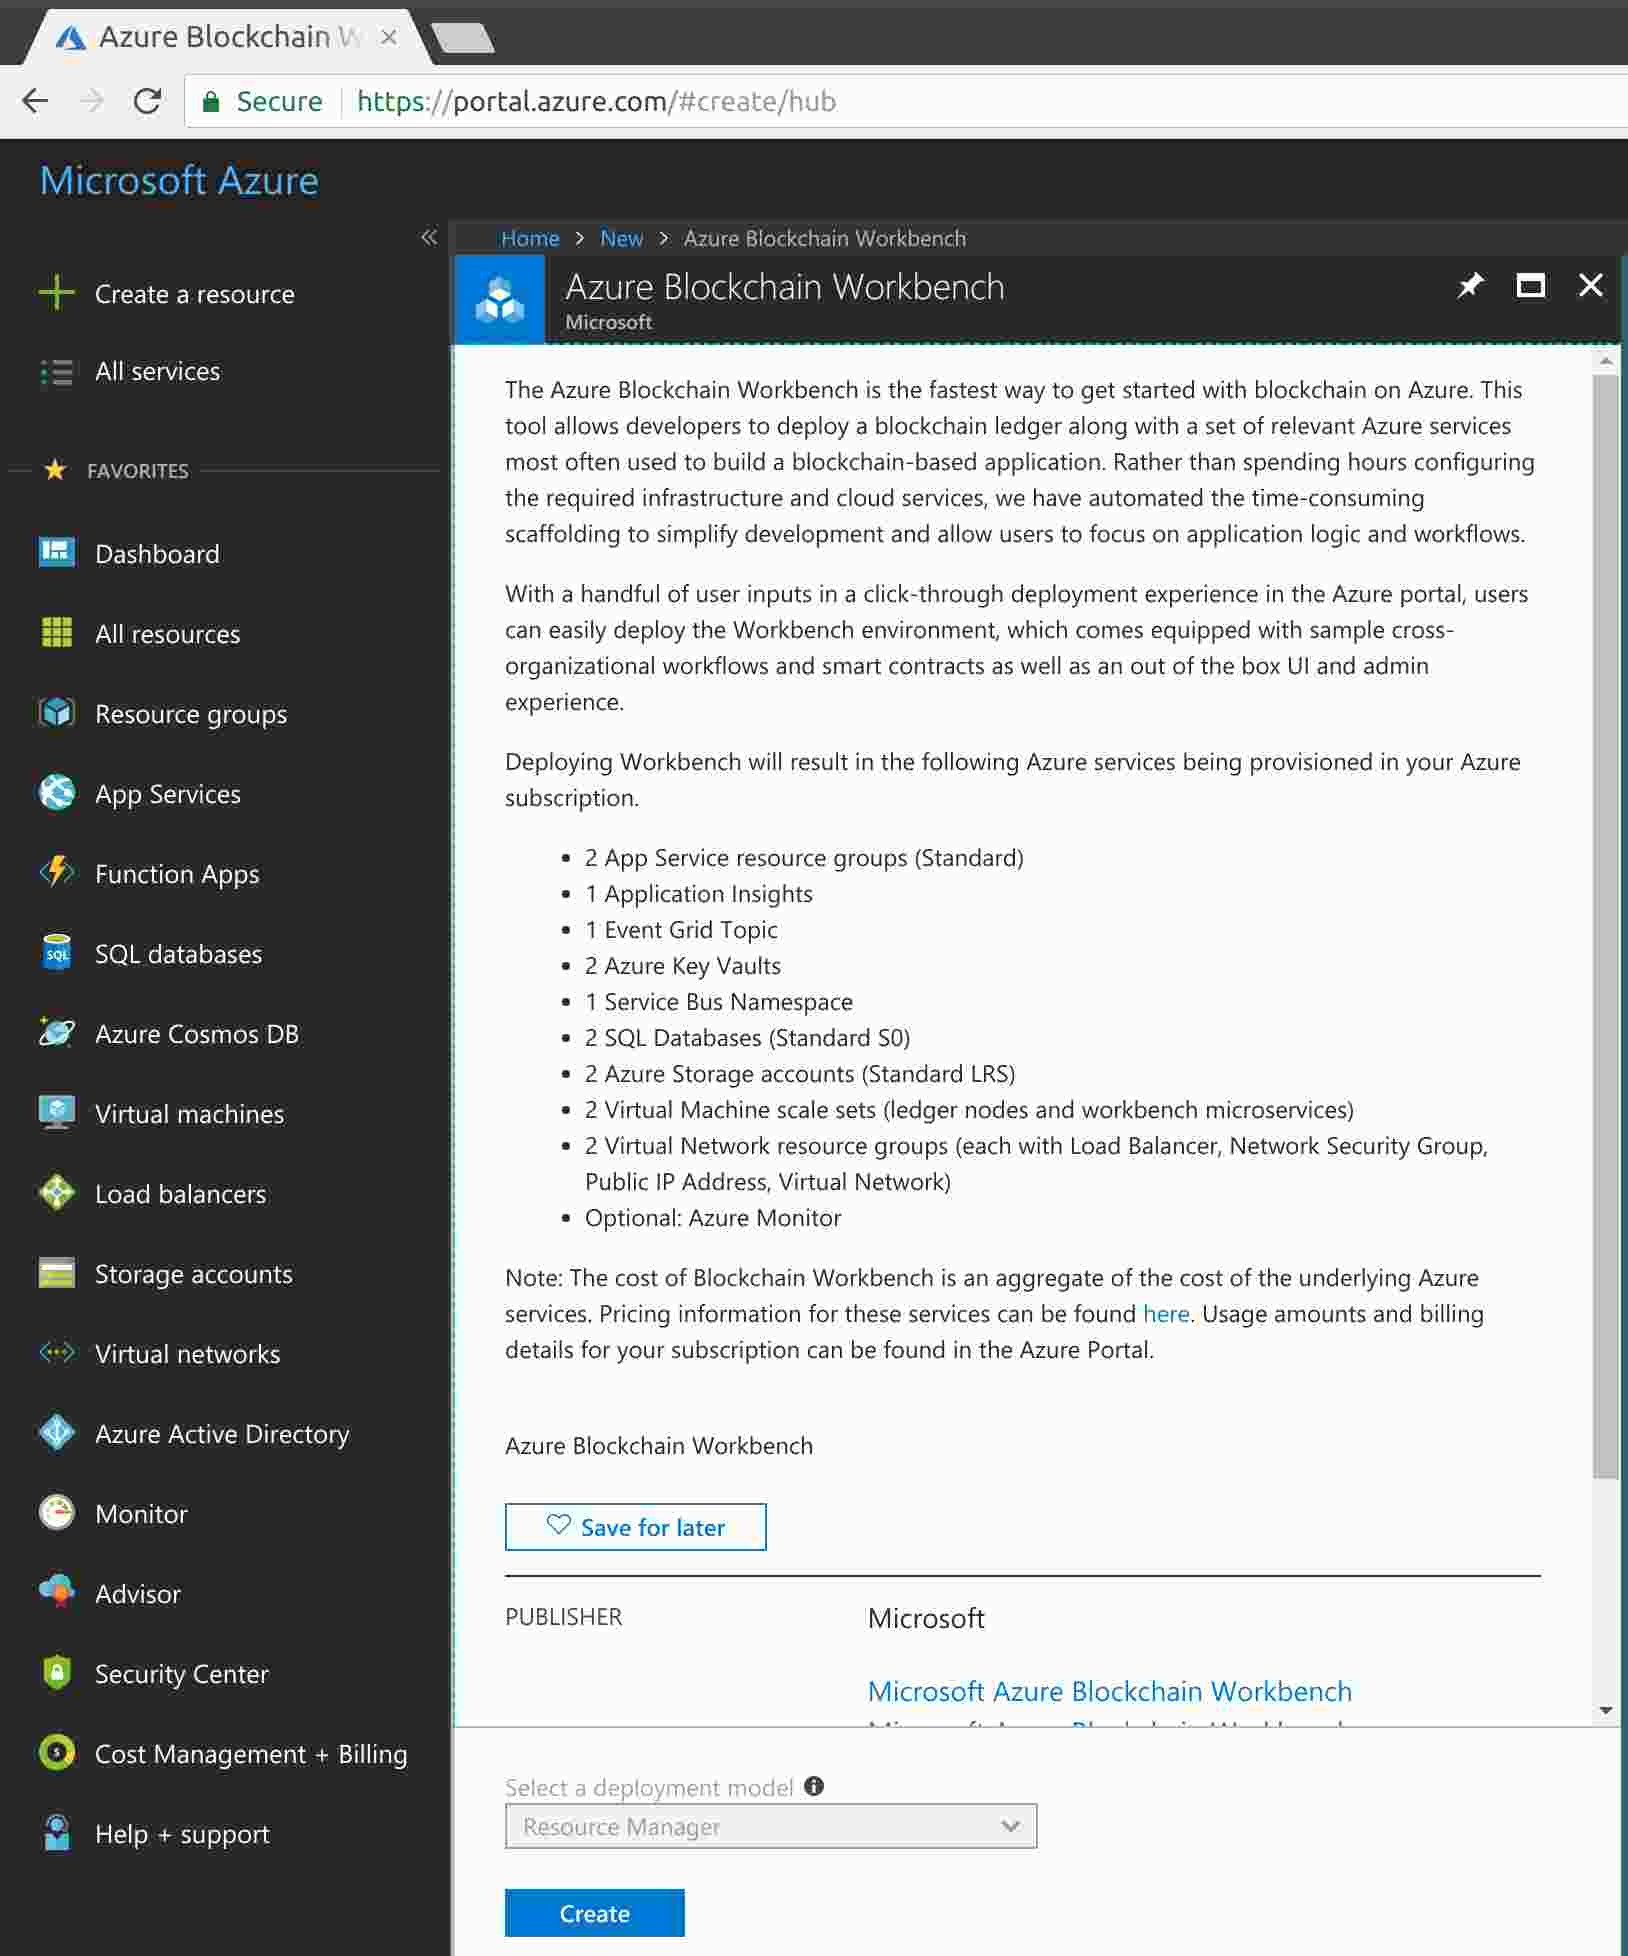
Basics: Configure Basic Setting:
Resource prefix: becke-ch--s0-v1
beckechs0v1:
String used as a base for naming resources (16 alphanumeric
characters or less) A unique hash is prepended to the string for
some resources, while resource specific information is appended.
There seems to be a bug in the naming
validation i.e. some names are passing the validation but this
resulting in an error later on.
(Actually would have
preferred longer name but this is not possible and therefore have
to leave away the product name “blockchain”:
becke-ch--blockchain--s0-v1)
VM user name: beckechs0v1:
Admin username for all of the deployed virtual machines (Admin
username between 5 and 16 characters long, and can contain only
letters and numbers without spaces)
(Actually would have
preferred longer name and dash characters as separators but this is
not possible and therefore have to leave away the product name
“blockchain” and dashes: becke-ch--blockchain--s0-v1)
Password: Eo...2018: VM password needs to be 12 characters and have 3 of the following: 1 lower case character, 1 uppercase character, 1 number and 1 special character.
Database password: Eo...2018: Password used for administrator access to the database.
Deployment region: West Europe or East US: Select where to deploy the Blockchain Workbench resources. For the best availability, this should match your selection under Location drop-down below. The Location section determines where your resource group metadata is stored.
Subscription: …
Resource Group: Create new: becke-ch--blockchain--s0-v1--wbench : A resource group is a collection of resources that share the same lifecycle.

Azure Active Directory Setup:
Azure AD tenant:
Domain name: beckech.onmicrosoft.com : Use the Azure AD tenant collected in the Get tenant domain name prerequisite section..
Azure AD client:
Application ID: 332d50a3-a610-4b7e-a02f-abb9f5b3b109: Use the Application ID from the Blockchain client app registration collected in the Get application ID prerequisite section.
Application key: …: Use the Application key from the Blockchain client app registration collected in the Add Graph API key to application prerequisite section.
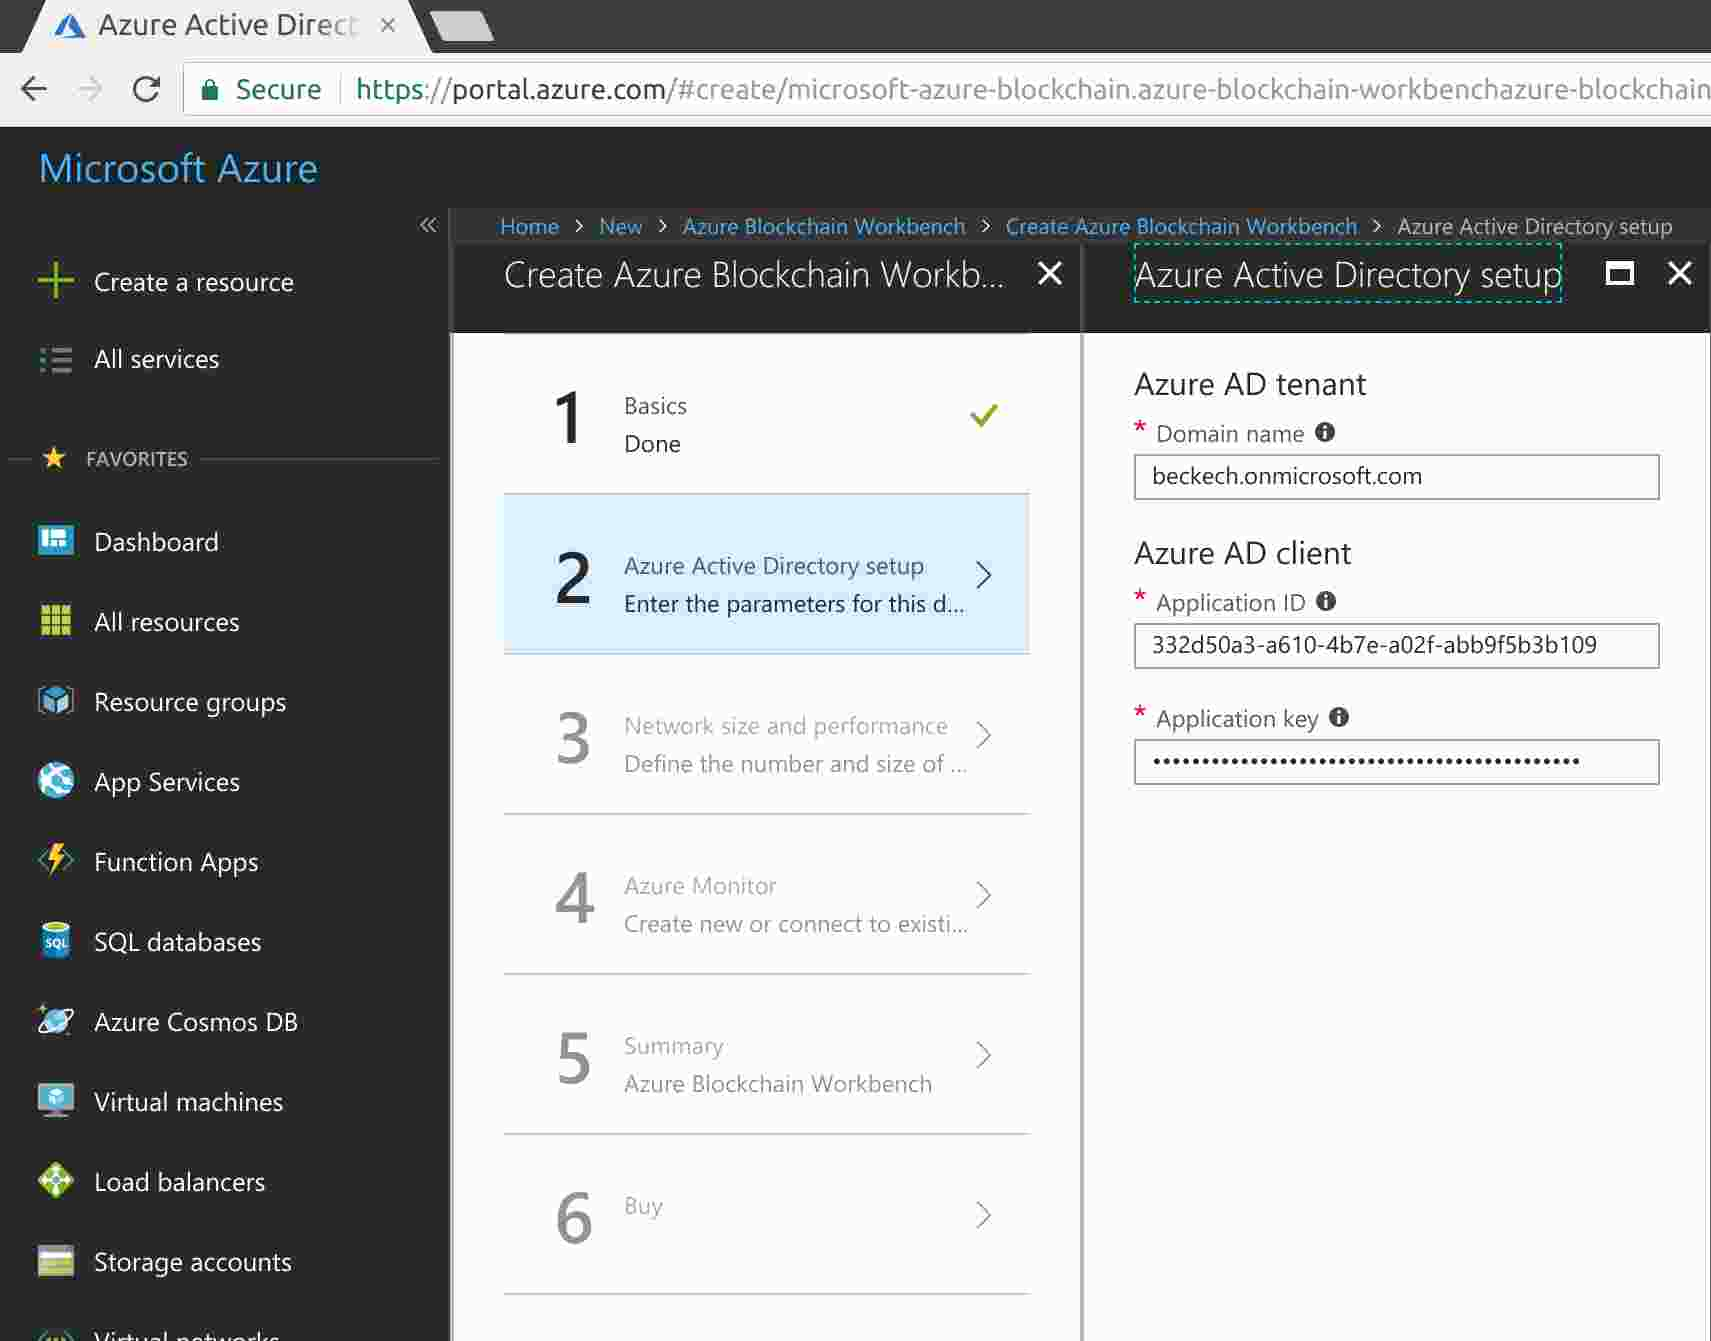
Network size and performance
Number of blockchain nodes (default): 2: Choose the number of Ethereum PoA validator nodes to be deployed in your network.
Storage performance (default): Standard: Choose the preferred VM storage performance for your blockchain network.
Virtual machine size (default): 2x Standard D1 v2: Choose the preferred VM size for your blockchain network.
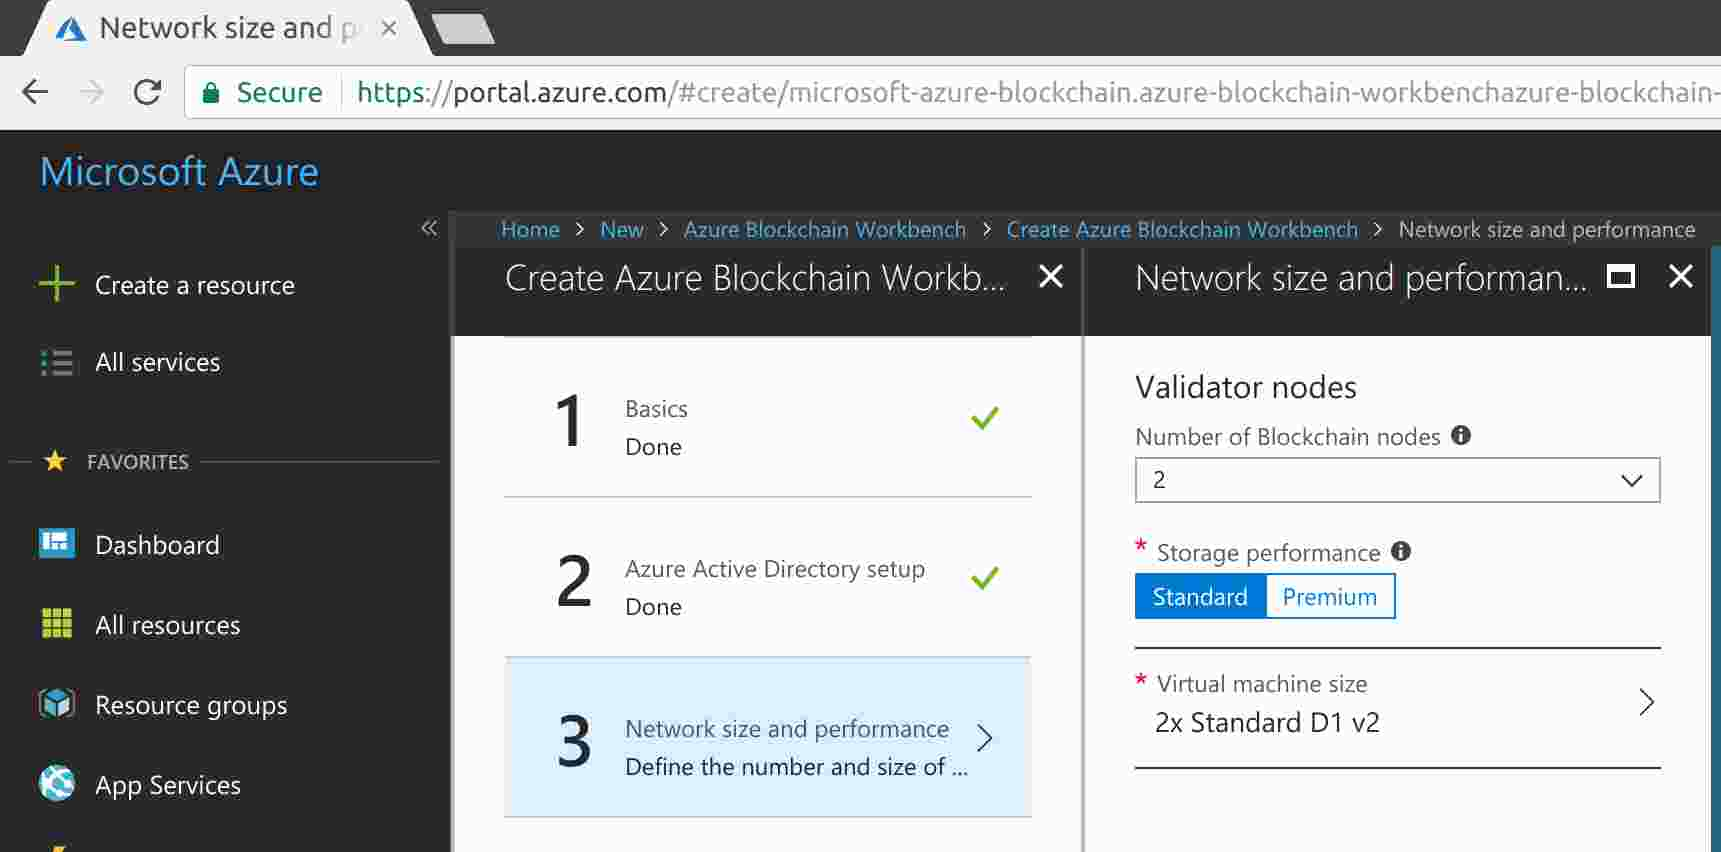
Complete the Azure Monitor settings.
Monitoring (default): Enable: Choose whether you want Azure Monitor to be used to monitor your blockchain network
Connect to existing OMS instance (default): Create new: Choose whether you want to use an existing Operations Management Suite instance or create a new one
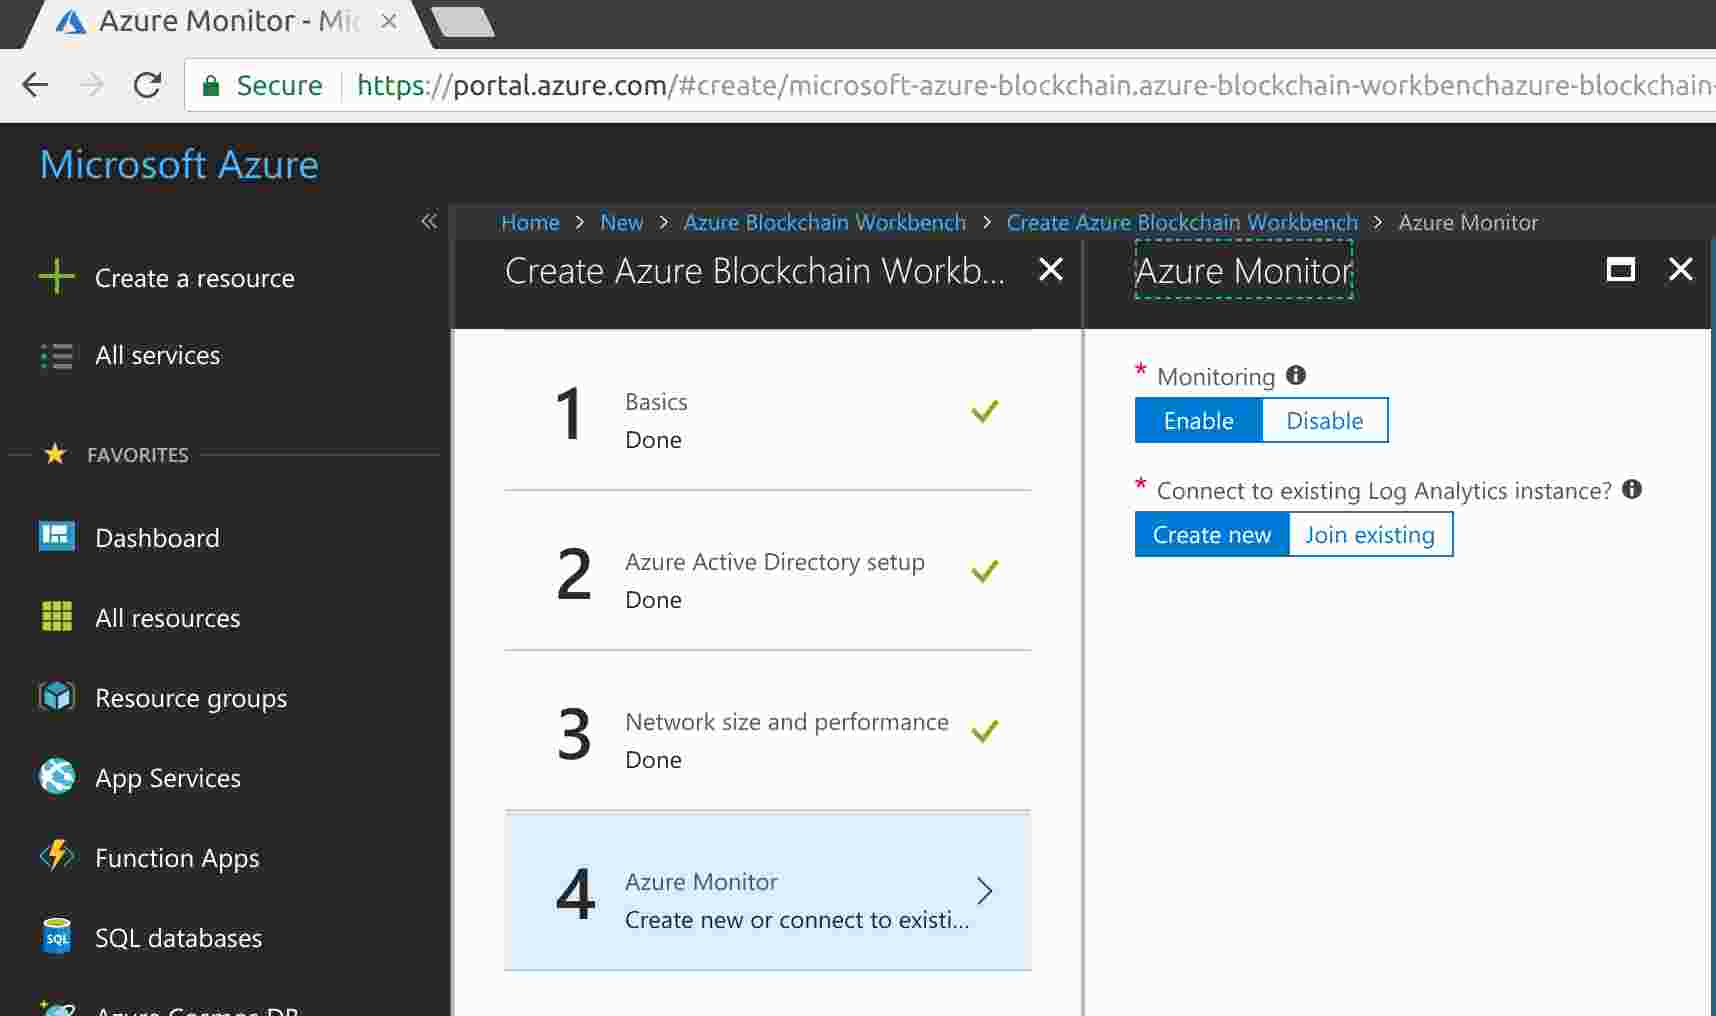
Summary:
Basics
Subscription
MSDN Platforms
Resource group
becke-ch--blockchain--s0-v1--wbench
Location
West Europe
Resource prefix
becke-ch--s0-v1
VM user name
beckechs0v1
Password
************
Database password
************
Deployment region
West Europe
Azure Active Directory setup
Domain name
beckech.onmicrosoft.com
Application ID
332d50a3-a610-4b7e-a02f-abb9f5b3b109
Application key
********************************************
Network size and performance
Number of Blockchain nodes
2
Storage performance
Standard
Virtual machine size
Standard D1 v2
Azure Monitor
Monitoring
Enable
Connect to existing Log Analytics instance?
Create new
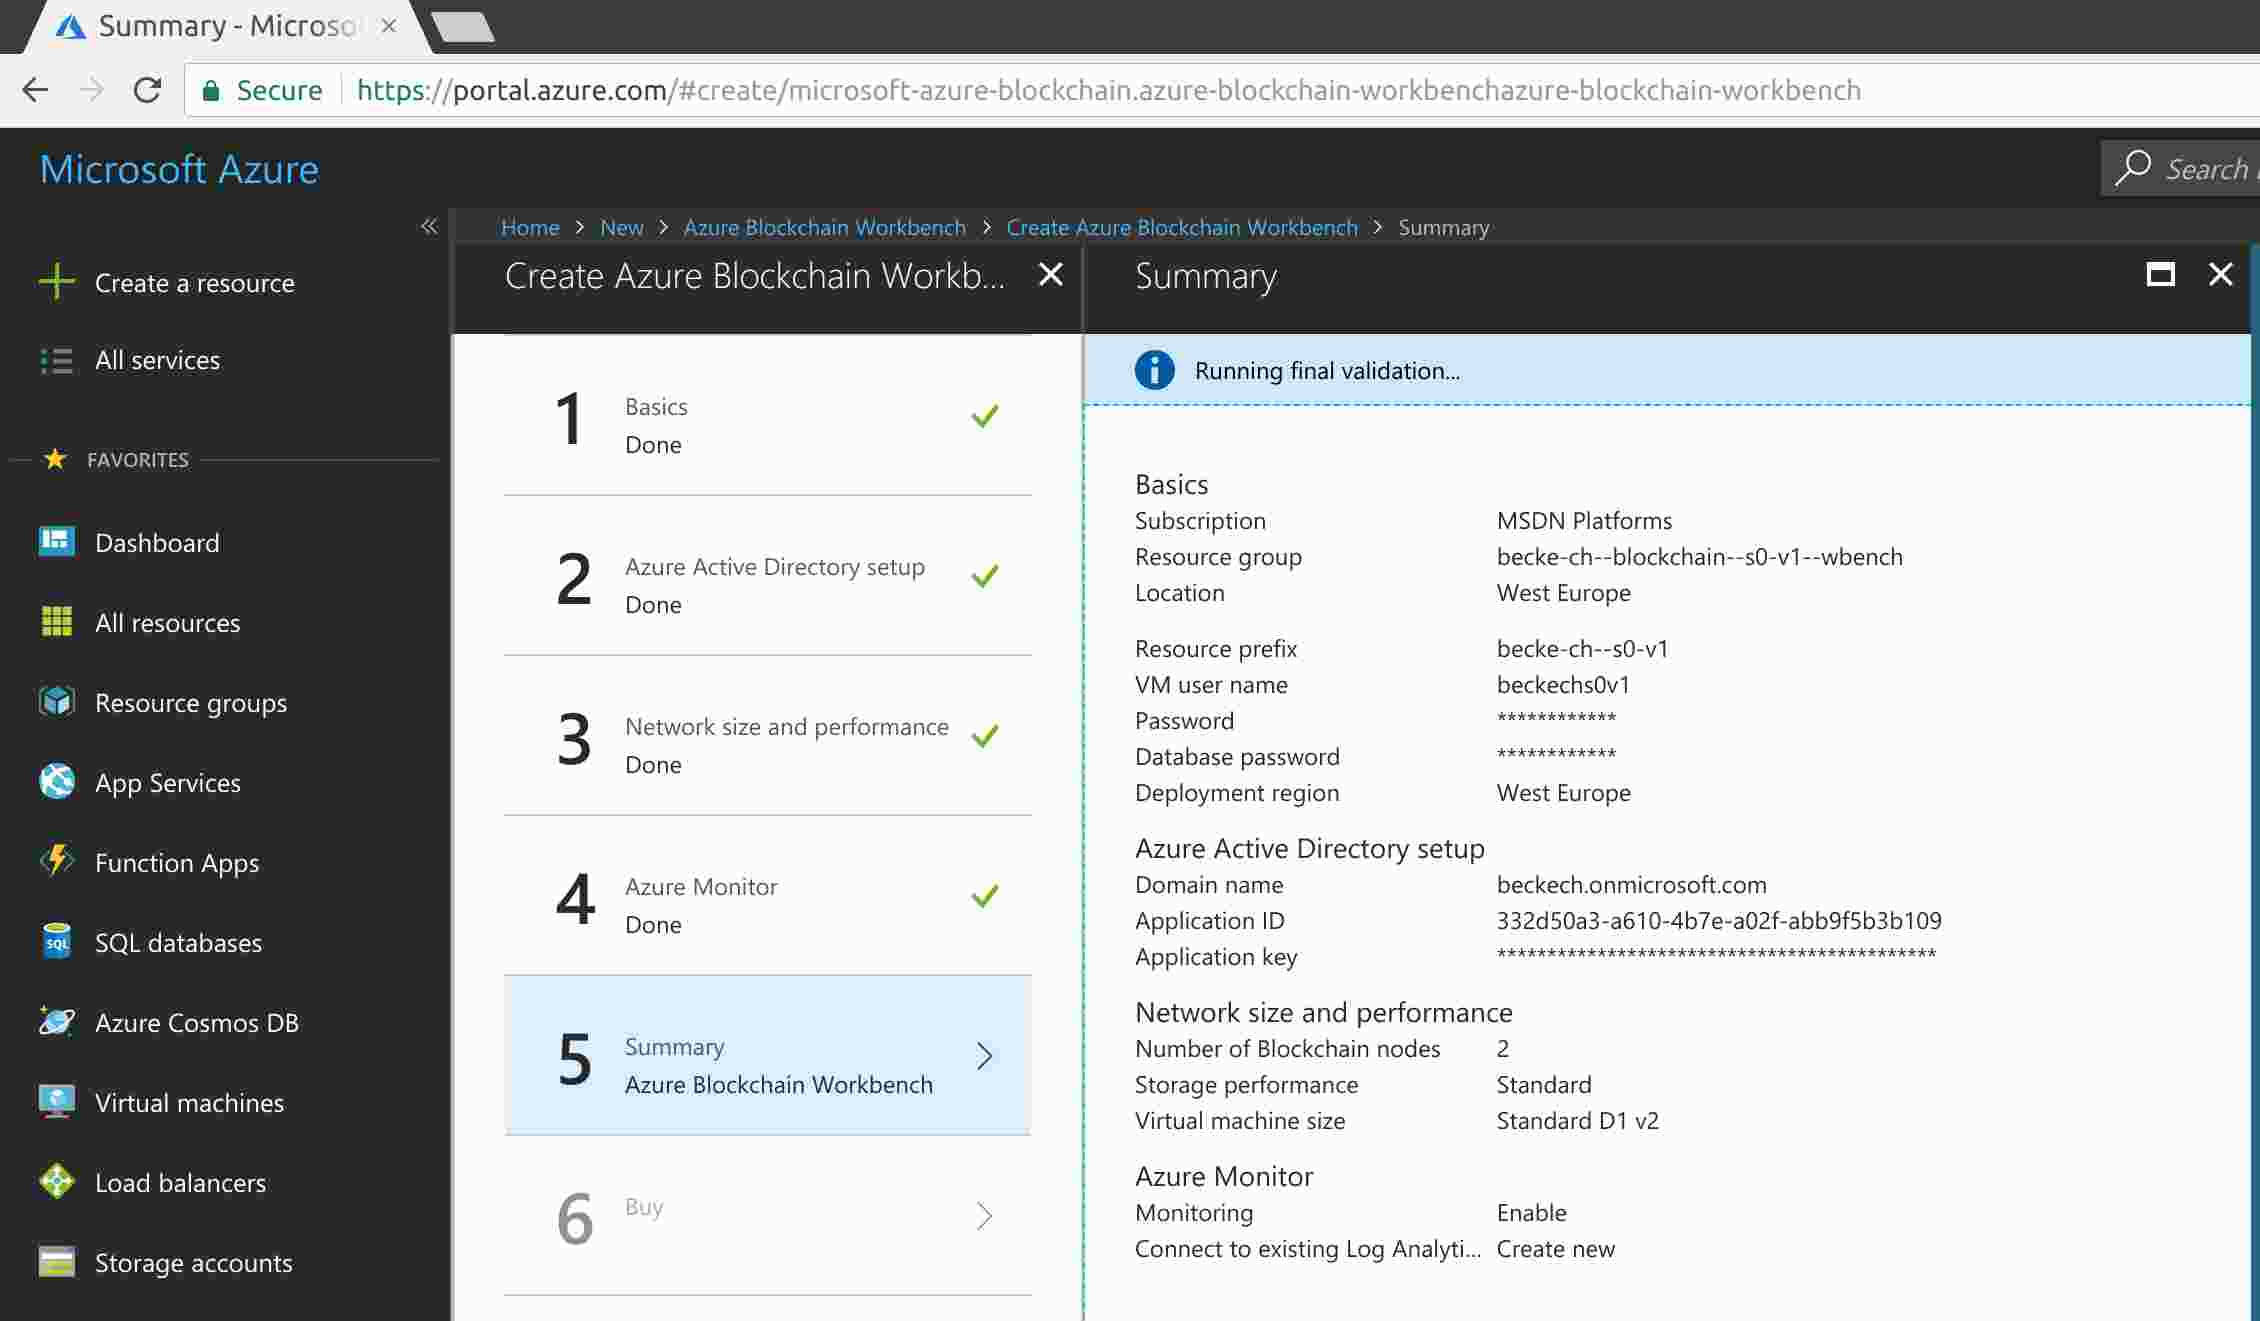
Click “Download template and parameters” and store “template.zip” in a folder e.g. “/ws/app/becke-ch--blockchain--s0-v1/azure”
Click “ok” and click “confirm” finally
Once the Azure Blockchain Workbench has been deployed, the next step is to make sure the Azure Active Directory (Azure AD) client application is registered to the correct Reply URL of the deployed Blockchain Workbench web URL.
In the left-hand navigation pane, select the Azure Active Directory service. Select App registrations.
Select the Azure AD client application you registered in the prerequisite section.
Select Settings > Reply URLs.
Specify the main web URL of the Azure Blockchain Workbench deployment you retrieved in the Get the Azure Blockchain Workbench Web URL section. The Reply URL is prefixed with https://. https://beckechs0v3-2irz.azurewebsites.net/
https://docs.microsoft.com/en-us/azure/blockchain-workbench/blockchain-workbench-create-app
In your favorite editor, create a file named HelloBlockchain.json (content of the file can be copied from https://docs.microsoft.com/en-us/azure/blockchain-workbench/blockchain-workbench-create-app )
Application metadata: The beginning of the configuration file contains information about the application including application name and description.
Application roles: The application roles section defines the user roles who can act or participate within the blockchain application.
Workflows: Workflows define one or more stages and actions of the contract. In the request-response scenario, the first stage (state) of the workflow is a requestor (role) takes an action (transition) to send a request (function). The next stage (state) is a responder (role) takes an action (transition) to send a response (function). An application's workflow can involve properties, functions, and states required describe the flow of a contract.
B.1.2. Smart contract code file
create a file called HelloBlockchain.sol
Base class: WorkbenchBase base class enables Blockchain Workbench to create an update the contract. The base class is required for Blockchain Workbench specific smart contract code. Your contract needs to inherit from the WorkbenchBase base class.
event WorkbenchContractCreated(string applicationName, string workflowName, address originatingAddress);
event WorkbenchContractUpdated(string applicationName, string workflowName, string action, address originatingAddress);
string internal ApplicationName;
string internal WorkflowName;
function WorkbenchBase(string applicationName, string workflowName) internal {
ApplicationName = applicationName;
WorkflowName = workflowName;
}
function ContractCreated() internal {
WorkbenchContractCreated(ApplicationName, WorkflowName, msg.sender);
}
function ContractUpdated(string action) internal {
WorkbenchContractUpdated(ApplicationName, WorkflowName, action, msg.sender);
}
}
contract HelloBlockchain is WorkbenchBase('HelloBlockchain', 'HelloBlockchain') {
…
}
Pre-Step: In AAD add 2 users: “becke-ch--blockchain--s0-v3--user” (becke-ch--blockchain--s0-v3--user@beckech.onmicrosoft.com Password: “Fona6786” change to “Eo...”) and “becke-ch--blockchain--s0-v3--admin” (becke-ch--blockchain--s0-v3--admin@beckech.onmicrosoft.com Password: “Quca6033” change to “Eo...”)
https://docs.microsoft.com/en-us/azure/blockchain-workbench/blockchain-workbench-manage-users
Select the Azure AD client application for Blockchain Workbench: becke-ch--blockchain--s0-v1--api
Select Users and groups > Add user
In Add Assignment, select Users
Verify Role is set to Administrator
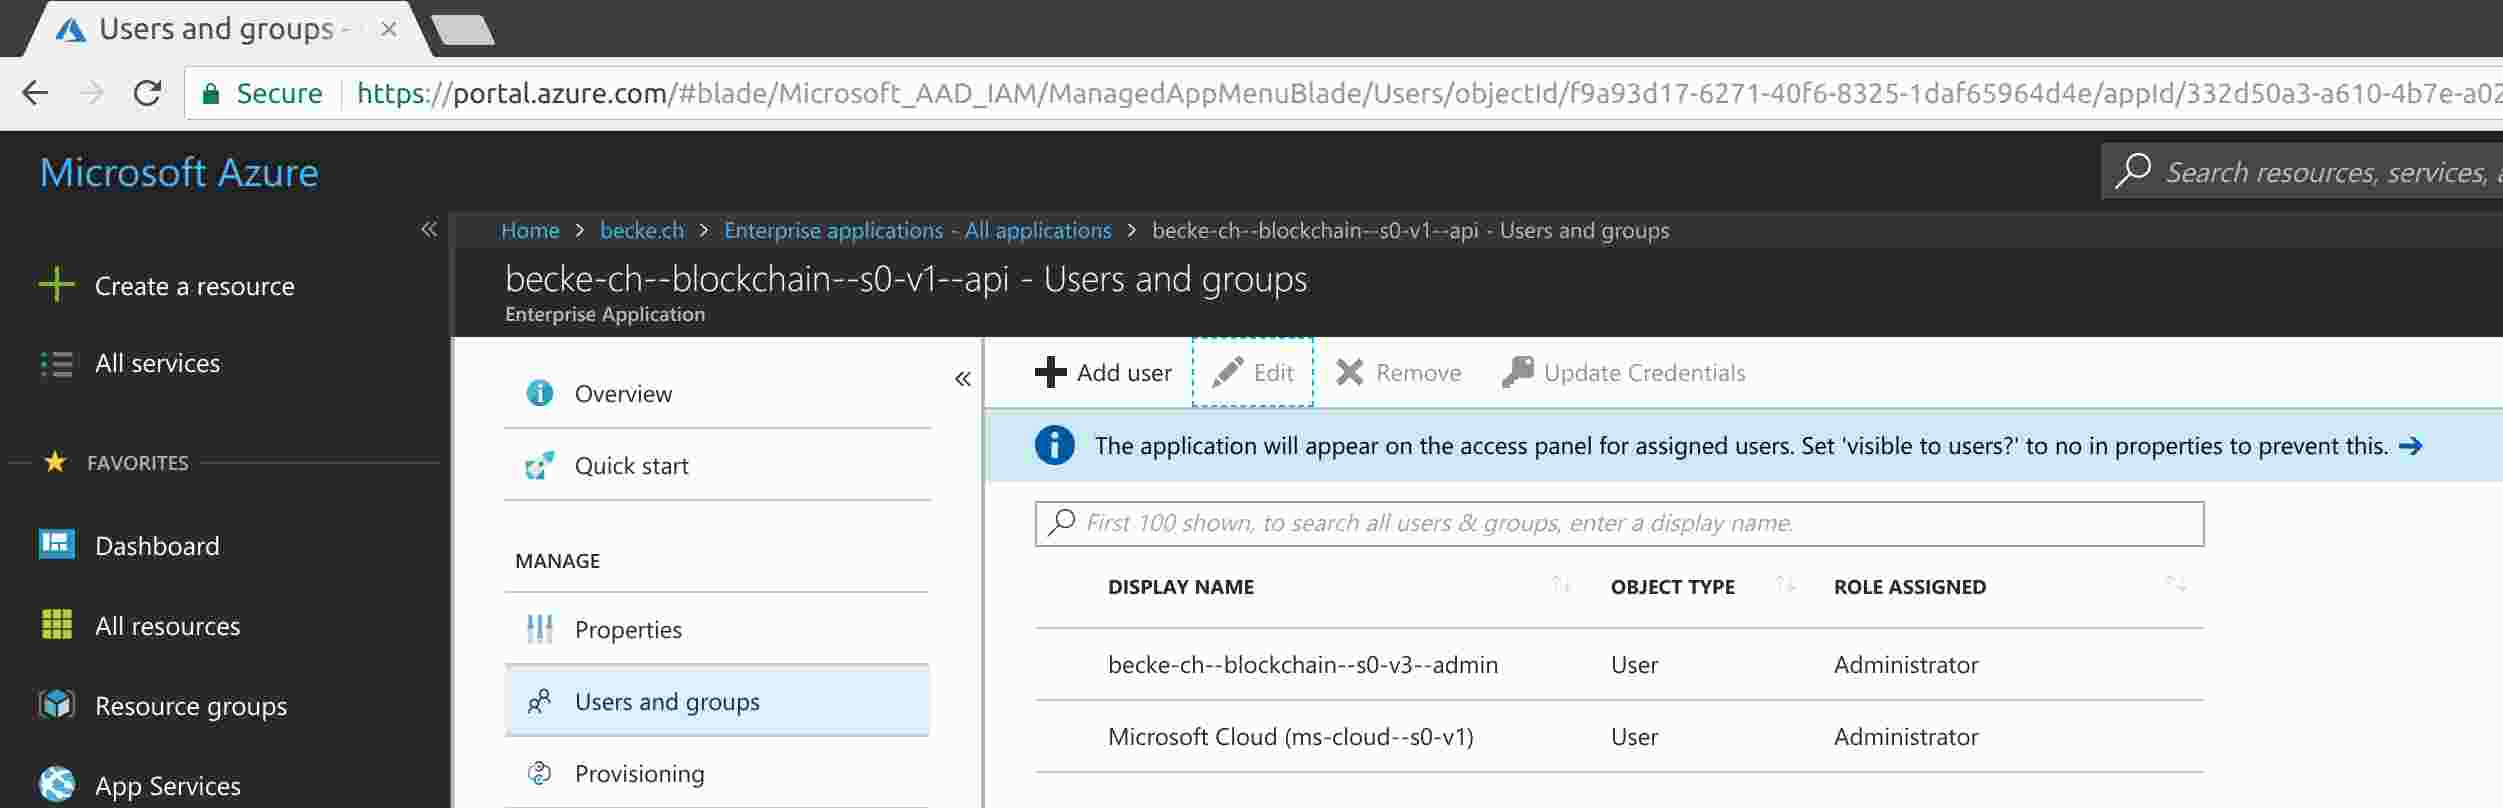
Managing Blockchain Workbench members
Open the Blockchain Workbench (https://beckechs0v3-2irz.azurewebsites.net) in your browser and sign in as an administrator.
B.1.4. Add blockchain application to Blockchain Workbench
To add a blockchain application to Blockchain Workbench, you upload the configuration and smart contract files to define the application.
In a web browser, navigate to the Blockchain Workbench web address: https://beckechs0v3-2irz.azurewebsites.net . The web application is created when you deploy Blockchain Workbench. For information on how to find your Blockchain Workbench web address, see Blockchain Workbench Web URL
Sign in as a Blockchain Workbench administrator.
Select Applications > New. The New application pane is displayed.
Select Upload the contract configuration > Browse to locate the HelloBlockchain.json configuration file you created. The configuration file is automatically validated. Select the Show link to display validation errors. Fix validation errors before you deploy the application.
Select Upload the contract code > Browse to locate the HelloBlockchain.sol smart contract code file. The code file is automatically validated. Select the Show link to display validation errors. Fix validation errors before you deploy the application.
Select Deploy to create the blockchain application based on the configuration and smart contract files.
C. Appendix – Parity on Docker Installation
All details respective output and issues encountered can be found in appendix D.2. Listed here is only a summary of the steps necessary in the required order:
Start Ubuntu container:
$ docker run -it ubuntu bash
Update Ubuntu:
root@a145b4b96377:/# apt-get update
Install software required to build parity:
root@a6a9230f6d31:/# apt-get install curl
root@a145b4b96377:/# curl https://sh.rustup.rs -sSf | sh
info: downloading installer
Welcome to Rust!
This will download and install the official compiler for the Rust programming
language, and its package manager, Cargo.
It will add the cargo, rustc, rustup and other commands to Cargo's bin
directory, located at:
/root/.cargo/bin
This path will then be added to your PATH environment variable by modifying the
profile file located at:
/root/.profile
You can uninstall at any time with rustup self uninstall and these changes will
be reverted.
Current installation options:
default host triple: x86_64-unknown-linux-gnu
default toolchain: stable
modify PATH variable: yes
1) Proceed with installation (default)
2) Customize installation
3) Cancel installation
1
...
Rust is installed now. Great!
To get started you need Cargo's bin directory ($HOME/.cargo/bin) in your PATH
environment variable. Next time you log in this will be done automatically.
To configure your current shell run source $HOME/.cargo/env
root@a6a9230f6d31:/#
root@a6a9230f6d31:/parity# apt-get install build-essential
root@a6a9230f6d31:/parity# apt-get install libudev-dev
root@a6a9230f6d31:/# apt-get install git
Download parity source code:
root@a6a9230f6d31:/# git clone https://github.com/paritytech/parity
root@a6a9230f6d31:/# cd parity/
root@a6a9230f6d31:/parity# git submodule init
Build parity from source:
root@a6a9230f6d31:/parity# source $HOME/.cargo/env
root@a6a9230f6d31:/parity# cargo build
OPTIONAL: Running Tests (this will run hundreds of tests and will take very long!)
root@a6a9230f6d31:/parity# ./test.sh
ERROR: configure: error: no acceptable C compiler found in $PATH
raoul-becke--s0-v1@hp-elitebook-850-g5--s0-v1:/ws/app/becke-ch--blockchain--s0-v1/becke-ch--blockchain--s0-v1--plain/becke-ch--blockchain--s0-v1--plain-simple-storage--pl--lib$ npm install web3
npm WARN deprecated fs-promise@2.0.3: Use mz or fs-extra^3.0 with Promise Support
npm WARN deprecated tar.gz@1.0.7: ⚠️ WARNING ⚠️ tar.gz module has been deprecated and your application is vulnerable. Please use tar module instead: https://npmjs.com/tar
> scrypt@6.0.3 preinstall /ws/app/becke-ch--blockchain--s0-v1/becke-ch--blockchain--s0-v1--plain/becke-ch--blockchain--s0-v1--plain-simple-storage--pl--lib/node_modules/scrypt
> node node-scrypt-preinstall.js
Error: Error: Command failed: ./configure
configure: error: in `/ws/app/becke-ch--blockchain--s0-v1/becke-ch--blockchain--s0-v1--plain/becke-ch--blockchain--s0-v1--plain-simple-storage--pl--lib/node_modules/scrypt/scrypt/scrypt-1.2.0':
configure: error: no acceptable C compiler found in $PATH
See `config.log' for more details
> scrypt@6.0.3 install /ws/app/becke-ch--blockchain--s0-v1/becke-ch--blockchain--s0-v1--plain/becke-ch--blockchain--s0-v1--plain-simple-storage--pl--lib/node_modules/scrypt
> node-gyp rebuild
gyp ERR! build error
gyp ERR! stack Error: not found: make
gyp ERR! stack at getNotFoundError (/tool/node-v8.11.1-linux-x64/lib/node_modules/npm/node_modules/which/which.js:13:12)
gyp ERR! stack at F (/tool/node-v8.11.1-linux-x64/lib/node_modules/npm/node_modules/which/which.js:68:19)
gyp ERR! stack at E (/tool/node-v8.11.1-linux-x64/lib/node_modules/npm/node_modules/which/which.js:80:29)
gyp ERR! stack at /tool/node-v8.11.1-linux-x64/lib/node_modules/npm/node_modules/which/which.js:89:16
gyp ERR! stack at /tool/node-v8.11.1-linux-x64/lib/node_modules/npm/node_modules/which/node_modules/isexe/index.js:42:5
gyp ERR! stack at /tool/node-v8.11.1-linux-x64/lib/node_modules/npm/node_modules/which/node_modules/isexe/mode.js:8:5
gyp ERR! stack at FSReqWrap.oncomplete (fs.js:152:21)
gyp ERR! System Linux 4.15.0-20-generic
gyp ERR! command "/tool/node-v8.11.1-linux-x64/bin/node" "/tool/node-v8.11.1-linux-x64/lib/node_modules/npm/node_modules/node-gyp/bin/node-gyp.js" "rebuild"
gyp ERR! cwd /ws/app/becke-ch--blockchain--s0-v1/becke-ch--blockchain--s0-v1--plain/becke-ch--blockchain--s0-v1--plain-simple-storage--pl--lib/node_modules/scrypt
gyp ERR! node -v v8.11.1
gyp ERR! node-gyp -v v3.6.2
gyp ERR! not ok
npm WARN becke-ch--blockchain--s0-v1--plain-simple-storage--pl--lib@1.0.0 No repository field.
npm ERR! code ELIFECYCLE
npm ERR! errno 1
npm ERR! scrypt@6.0.3 install: `node-gyp rebuild`
npm ERR! Exit status 1
npm ERR!
npm ERR! Failed at the scrypt@6.0.3 install script.
npm ERR! This is probably not a problem with npm. There is likely additional logging output above.
npm ERR! A complete log of this run can be found in:
npm ERR! /home/raoul-becke--s0-v1/.npm/_logs/2018-05-02T20_43_37_557Z-debug.log
SOLUTION: Install “build-essential”: sudo apt-get install build-essential
sudo apt-cache show build-essential
root@hp-elitebook-850-g5--s0-v1:~# sudo apt-cache show build-essential
Package: build-essential
Architecture: amd64
Version: 12.4ubuntu1
Priority: optional
Section: devel
Origin: Ubuntu
Maintainer: Ubuntu Developers <ubuntu-devel-discuss@lists.ubuntu.com>
Original-Maintainer: Matthias Klose <doko@debian.org>
Bugs: https://bugs.launchpad.net/ubuntu/+filebug
Installed-Size: 20
Depends: libc6-dev | libc-dev, gcc (>= 4:7.2), g++ (>= 4:7.2), make, dpkg-dev (>= 1.17.11)
Filename: pool/main/b/build-essential/build-essential_12.4ubuntu1_amd64.deb
Size: 4758
MD5sum: 4a579fdac0b67fa8acba7d458c7e2af2
SHA1: c7b26a0e9b086afdcd81bb02a4cbe12646dade91
SHA256: bb2ac7aae21544446f45e200aacb961f0dcc42c8caacdc8da37d392b222abfa0
Description-en: Informational list of build-essential packages
If you do not plan to build Debian packages, you don't need this
package. Starting with dpkg (>= 1.14.18) this package is required
for building Debian packages.
.
This package contains an informational list of packages which are
considered essential for building Debian packages. This package also
depends on the packages on that list, to make it easy to have the
build-essential packages installed.
.
If you have this package installed, you only need to install whatever
a package specifies as its build-time dependencies to build the
package. Conversely, if you are determining what your package needs
to build-depend on, you can always leave out the packages this
package depends on.
.
This package is NOT the definition of what packages are
build-essential; the real definition is in the Debian Policy Manual.
This package contains merely an informational list, which is all
most people need. However, if this package and the manual disagree,
the manual is correct.
Description-md5: 90ef0ef86cafda0bd16f746eb621d9da
Build-Essential: yes
Supported: 5y
sudo apt-get install build-essential
root@hp-elitebook-850-g5--s0-v1:~# sudo apt-get install build-essential
Reading package lists... Done
Building dependency tree
Reading state information... Done
The following packages were automatically installed and are no longer required:
libjs-sphinxdoc libopts25 python-configparser python-custodia python-memcache python-systemd sntp
Use 'sudo apt autoremove' to remove them.
The following additional packages will be installed:
dpkg-dev fakeroot g++ g++-7 gcc gcc-7 libalgorithm-diff-perl libalgorithm-diff-xs-perl libalgorithm-merge-perl libasan4 libatomic1 libc-dev-bin libc6-dev libcilkrts5 libfakeroot libgcc-7-dev libitm1 liblsan0
libmpx2 libquadmath0 libstdc++-7-dev libtsan0 libubsan0 linux-libc-dev make manpages-dev
Suggested packages:
debian-keyring g++-multilib g++-7-multilib gcc-7-doc libstdc++6-7-dbg gcc-multilib autoconf automake libtool flex bison gcc-doc gcc-7-multilib gcc-7-locales libgcc1-dbg libgomp1-dbg libitm1-dbg
libatomic1-dbg libasan4-dbg liblsan0-dbg libtsan0-dbg libubsan0-dbg libcilkrts5-dbg libmpx2-dbg libquadmath0-dbg glibc-doc libstdc++-7-doc make-doc
The following NEW packages will be installed:
build-essential dpkg-dev fakeroot g++ g++-7 gcc gcc-7 libalgorithm-diff-perl libalgorithm-diff-xs-perl libalgorithm-merge-perl libasan4 libatomic1 libc-dev-bin libc6-dev libcilkrts5 libfakeroot libgcc-7-dev
libitm1 liblsan0 libmpx2 libquadmath0 libstdc++-7-dev libtsan0 libubsan0 linux-libc-dev make manpages-dev
0 upgraded, 27 newly installed, 0 to remove and 0 not upgraded.
Need to get 26.8 MB of archives.
After this operation, 117 MB of additional disk space will be used.
Do you want to continue? [Y/n] Y
…
Setting up libquadmath0:amd64 (8-20180414-1ubuntu2) ...
Setting up libatomic1:amd64 (8-20180414-1ubuntu2) ...
Setting up make (4.1-9.1ubuntu1) ...
Setting up libasan4:amd64 (7.3.0-16ubuntu3) ...
Setting up libcilkrts5:amd64 (7.3.0-16ubuntu3) ...
Setting up libubsan0:amd64 (7.3.0-16ubuntu3) ...
Setting up libtsan0:amd64 (8-20180414-1ubuntu2) ...
Setting up linux-libc-dev:amd64 (4.15.0-20.21) ...
Setting up liblsan0:amd64 (8-20180414-1ubuntu2) ...
Setting up libmpx2:amd64 (8-20180414-1ubuntu2) ...
Setting up dpkg-dev (1.19.0.5ubuntu2) ...
Processing triggers for libc-bin (2.27-3ubuntu1) ...
Setting up libfakeroot:amd64 (1.22-2ubuntu1) ...
Setting up libalgorithm-diff-perl (1.19.03-1) ...
Processing triggers for man-db (2.8.3-2) ...
Setting up libc-dev-bin (2.27-3ubuntu1) ...
Setting up manpages-dev (4.15-1) ...
Setting up libc6-dev:amd64 (2.27-3ubuntu1) ...
Setting up libitm1:amd64 (8-20180414-1ubuntu2) ...
Setting up fakeroot (1.22-2ubuntu1) ...
update-alternatives: using /usr/bin/fakeroot-sysv to provide /usr/bin/fakeroot (fakeroot) in auto mode
Setting up libgcc-7-dev:amd64 (7.3.0-16ubuntu3) ...
Setting up libstdc++-7-dev:amd64 (7.3.0-16ubuntu3) ...
Setting up libalgorithm-merge-perl (0.08-3) ...
Setting up libalgorithm-diff-xs-perl (0.04-5) ...
Setting up gcc-7 (7.3.0-16ubuntu3) ...
Setting up g++-7 (7.3.0-16ubuntu3) ...
Setting up gcc (4:7.3.0-3ubuntu2) ...
Setting up g++ (4:7.3.0-3ubuntu2) ...
update-alternatives: using /usr/bin/g++ to provide /usr/bin/c++ (c++) in auto mode
Setting up build-essential (12.4ubuntu1) ...
Processing triggers for libc-bin (2.27-3ubuntu1) ...
root@hp-elitebook-850-g5--s0-v1:~#
ERROR: TypeError: web3.eth.Contract is not a constructor
File: index.html
<html lang="en">
<head>
<script language="JavaScript" src="lib/web3/web3.js" type="text/javascript"></script>
<!--script src="https://cdn.jsdelivr.net/gh/ethereum/web3.js/dist/web3.min.js"></script-->
<script language="JavaScript">
<!--
//var Web3 = require('web3'); // https://www.npmjs.com/package/web3
var web3 = new Web3();
web3.setProvider(new web3.providers.HttpProvider('http://localhost:7545'));
var account = '0x26D9E695Bd95fD6cd9e2C08Fc3450FCD6958fC1E';
var privateKey = '0xc0a3abf9755bcfdeafcab14916c1ef4b94186c94f62a3edf67dc082eabcfd507';
var source = '{"contracts":{"SimpleStorage.sol:SimpleStorage"...}}},"version":"0.4.23+commit.124ca40d.Linux.g++"}';
var contractKey = 'SimpleStorage.sol:SimpleStorage';
var contractAddressFile = "SimpleStorageAddress.txt";
var contracts = JSON.parse(source)["contracts"];
var abi = JSON.parse(contracts[contractKey].abi);
var contractAddress = '0x4B2119f18c9194C57E6ebd0B5BBa84F9ac189C39';
console.log("Contract address: " + contractAddress);
var contract = new web3.eth.Contract(abi, contractAddress);
...
In web3 < 1.0, this is the syntax (lowercase c, no 'new'):
var MyContract = web3.eth.contract(abiArray, contractAddress);
var version = web3.version.api; // "0.2.0"
In web3 1.0 (not ready for production yet) this is the syntax (uppercase C, 'new'):
var MyContract = new web3.eth.Contract(abiArray, contractAddress);
var version = web3.version; // "1.0.0"
Download version 1.0 from: https://github.com/ethereum/web3.js/tree/1.0
https://wiki.parity.io/Setup#building-using-docker
$ docker run -it ubuntu bash
raoul-becke--s0-v1@hp-elitebook-850-g5--s0-v1:/ws/app/becke-ch--blockchain--s0-v1/docker/becke-ch--parity--s0-v1$ docker run -it ubuntu bash
Unable to find image 'ubuntu:latest' locally
latest: Pulling from library/ubuntu
...
0b4aba487617: Pull complete
Digest: sha256:c8c275751219dadad8fa56b3ac41ca6cb22219ff117ca98fe82b42f24e1ba64e
Status: Downloaded newer image for ubuntu:latest
root@ad5d616755dd:/# uname -a
Linux ad5d616755dd 4.15.0-20-generic #21-Ubuntu SMP Tue Apr 24 06:16:15 UTC 2018 x86_64 x86_64 x86_64 GNU/Linux
root@a145b4b96377:/# apt-get update
Get:1 http://security.ubuntu.com/ubuntu bionic-security InRelease [69.9 kB]
...
Get:15 http://archive.ubuntu.com/ubuntu bionic-updates/universe amd64 Packages [3631 B]
Fetched 24.9 MB in 10s (2466 kB/s)
Reading package lists... Done
root@a145b4b96377:/# curl
bash: curl: command not found
root@a145b4b96377:/# apt-cache show curl
Package: curl
Architecture: amd64
Version: 7.58.0-2ubuntu3
Multi-Arch: foreign
Priority: optional
Section: web
Origin: Ubuntu
Maintainer: Ubuntu Developers <ubuntu-devel-discuss@lists.ubuntu.com>
Original-Maintainer: Alessandro Ghedini <ghedo@debian.org>
Bugs: https://bugs.launchpad.net/ubuntu/+filebug
Installed-Size: 386
Depends: libc6 (>= 2.17), libcurl4 (= 7.58.0-2ubuntu3), zlib1g (>= 1:1.1.4)
Filename: pool/main/c/curl/curl_7.58.0-2ubuntu3_amd64.deb
Size: 158884
MD5sum: 43f1eab4dcfdaab2d4b9f8ade5b5c58e
SHA1: 5878faa881e0b475d3a6870b47423b0f0304a530
SHA256: 02c53c28334b2c6b1aa9643ae585744ee90ce113fbb7699f9607e38e82b9d526
Homepage: http://curl.haxx.se
Description: command line tool for transferring data with URL syntax
Description-md5: f83293d10df083ae6f7bb7d01642913c
Task: cloud-image, server, ubuntu-budgie-desktop
Supported: 5y
root@a6a9230f6d31:/# apt-get install curl
Reading package lists... Done
Building dependency tree
Reading state information... Done
The following additional packages will be installed:
ca-certificates krb5-locales libasn1-8-heimdal libcurl4 libgssapi-krb5-2 libgssapi3-heimdal libhcrypto4-heimdal libheimbase1-heimdal libheimntlm0-heimdal libhx509-5-heimdal libk5crypto3 libkeyutils1
libkrb5-26-heimdal libkrb5-3 libkrb5support0 libldap-2.4-2 libldap-common libnghttp2-14 libpsl5 libroken18-heimdal librtmp1 libsasl2-2 libsasl2-modules libsasl2-modules-db libsqlite3-0 libssl1.1
libwind0-heimdal openssl publicsuffix
Suggested packages:
krb5-doc krb5-user libsasl2-modules-gssapi-mit | libsasl2-modules-gssapi-heimdal libsasl2-modules-ldap libsasl2-modules-otp libsasl2-modules-sql
The following NEW packages will be installed:
ca-certificates curl krb5-locales libasn1-8-heimdal libcurl4 libgssapi-krb5-2 libgssapi3-heimdal libhcrypto4-heimdal libheimbase1-heimdal libheimntlm0-heimdal libhx509-5-heimdal libk5crypto3 libkeyutils1
libkrb5-26-heimdal libkrb5-3 libkrb5support0 libldap-2.4-2 libldap-common libnghttp2-14 libpsl5 libroken18-heimdal librtmp1 libsasl2-2 libsasl2-modules libsasl2-modules-db libsqlite3-0 libssl1.1
libwind0-heimdal openssl publicsuffix
0 upgraded, 30 newly installed, 0 to remove and 0 not upgraded.
Need to get 4580 kB of archives.
After this operation, 14.1 MB of additional disk space will be used.
Do you want to continue? [Y/n]
…
et:1 http://archive.ubuntu.com/ubuntu bionic/main amd64 libssl1.1 amd64 1.1.0g-2ubuntu4 [1128 kB]
...
Get:30 http://archive.ubuntu.com/ubuntu bionic/main amd64 libsasl2-modules amd64 2.1.27~101-g0780600+dfsg-3ubuntu2 [48.7 kB]
Fetched 4580 kB in 7s (669 kB/s)
debconf: delaying package configuration, since apt-utils is not installed
Selecting previously unselected package libssl1.1:amd64.
(Reading database ... 4035 files and directories currently installed.)
Preparing to unpack .../00-libssl1.1_1.1.0g-2ubuntu4_amd64.deb ...
Unpacking libssl1.1:amd64 (1.1.0g-2ubuntu4) ...
...
Preparing to unpack .../29-libsasl2-modules_2.1.27~101-g0780600+dfsg-3ubuntu2_amd64.deb ...
Unpacking libsasl2-modules:amd64 (2.1.27~101-g0780600+dfsg-3ubuntu2) ...
Setting up libnghttp2-14:amd64 (1.30.0-1ubuntu1) ...
...
Setting up libssl1.1:amd64 (1.1.0g-2ubuntu4) ...
debconf: unable to initialize frontend: Dialog
debconf: (No usable dialog-like program is installed, so the dialog based frontend cannot be used. at /usr/share/perl5/Debconf/FrontEnd/Dialog.pm line 76.)
debconf: falling back to frontend: Readline
debconf: unable to initialize frontend: Readline
debconf: (Can't locate Term/ReadLine.pm in @INC (you may need to install the Term::ReadLine module) (@INC contains: /etc/perl /usr/local/lib/x86_64-linux-gnu/perl/5.26.1 /usr/local/share/perl/5.26.1 /usr/lib/x86_64-linux-gnu/perl5/5.26 /usr/share/perl5 /usr/lib/x86_64-linux-gnu/perl/5.26 /usr/share/perl/5.26 /usr/local/lib/site_perl /usr/lib/x86_64-linux-gnu/perl-base) at /usr/share/perl5/Debconf/FrontEnd/Readline.pm line 7.)
debconf: falling back to frontend: Teletype
Setting up libheimbase1-heimdal:amd64 (7.5.0+dfsg-1) ...
Setting up openssl (1.1.0g-2ubuntu4) ...
Setting up libsqlite3-0:amd64 (3.22.0-1) ...
Setting up libkeyutils1:amd64 (1.5.9-9.2ubuntu2) ...
Setting up libsasl2-modules:amd64 (2.1.27~101-g0780600+dfsg-3ubuntu2) ...
Setting up ca-certificates (20180409) ...
debconf: unable to initialize frontend: Dialog
debconf: (No usable dialog-like program is installed, so the dialog based frontend cannot be used. at /usr/share/perl5/Debconf/FrontEnd/Dialog.pm line 76.)
debconf: falling back to frontend: Readline
debconf: unable to initialize frontend: Readline
debconf: (Can't locate Term/ReadLine.pm in @INC (you may need to install the Term::ReadLine module) (@INC contains: /etc/perl /usr/local/lib/x86_64-linux-gnu/perl/5.26.1 /usr/local/share/perl/5.26.1 /usr/lib/x86_64-linux-gnu/perl5/5.26 /usr/share/perl5 /usr/lib/x86_64-linux-gnu/perl/5.26 /usr/share/perl/5.26 /usr/local/lib/site_perl /usr/lib/x86_64-linux-gnu/perl-base) at /usr/share/perl5/Debconf/FrontEnd/Readline.pm line 7.)
debconf: falling back to frontend: Teletype
Updating certificates in /etc/ssl/certs...
133 added, 0 removed; done.
Setting up libk5crypto3:amd64 (1.16-2build1) ...
...
Setting up curl (7.58.0-2ubuntu3) ...
Processing triggers for libc-bin (2.27-3ubuntu1) ...
Processing triggers for ca-certificates (20180409) ...
Updating certificates in /etc/ssl/certs...
0 added, 0 removed; done.
Running hooks in /etc/ca-certificates/update.d...
done.
root@a6a9230f6d31:/#
root@a145b4b96377:/# curl https://sh.rustup.rs -sSf | sh
root@a6a9230f6d31:/# curl https://sh.rustup.rs -sSf | sh
info: downloading installer
Welcome to Rust!
This will download and install the official compiler for the Rust programming
language, and its package manager, Cargo.
It will add the cargo, rustc, rustup and other commands to Cargo's bin
directory, located at:
/root/.cargo/bin
This path will then be added to your PATH environment variable by modifying the
profile file located at:
/root/.profile
You can uninstall at any time with rustup self uninstall and these changes will
be reverted.
Current installation options:
default host triple: x86_64-unknown-linux-gnu
default toolchain: stable
modify PATH variable: yes
1) Proceed with installation (default)
2) Customize installation
3) Cancel installation
1
info: syncing channel updates for 'stable-x86_64-unknown-linux-gnu'
info: latest update on 2018-03-29, rust version 1.25.0 (84203cac6 2018-03-25)
info: downloading component 'rustc'
55.2 MiB / 55.2 MiB (100 %) 10.1 MiB/s ETA: 0 s
info: downloading component 'rust-std'
47.3 MiB / 47.3 MiB (100 %) 10.4 MiB/s ETA: 0 s
info: downloading component 'cargo'
info: downloading component 'rust-docs'
info: installing component 'rustc'
info: installing component 'rust-std'
info: installing component 'cargo'
info: installing component 'rust-docs'
info: default toolchain set to 'stable'
stable installed - rustc 1.25.0 (84203cac6 2018-03-25)
Rust is installed now. Great!
To get started you need Cargo's bin directory ($HOME/.cargo/bin) in your PATH
environment variable. Next time you log in this will be done automatically.
To configure your current shell run source $HOME/.cargo/env
root@a6a9230f6d31:/#
root@a6a9230f6d31:/# apt-get install git
Reading package lists... Done
Building dependency tree
Reading state information... Done
The following additional packages will be installed:
git-man less libbsd0 libcurl3-gnutls libedit2 liberror-perl libexpat1 libgdbm-compat4 libgdbm5 libperl5.26 libssl1.0.0 libx11-6 libx11-data libxau6 libxcb1 libxdmcp6 libxext6 libxmuu1 multiarch-support
netbase openssh-client patch perl perl-modules-5.26 xauth
Suggested packages:
gettext-base git-daemon-run | git-daemon-sysvinit git-doc git-el git-email git-gui gitk gitweb git-cvs git-mediawiki git-svn gdbm-l10n keychain libpam-ssh monkeysphere ssh-askpass ed diffutils-doc perl-doc
libterm-readline-gnu-perl | libterm-readline-perl-perl make
The following NEW packages will be installed:
git git-man less libbsd0 libcurl3-gnutls libedit2 liberror-perl libexpat1 libgdbm-compat4 libgdbm5 libperl5.26 libssl1.0.0 libx11-6 libx11-data libxau6 libxcb1 libxdmcp6 libxext6 libxmuu1 multiarch-support
netbase openssh-client patch perl perl-modules-5.26 xauth
0 upgraded, 26 newly installed, 0 to remove and 0 not upgraded.
Need to get 14.4 MB of archives.
After this operation, 88.8 MB of additional disk space will be used.
Do you want to continue? [Y/n] Y
…
Get:1 http://archive.ubuntu.com/ubuntu bionic/main amd64 multiarch-support amd64 2.27-3ubuntu1 [6916 B]
...
Get:26 http://archive.ubuntu.com/ubuntu bionic/main amd64 patch amd64 2.7.6-2ubuntu1 [102 kB]
Fetched 14.4 MB in 7s (2097 kB/s)
debconf: delaying package configuration, since apt-utils is not installed
Selecting previously unselected package multiarch-support.
(Reading database ... 4551 files and directories currently installed.)
Preparing to unpack .../multiarch-support_2.27-3ubuntu1_amd64.deb ...
Unpacking multiarch-support (2.27-3ubuntu1) ...
Setting up multiarch-support (2.27-3ubuntu1) ...
Selecting previously unselected package libxau6:amd64.
(Reading database ... 4554 files and directories currently installed.)
Preparing to unpack .../00-libxau6_1%3a1.0.8-1_amd64.deb ...
Unpacking libxau6:amd64 (1:1.0.8-1) ...
...
Selecting previously unselected package patch.
Preparing to unpack .../24-patch_2.7.6-2ubuntu1_amd64.deb ...
Unpacking patch (2.7.6-2ubuntu1) ...
Setting up libedit2:amd64 (3.1-20170329-1) ...
Setting up git-man (1:2.17.0-1ubuntu1) ...
Setting up libexpat1:amd64 (2.2.5-3) ...
Setting up less (487-0.1) ...
debconf: unable to initialize frontend: Dialog
debconf: (No usable dialog-like program is installed, so the dialog based frontend cannot be used. at /usr/share/perl5/Debconf/FrontEnd/Dialog.pm line 76.)
debconf: falling back to frontend: Readline
Setting up libssl1.0.0:amd64 (1.0.2n-1ubuntu5) ...
debconf: unable to initialize frontend: Dialog
debconf: (No usable dialog-like program is installed, so the dialog based frontend cannot be used. at /usr/share/perl5/Debconf/FrontEnd/Dialog.pm line 76.)
debconf: falling back to frontend: Readline
Setting up libcurl3-gnutls:amd64 (7.58.0-2ubuntu3) ...
Setting up perl-modules-5.26 (5.26.1-6) ...
...
Setting up git (1:2.17.0-1ubuntu1) ...
Processing triggers for libc-bin (2.27-3ubuntu1) ...
root@a6a9230f6d31:/#
root@a6a9230f6d31:/# git clone https://github.com/paritytech/parity
Cloning into 'parity'...
remote: Counting objects: 126541, done.
remote: Compressing objects: 100% (79/79), done.
remote: Total 126541 (delta 33), reused 30 (delta 15), pack-reused 126447
Receiving objects: 100% (126541/126541), 49.14 MiB | 8.38 MiB/s, done.
Resolving deltas: 100% (91692/91692), done.
root@a6a9230f6d31:/# cd parity/
root@a6a9230f6d31:/parity# git submodule init
Submodule 'ethcore/res/ethereum/tests' (https://github.com/ethereum/tests.git) registered for path 'ethcore/res/ethereum/tests'
Submodule 'ethcore/res/wasm-tests' (https://github.com/paritytech/wasm-tests) registered for path 'ethcore/res/wasm-tests'
root@a6a9230f6d31:/parity# git submodule update
Cloning into '/parity/ethcore/res/ethereum/tests'...
Cloning into '/parity/ethcore/res/wasm-tests'...
Submodule path 'ethcore/res/ethereum/tests': checked out 'b6011c3fb567d7178915574de0a8d4b5331fe725'
Submodule path 'ethcore/res/wasm-tests': checked out 'fb111c82deff8759f54a5038d07cecc77cb5a663'
root@a6a9230f6d31:/parity#
root@a6a9230f6d31:/parity# source $HOME/.cargo/env
root@a6a9230f6d31:/parity#
root@a6a9230f6d31:/parity#
root@a6a9230f6d31:/parity# cargo build
Updating git repository `https://github.com/paritytech/ring`
...
Updating git repository `https://github.com/nikvolf/tokio-named-pipes`
Downloading rustc-hex v1.0.0
Downloading number_prefix v0.2.7
Downloading toml v0.4.5
Downloading docopt v0.8.3
…
Downloading backtrace-sys v0.1.14
Downloading xdg v2.1.0
Compiling using_queue v0.1.0 (file:///parity/util/using_queue)
Compiling order-stat v0.1.3
…
Compiling lazy_static v1.0.0
error: linker `cc` not found
|
= note: No such file or directory (os error 2)
error: aborting due to previous error
error: Could not compile `heapsize`.
warning: build failed, waiting for other jobs to finish...
error: build failed
root@a6a9230f6d31:/parity# apt-get install build-essential
Reading package lists... Done
...
After this operation, 170 MB of additional disk space will be used.
Do you want to continue? [Y/n] Y
…
Setting up g++ (4:7.3.0-3ubuntu2) ...
update-alternatives: using /usr/bin/g++ to provide /usr/bin/c++ (c++) in auto mode
update-alternatives: warning: skip creation of /usr/share/man/man1/c++.1.gz because associated file /usr/share/man/man1/g++.1.gz (of link group c++) doesn't exist
Setting up build-essential (12.4ubuntu1) ...
Processing triggers for libc-bin (2.27-3ubuntu1) ...
root@a6a9230f6d31:/parity#
root@a6a9230f6d31:/parity# cargo build
Compiling unicode-width v0.1.4
Compiling crossbeam v0.3.2
…
Compiling aster v0.41.0
Compiling hyper v0.11.24
error: failed to run custom build command for `hidapi v0.3.1 (https://github.com/paritytech/hidapi-rs#70ec4bd1)`
process didn't exit successfully: `/parity/target/debug/build/hidapi-3ca5c9226e2bde3d/build-script-build` (exit code: 101)
--- stdout
TARGET = Some("x86_64-unknown-linux-gnu")
OPT_LEVEL = Some("0")
TARGET = Some("x86_64-unknown-linux-gnu")
HOST = Some("x86_64-unknown-linux-gnu")
TARGET = Some("x86_64-unknown-linux-gnu")
TARGET = Some("x86_64-unknown-linux-gnu")
HOST = Some("x86_64-unknown-linux-gnu")
CC_x86_64-unknown-linux-gnu = None
CC_x86_64_unknown_linux_gnu = None
HOST_CC = None
CC = None
HOST = Some("x86_64-unknown-linux-gnu")
TARGET = Some("x86_64-unknown-linux-gnu")
HOST = Some("x86_64-unknown-linux-gnu")
CFLAGS_x86_64-unknown-linux-gnu = None
CFLAGS_x86_64_unknown_linux_gnu = None
HOST_CFLAGS = None
CFLAGS = None
DEBUG = Some("true")
running: "cc" "-O0" "-ffunction-sections" "-fdata-sections" "-fPIC" "-g" "-m64" "-I" "etc/hidapi/hidapi" "-Wall" "-Wextra" "-o" "/parity/target/debug/build/hidapi-82c36c9c0f583791/out/etc/hidapi/linux/hid.o" "-c" "etc/hidapi/linux/hid.c"
cargo:warning=etc/hidapi/linux/hid.c:44:10: fatal error: libudev.h: No such file or directory
cargo:warning= #include <libudev.h>
cargo:warning= ^~~~~~~~~~~
cargo:warning=compilation terminated.
exit code: 1
--- stderr
thread 'main' panicked at '
Internal error occurred: Command "cc" "-O0" "-ffunction-sections" "-fdata-sections" "-fPIC" "-g" "-m64" "-I" "etc/hidapi/hidapi" "-Wall" "-Wextra" "-o" "/parity/target/debug/build/hidapi-82c36c9c0f583791/out/etc/hidapi/linux/hid.o" "-c" "etc/hidapi/linux/hid.c" with args "cc" did not execute successfully (status code exit code: 1).
', /root/.cargo/registry/src/github.com-1ecc6299db9ec823/cc-1.0.10/src/lib.rs:2083:5
note: Run with `RUST_BACKTRACE=1` for a backtrace.
warning: build failed, waiting for other jobs to finish...
error: build failed
root@a6a9230f6d31:/parity# apt-get install libudev-dev
Reading package lists... Done
Building dependency tree
Reading state information... Done
The following NEW packages will be installed:
libudev-dev
0 upgraded, 1 newly installed, 0 to remove and 0 not upgraded.
Need to get 19.1 kB of archives.
After this operation, 195 kB of additional disk space will be used.
Get:1 http://archive.ubuntu.com/ubuntu bionic/main amd64 libudev-dev amd64 237-3ubuntu10 [19.1 kB]
Fetched 19.1 kB in 11s (1801 B/s)
debconf: delaying package configuration, since apt-utils is not installed
Selecting previously unselected package libudev-dev:amd64.
(Reading database ... 13813 files and directories currently installed.)
Preparing to unpack .../libudev-dev_237-3ubuntu10_amd64.deb ...
Unpacking libudev-dev:amd64 (237-3ubuntu10) ...
Setting up libudev-dev:amd64 (237-3ubuntu10) ...
root@a6a9230f6d31:/parity#
root@a6a9230f6d31:/parity# cargo build
Compiling quasi_codegen v0.32.0
Compiling hashdb v0.1.1 (file:///parity/util/hashdb)
Compiling plain_hasher v0.1.0 (file:///parity/util/plain_hasher)
…
Compiling rpc-cli v1.4.0 (file:///parity/rpc_cli)
Compiling parity v1.12.0 (file:///parity)
Finished dev [unoptimized + debuginfo] target(s) in 380.13 secs
root@a6a9230f6d31:/parity#
D.3. Azure Blockchain Workbench Setup
During the workbench set-up the following errors occurred:
ERROR: Database: Subscriptions are restricted from provisioning in this region. Please choose a different region. For exceptions to this rule please contact Microsoft Support.
{
"code": "Conflict",
"message": "{\r\n \"status\": \"Failed\",\r\n \"error\": {\r\n \"code\": \"ResourceDeploymentFailure\",\r\n \"message\": \"The resource operation completed with terminal provisioning state 'Failed'.\",\r\n \"details\": [\r\n {\r\n \"code\": \"DeploymentFailed\",\r\n \"message\": \"At least one resource deployment operation failed. Please list deployment operations for details. Please see https://aka.ms/arm-debug for usage details.\",\r\n \"details\": [\r\n {\r\n \"code\": \"Conflict\",\r\n \"message\": \"{\\r\\n \\\"status\\\": \\\"Failed\\\",\\r\\n \\\"error\\\": {\\r\\n \\\"code\\\": \\\"ResourceDeploymentFailure\\\",\\r\\n \\\"message\\\": \\\"The resource operation completed with terminal provisioning state 'Failed'.\\\",\\r\\n \\\"details\\\": [\\r\\n {\\r\\n \\\"code\\\": \\\"ProvisioningDisabled\\\",\\r\\n \\\"message\\\": \\\"Subscriptions are restricted from provisioning in this region. Please choose a different region. For exceptions to this rule please contact Microsoft Support.\\\"\\r\\n }\\r\\n ]\\r\\n }\\r\\n}\"\r\n }\r\n ]\r\n }\r\n ]\r\n }\r\n}"
},
REASON: It seems that the MSDN subscription has restrictions to deploy the blockchain workbench in certain regions.
SOLUTION: Change the “Deployment region”
from “West Europe” to “East US”.
ERROR: Service Bus: The specified service namespace is invalid. CorrelationId: ff6e72ba-cc2b-4b78-bc93-1dbe883399be
REASON: It seems that the “Resource prefix” is
not allowed to contain dashes e.g. “becke-ch--s0-v1”!
SOLUTION: Remove dashes from “Resource
prefix” e.g. instead of “becke-ch--s0-v1”
use “beckechs0v1”
1Comparable with when a cash account book (block) is full of transactions a new cash account book is started and refers to the previous book (block) and potentially for security reason contains the total sum (hash value) of the transactions handled in the previous book.
2Synonyms for address are: account or public-key.
3Comparable to currencies used in different countries (blockchains) which require a currency exchange rate and foreign exchange market in between to change from one currency to another
4According to the developers the ParityUI communicates with the node using a signer token and has therefore access to all APIs. The only issue respective bug here is that the signer token provisioning step is bypassed for the first Parity UI connecting to the node which is again a security issue!
5This account must have been added to the node in the previous step see above other wise the following error is displayed: “Consensus signer account not found for the current chain. You can create an account via RPC, UI or `parity account new --chain /data/becke-ch--parity-node--s0-v1/configuration/chain-config.json --keys-path /data/becke-ch—parity-node--s0-v1/data//keys`.”
6otherwise the following error is displayed: “No password found for the consensus signer 0xdfba…85e8. Make sure valid password is present in files passed using `--password` or in the configuration file.”